Do you use a smartphone or mic to record your voice? Soon, you may find that your voice in the recording is unclear. A delayed sound occurs repeatedly. This echo effect is surely unwanted, for it reduces the quality and discomfort listening experience as well.
Is it possible to remove echo from audio recording? Certainly yes. More than echoes, reverberations can also be removed with these four methods. In this article, we will show how to do it step by step and introduce tools. Now, read on!
Method 1: How to Freely Remove Echo from Audio with Kingshiper?
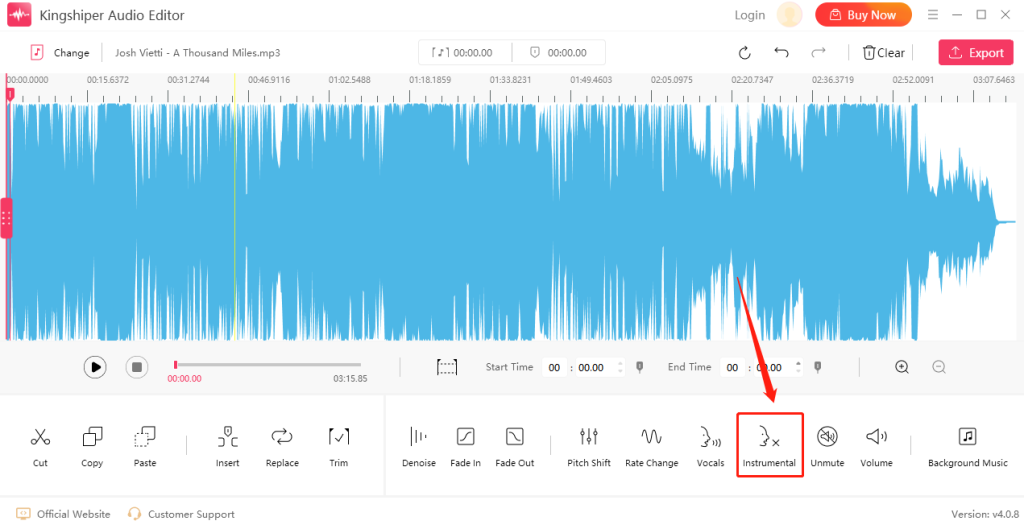
Echo remover makes the process as easy as one step. Kingshiper is one that you can remove echo from audio within one click. It provides free-to-use features, including Denoise, Vocals Extraction, Vocals Removal, Unmute, etc. More, as a set of audio editing tools, you can use the Vocal Remover software to extract voice and remove it from video.
The software is easy to use.
1. Add your recording file to the software.
2. Click Instrumentals to separate human voice from other audio elements and remove.
3. Click Export to get the edited file.
Multiple audio formats are supported by Kingshiper, such as mp3, mp2, ogg, flac, m4a, wav, amr, ac3, wma, aiff, aifc, caf, m4r, aac, wv, mmf, ape, amr, au, voc, 3gp, avi, flv, mkv, mov, mp4, mpg, swf, wmv, etc.
Method 2: How to Remove Echo Online from Recording?
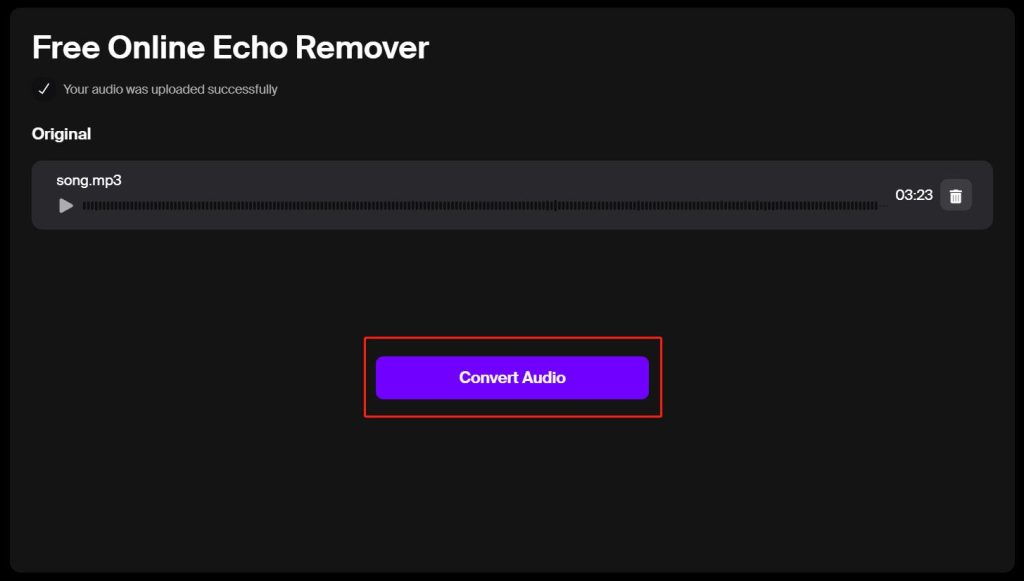
Using online echo remover is the fastest way to reduce echo. Voice.ai is a free and online tool to help remove echo from audio. As you upload the recording file, this tool will separate vocals and noise automatically. Just pay attention to the format you add; the online tool supports mp3, .wav, and .flac only.
How to use it?
1. Open the online remover in your browser.
2. Upload the audio.
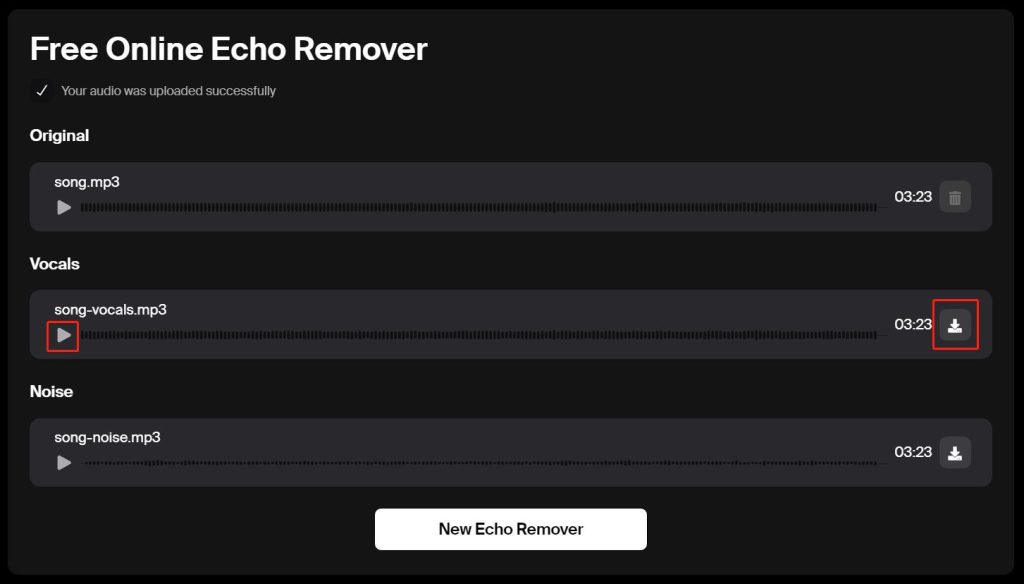
3. Wait for track separations after clicking Convert Audio.
4. Click the play button to preview.
5. If you are satisfied with the effect, click the download button in the right.
More: How to Remove Reverb from Audio Online?
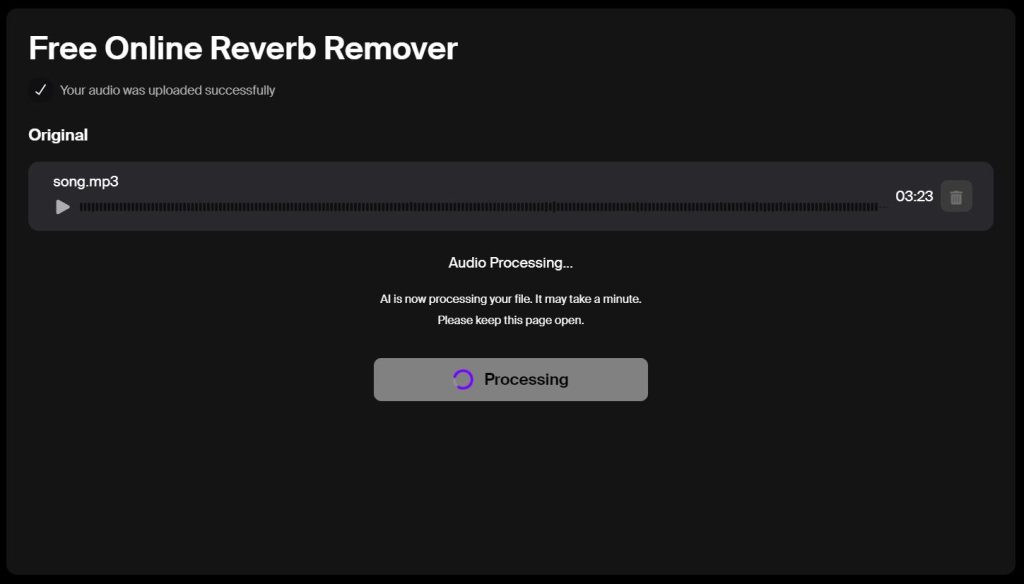
You can do more with this free AI tool, for example, to use it for reverberation reduction.
1. Switch to its Reverb Remover on your browser.
2. Upload your audio and click Convert Audio.
3. You will get two tracks then. Preview and download them by clicking the button beside.
Method 3:How to Remove Echo from Audio with Audition?
Speaking of audio processing, like reducing echo, Adobe Audition is the most-used DAW to give support. It’s best for professionals and many who need high-quality audio. There are lots of advanced features that allow users to do granular editions for audio files. And you can use them freely for 7 days.
What feature helps? DeReverb. Now, see how to use it to remove echo from audio recording. Just a reminder, this feature and the guide below can also be used to remove reverb from audio.
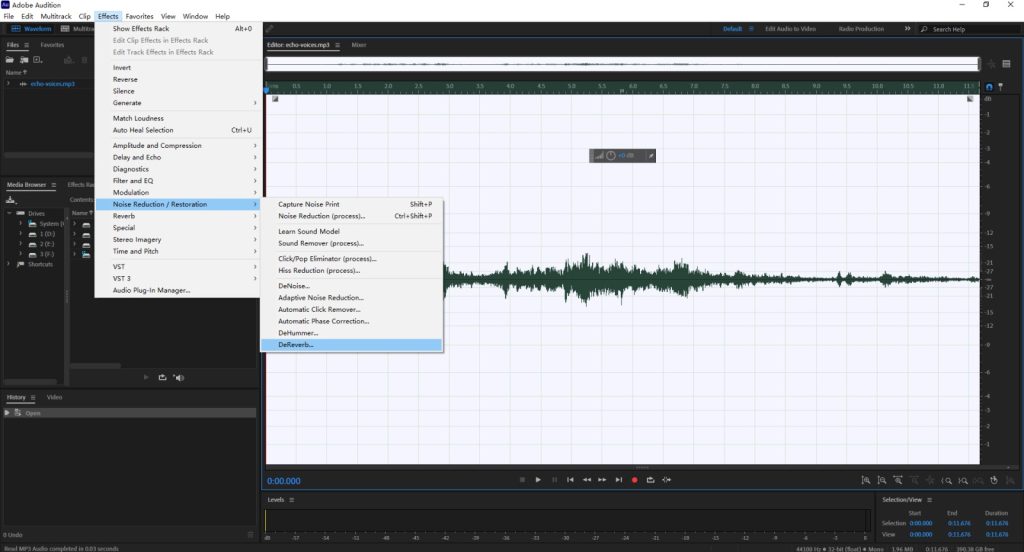
1. Select the whole audio track in the waveform after opening your file.
2. Click Effect - Noise Reduction - DeReverb.
3. Click the power button to start.
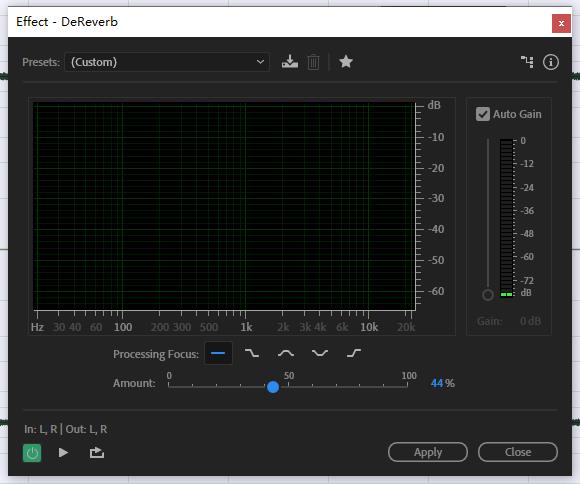
4. Adjust the slider of Amount. The higher the number you set, the less clear the sound will be. Therefore, you need to test and find out the best percentage,
5. You can check the effect in real-time.
6. Click Apply if you think the audio is perfect.
Explanation:
The Amount control slider is used to determine how much of the reverb you want to reduce or remove. It applies the same to echo removal.
The Auto Gain settings are ticked by default. You can use it to adjust the output level of the audio after reducing the reverb.
Processing Focus has five options to choose from - All frequencies, lower frequencies, mid frequencies, lower & higher frequencies, and higher frequencies. This is used to target specific frequency ranges of the audio.
Method 4: How to Remove Echo from Audio with Audacity?
As a popular audio editor, Audacity is recommended to remove echo from audio due to its free and open-source advantages. The tool has a straightforward interface which brings convenience to edit your recording.
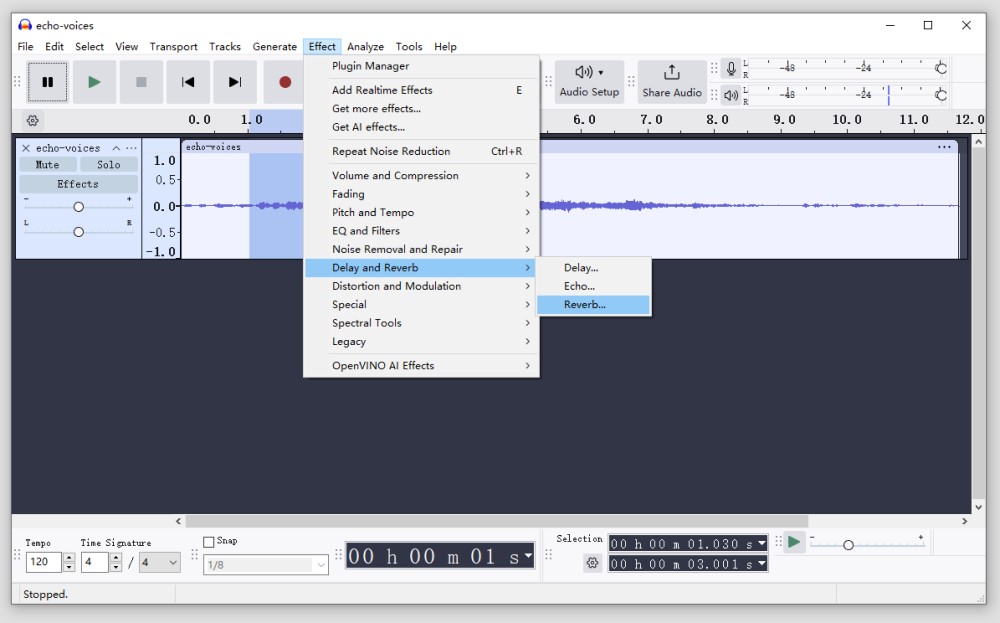
As for eliminating echoes, features are collected in the Effect menu. You can find it easily in the toolbar. In this guide, we’re going to use the Delay and Reverb feature. It is worth noting that this feature can remove both echo and reverb from audio. See how to use it now.
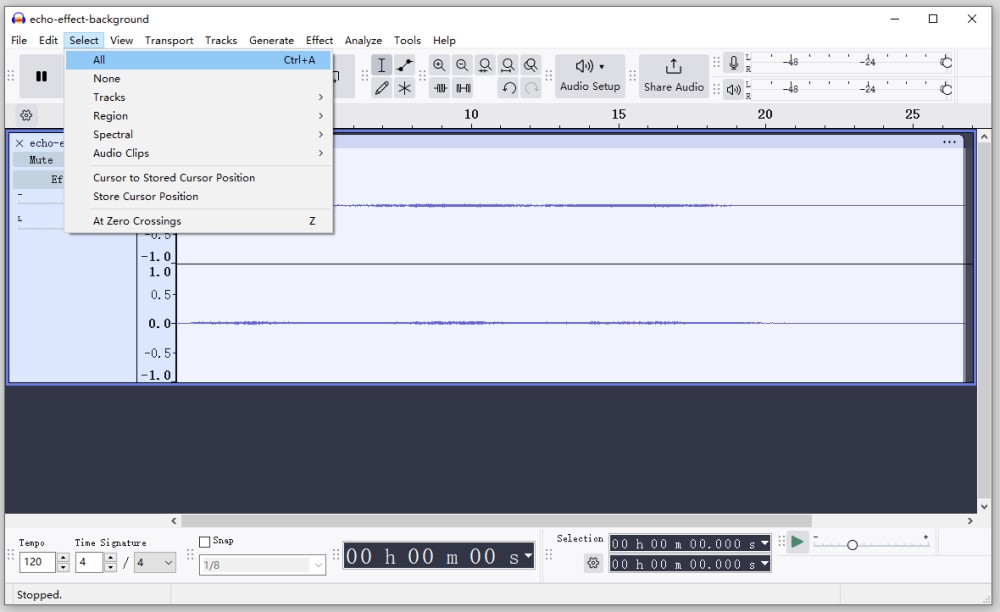
1. Open the file and select the whole track by clicking Select - All.
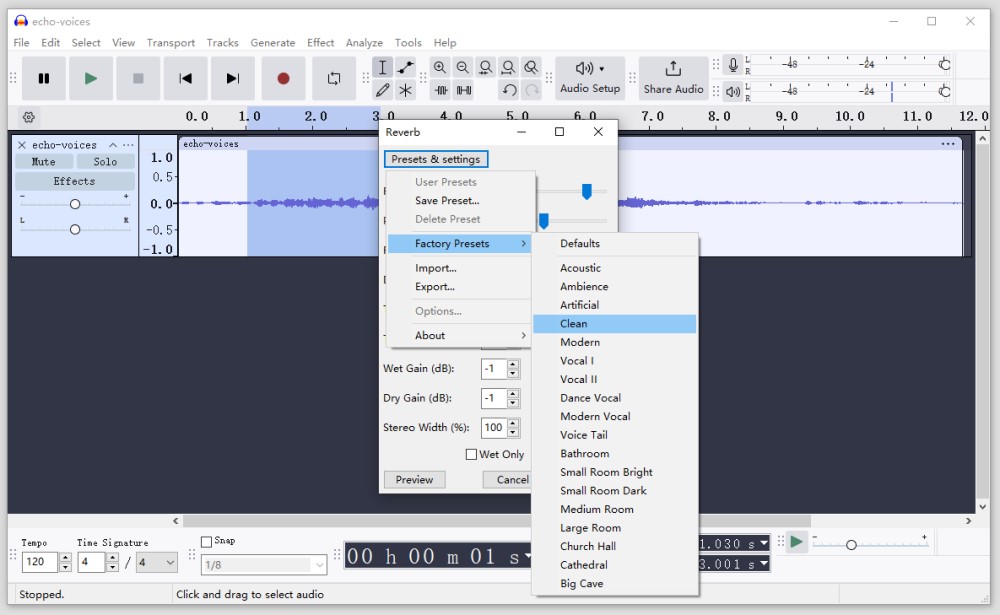
2. Go to Effect - Delay and Reverb - Reverb.
3. In the settings window, click Presets & Settings - Factory Presets - Clean.
Note: This step is to redefine the echo/reverb effect for your recording so that you can edit more settings effectively. In addtion, the Clean option is designed to create a clear reverb effect which to improve sound clarity without adding muddiness or echo.
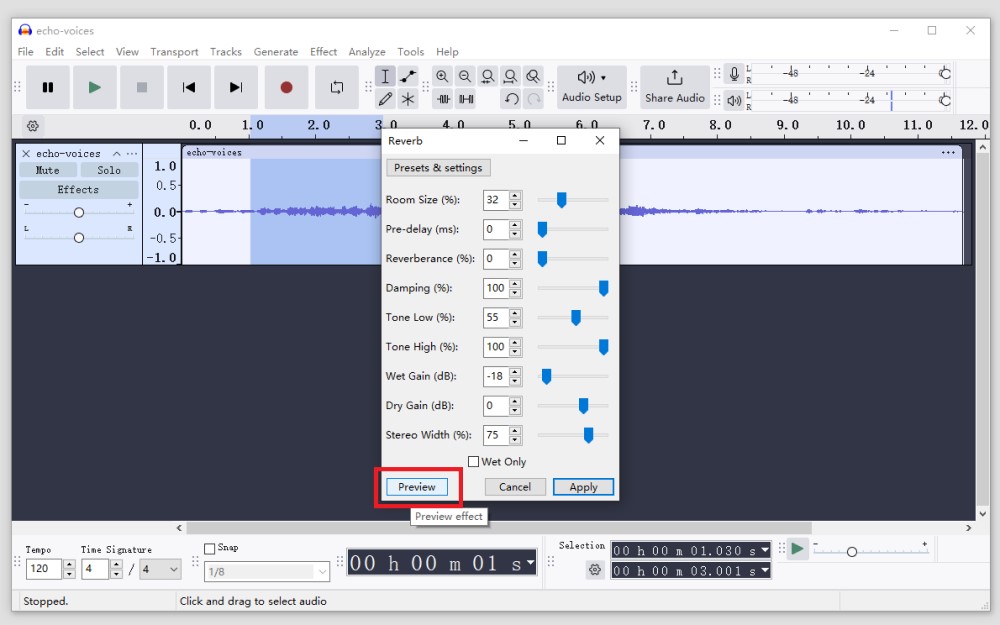
4. Set Room Size in to an appropriate rate, like 20-30. Don't be too small or it will hurt the audio quality.
5. Set Pre-delay to zero.
6. Reduce Reverberance to zero.
7. Set a proper value to Wet Gain and Dry Gain.
8. Click Preview from time to time to check if the effect matches your need perfectly.
9. Click Apply when you’re satisfied.
Explanation:
Room size - it is used to simulate the echo effect in different sizes of space.
Pre-delay - use to delay reverberations based on time.
Reverberance - use to decide how long the reverberation will exist.
Damping - not much to change echo; it affects high frequencies and creates a muted effect.
Wet Gain - increases the strength of the reverb.
Dry Gain - reduces the strength of the reverb.
More tips: There are two features frequently mentioned to deal with echo removal - the Noise Reduction and the Noise Gate. Of course, they are effective as well. Just take note of the difference between them. Noise Reduction is more suitable for removing room echoes, while Noise Gate is better for muting ambient noise in live performances.
Conclusion
These methods mentioned above are helpful in dealing with echoes/reverberations in the post-production of recordings. Choosing a method that meets your demand for quality is essential.
The more professional tools you use, the higher audio quality you will get.
What Can Cause Echoes in Your Recording?
Why there are encho in your audio recording? Reasons can be summed up in two points - the environment and the device. Echoes are sound reflections that bounce back from objects. If the object has a hard and smooth surface, it is easier to produce echoes, generally, such as walls and metal surfaces.
Now, think back on the circumstance you recorded an audio. For example, what is the room like? If the room has hard walls or a high ceiling, it can enhance the echo effect. Room acoustics explains this phenomenon.
Next, check your recording device. A microphone can pick up sound from all directions, including the source and its reflection. If you use an omnidirectional mic, the possiblity of catching echoes will increase.
Another reason that causes echoes is the speaker. If you put the speaker very close to the mic, it will lead to direct echoes. The sound amplified by the speaker is collected by the microphone again.
Well, some recording software may create audio latency and result in an echo effect in audio during the digital signal conversion.
What Are Some Tips to Prevent Echo in Recordings?
a. Reduce room reverberations by using soft carpets and curtains. The furnishings can help with absorbing sounds. This may be the cheapest and most effective way to reduce echoes.
b. Use directional microphones and place them closer to your mouth. This type of device is designed to focus on sounds from a fixed direction and is less sensitive to sound waves from the sides.
c. Adjust the position of the speaker and microphone.


 All
All