NTFS is best for large files and volumes, particularly with good performance in sizes over 16 TB. The excellent storage capability makes this file system an ideal choice for hard drives. If you're using one, you know the benefits. Using NTFS hard drives to back up important files or to store videos that require large space is quite nice until you use it on a Mac. The read-only support turns NTFS into an unsatisfactory file format on Mac. Inconveniences keep piling up.
To make the hard drive good to use on Mac? There are several ways. Changing the hard drive from NTFS to Mac-supported format is one free and easy way to go. Read on and get a detailed guide.
How to Change Hard Drive from NTFS to Mac Supported Formats?
Disk Utility is the tool you need.
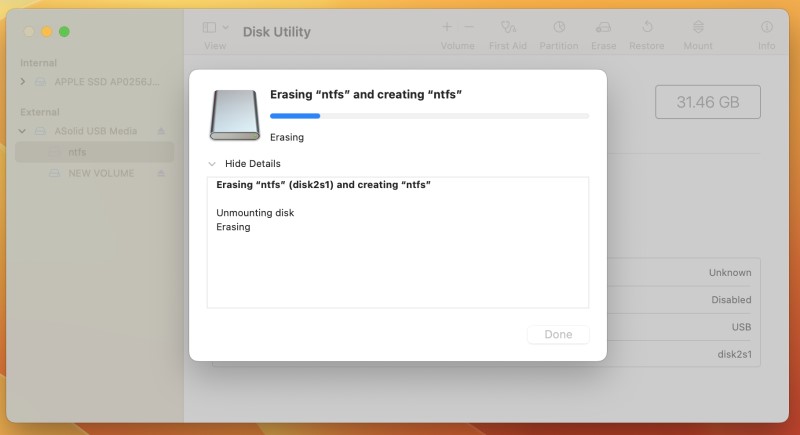
Step 1.Open Disk Utility.
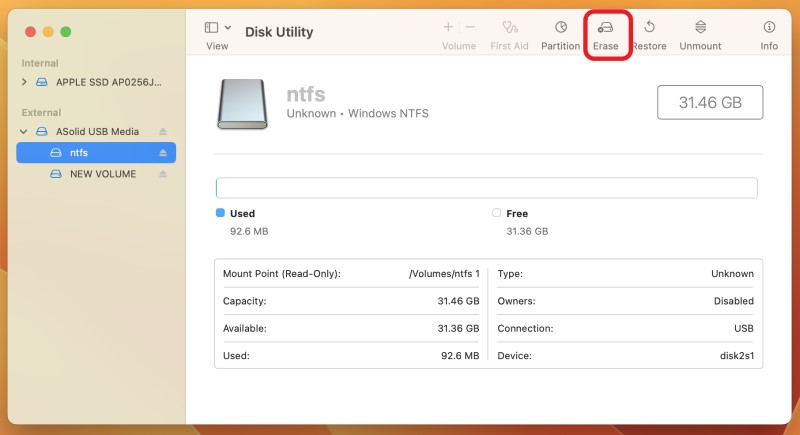
Step 2.Click the hard drive name in the left sidebar.
Step 3.Click 'Erase.'
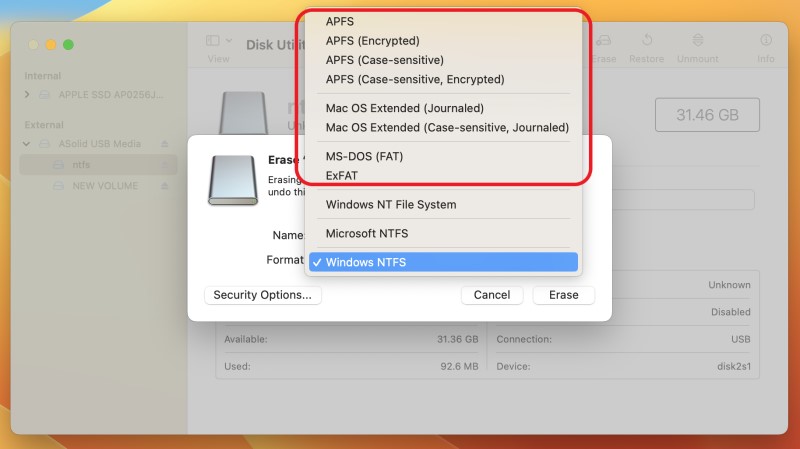
Step 4.Choose a file format in the dropdown menu, like APFS or MacOS Extended.
Tip: APFS, MacOS Extended, MS-DOS (FAT), and EXFAT are macOS-supported formats. Among them, APFS and MacOS Extended are developed by Apple itself.
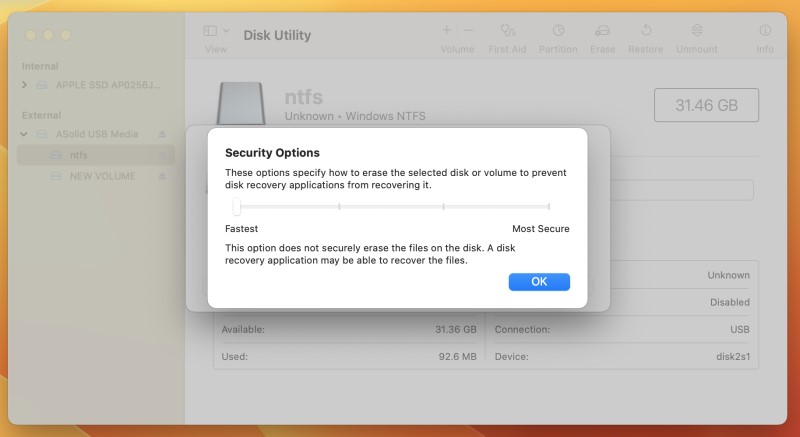
Step 5.Choose formatting preference in 'Security Options.'
Tip: You can choose between 'Fastest' and 'Most Secure.' The difference lies in how well a disk recovery software can recover data. The faster the erasure, the less thorough it becomes. If you wish to recover data after changing the disk format, you should choose 'Fastest.'
Step 6.Click 'Erase' again to complete.
How to Convert NTFS to Mac Without Losing Data?
Don't want to lose data while converting file format? The usual practice is to back up data first in cloud drives or PCs and then copy the backup to the formatted drive. However, this is not the best way to deal with a large amount of data for it takes time to transfer files from one place to another. To re-partitions your NTFS hard drive is a more efficient method, and without affecting data.
Preparation: a Windows PC, your hard drive and your Macbook.
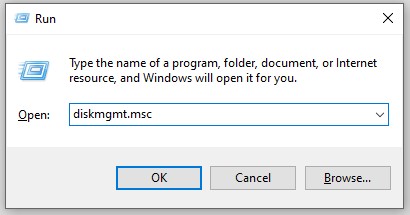
Step 1.Open Disk Management on your Windows PC. Press "Win + R"> enter "diskmgmt.msc" in the blank > click "OK."
Since the NTFS format is fully supported by Windows, it's convenient to partition the drive on PCs. As you insert your NTFS hard drive, you can open the Disk Management.
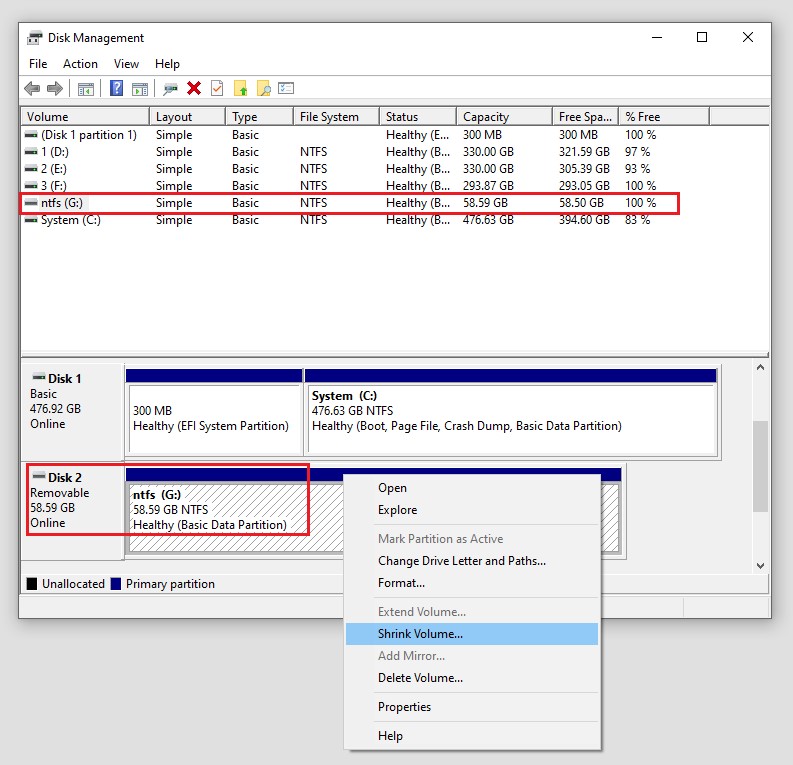
Step 2.Right-click the drive and choose "Shrink Volume."
When creating a new partition, you should shrink the existing partition first to create an unallocated space.
Choose your NTFS hard drive and then right-click the mouse.
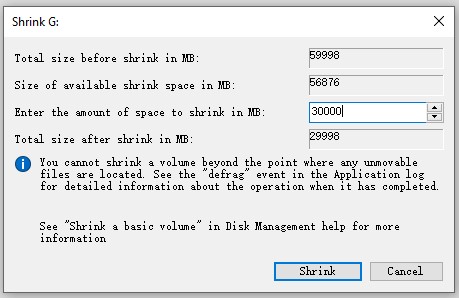
Step 3.Set an amount for the space to shrink.
You will see a window of the shrink operation right away. Enter a number as the space amount and click "Shrink."
Now, you can see a new space, marked as "Unallocate," appears beside the primary one.
Tips:
Make sure that you leave enough space for the existing stored data. Remember to keep enough free space to ensure optimal performance and avoid system slowdowns. You should determine how much space for the new partition. It depends on what files you plan to store; for example,
Software suites require GB of space
Videos and audio files require GB/MB of space
Images need MB/KB
Text documents need a few KB/MB
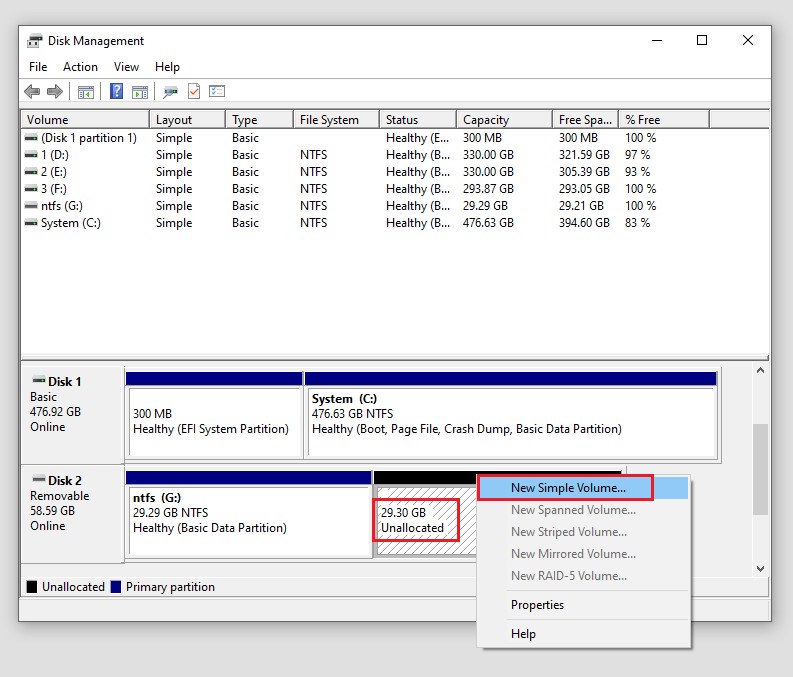
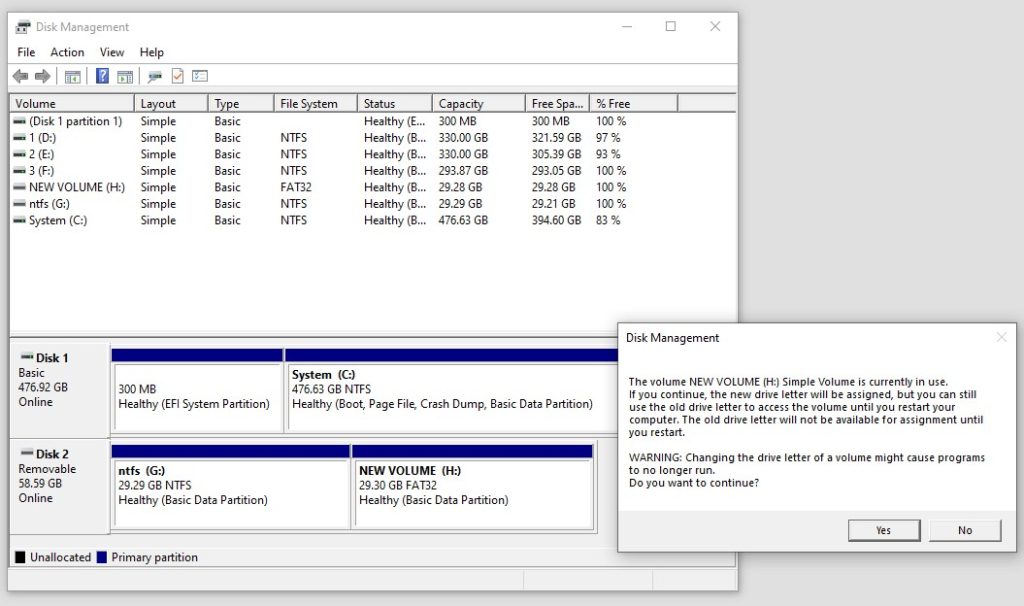
Step 4.Right-click the new unallocated space and choose "New Simple Volume."
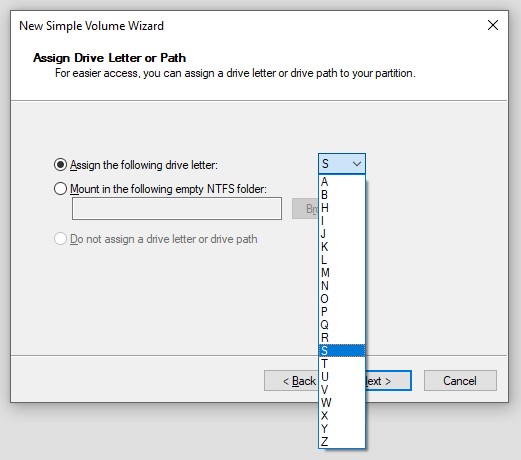
When the Wizard window pops up, click "Next" twice. Then, choose a letter to assign the new partition name.
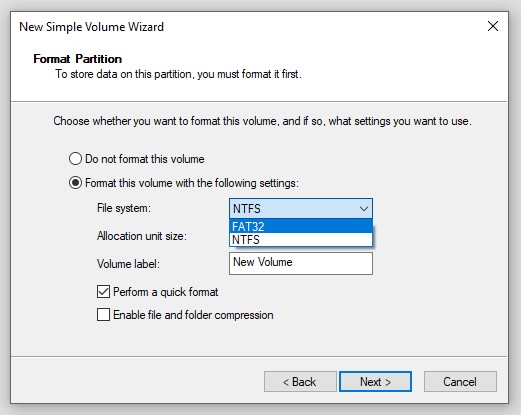
When you access "Format partition," choose FAT32 as the file system.
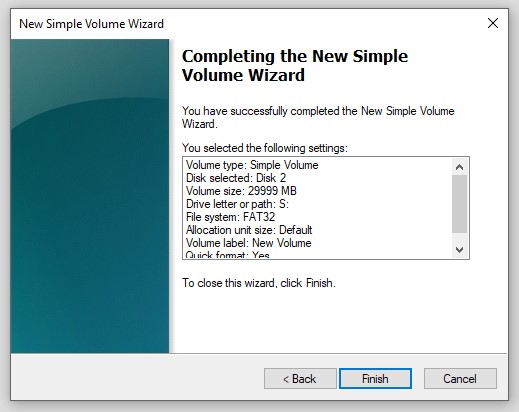
Step 5.Confirm the settings and click "Finish."
You will see the setting info for the new partition after step four. If everything looks good, click the finish button to end the operation.
The new space will change from black to blue. It means that, you can read and write the created partition like others.
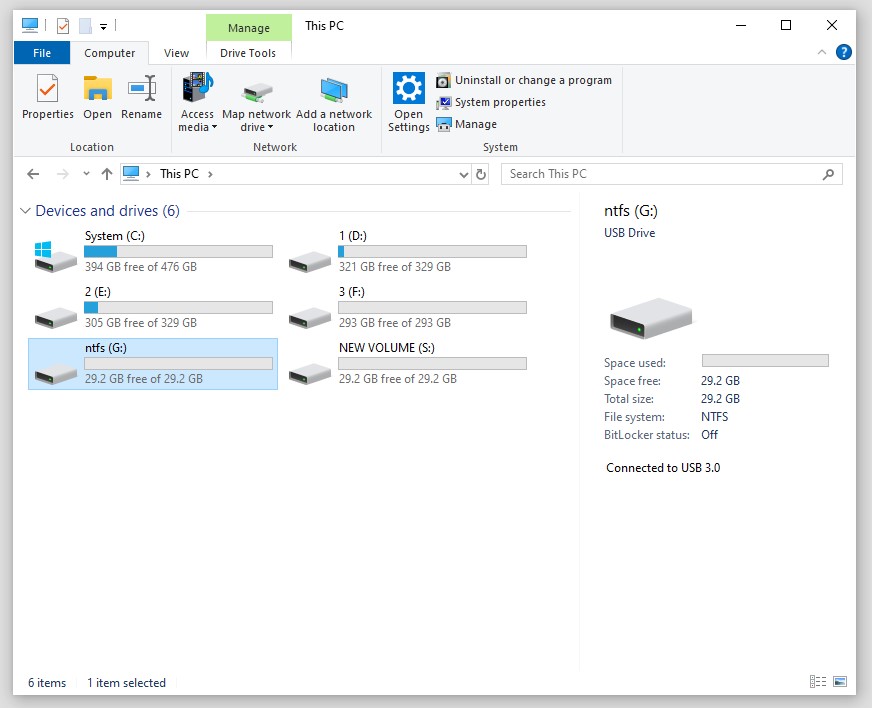
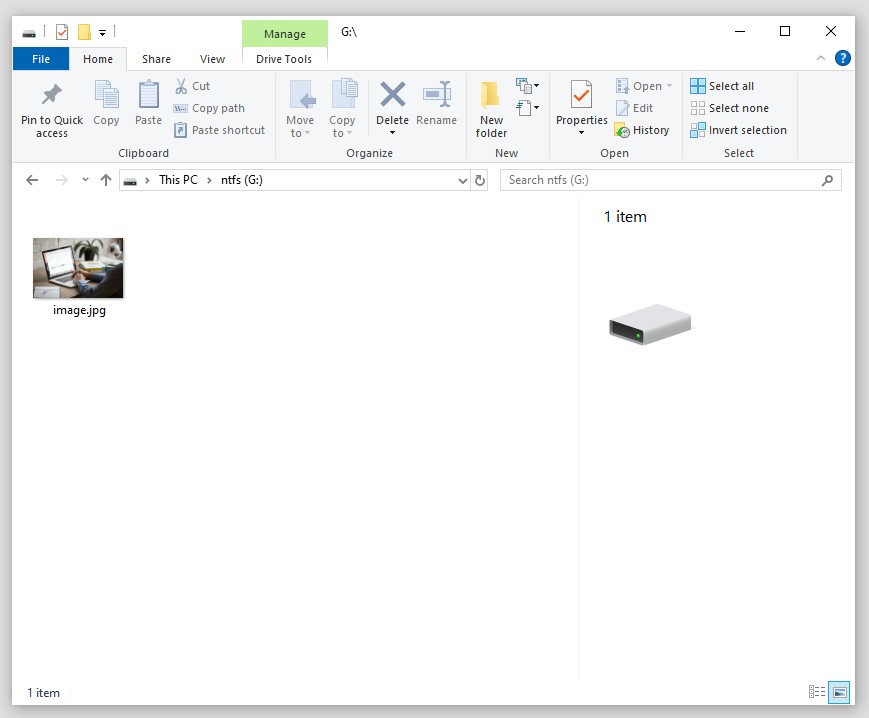
Let's see if the previous data in the NTFS hard drive is still available now. Go to This PC > click the drive name. The data is not lost!
The new partition is able to be used on Mac. You can see the volume is formatted as MS-DOS (FAT32). If you want to change another file system, for example, the APFS, just repeat the operations using Disk Utility.
The disk partitioning method not only convert NTFS to Mac without losing data but also keep the NTFS format while using the hard drive on the Mac at the same time.
Which Mac Format Should You Choose?
When you change NTFS on Mac, you can have it reformatted to APFS, MacOS Extended, MS-DOS, and EXFAT. Those file systems are able to make your hard drive easy to use on the Apple device. The point is, which one is best for you? Now, check their details below.
It should be noted that APFS and MacOS Extended are the official file systems of Mac OS, while MS-DOS and EXFAT are developed by Microsoft.
1.APFS
APFS supports macOS High Sierra (10.13) and later. It's designed for solid-state drives (SSDs) and offers features like space efficiency, fast directory sizing, and native encryption.
Besides, three additional sub-options - Encrypted, Case-sensitive, and Case-sensitive and Encrypted are provided. If you emphasize data security, APFS (Encrypted) will be the best choice that you can change NTFS to Mac.
2.MacOS Extended (HFS+)
This format has reliable performance on HDDs but works slower on SDDs. It supports features like journaling and file permissions. If you're using macOS 10.12 or earlier, MacOS Extended can be better compatible with these older versions.
Similarly, MacOS Extended has sub-options including 1) Journaled; 2) Journaled, Encrypted; 3) Case-sensitive, Journaled; 4) Case-sensitive, Journaled, Encrypted. Choose "Journaled" if you want faster data recovery.
3.MS-DOS (FAT)
MS-DOS is a Windows-and-macOS supported file system and be used on all macOS versions. MS-DOS on Mac has a limitation in file size, which only allows for files less than 4GB. But for USBs, this format is enough for use.
4.EXFAT
EXFAT is a format that can be used on Mac and Window PC. It is supported in macOS 10.6.5 and later. Compared to MS-DOS, EXFAT lifts the file size limit. Large file sizes of up to 16EB are available to use in this format. EXFAT is suitable for a wide range of devices, including external hard drives.
Tips: All four file formats are compatible with macOS and can be smoothly read and written on the device. If you plan to use the external hard drive between two systems, you'd better change hard drive from NTFS to EXFAT or MS-DOS. But if you use the hard drive on Mac only, APFS and MacOS Extended give extra features on security and transfer speed.
Is There a Way to Use NTFS on Mac?
Of course. Somehow people would like to use an NTFS drive along with their Apple devices and do not want to change. One effortless solution is to use a third-party NTFS for Mac software. With just a few simple steps, you can gain read-and-write access to your NTFS hard drive on a Mac.
Step 1. Download and install Kingshiper NTFS for Mac. Step 2. Connect the NTFS drive to the Mac. Step 3. Log into Kingshiper. Step 4. The read-write access will be then activated automatically.
There are several methods to convert NTFS format to Mac, such as using Disk Utility, Disk Management, or Windows's command prompt. You may experience data loss during the process, possibly because of corrupted files, improper ejection, or wrong commands.
Tip: Always back up your data. You can use Time Machine to help. It's the backup tool of macOS made by Apple to handle local and external storage devices.
2. Unrecognized Drives
Incompatible versions of NTFS and macOS can lead to unrecognized drive issues. The root cause is that the Mac cannot mount the NTFS format.
In some cases, a broken hard drive will also bring the same problem. This is mainly due to connectivity.
Tip: You need to identify the reason that causes the drive to be unrecognized. Test the port, the cable, and the drive itself.
3. File Permissions and Restricted Access
NTFS uses a different permission system compared to macOS file systems. Therefore, when converting NTFS to Mac, the original file permissions may not translate correctly. As a result, the macOS is unable to recognize the security settings from NTFS and block access.
Tip: You can make good use of Disk Utility. The "First Aid" feature is helpful to diagnose and fix the hard drive. Or you can right-click the drive and select "Sharing & Permissions" to adjust permission manually.


 All
All