Got it

Is NTFS Compatible with Mac? Based on Testing

Have you ever noticed the file system of your using external drive or other storage devices?

The same drive can perform differently between operating systems. If you have checked the disk properties, you may find that the file system that is marked as NTFS works well in Windows but the opposite on Mac.

As a Microsoft-developed system to organize and manage files, NTFS is not surprisingly wall Apple devices. But is that really the case? Is it true that NTFS drives cannot be used on a Mac at all?

Let's dive deep into the compatibility of NTFS and Mac. To answer the question, we test NTFS-formatted storage devices on different MacOS devices.

is ntfs compatible with mac

Is NTFS Compatible with Mac? Yes, but not fully.

The built-in Disk Utility on Mac is able to recognize NTFS drives. Although there is no Apple official document to address that NTFS is supported, you can actually use an NTFS drive on a Mac.

But please don't take this the wrong way. When saying 'use' in this context, restrictions exist. You can only read the NTFS drive on Mac, which refers to actions like viewing folders and file info. Writing the NTFS drive is not allowed.

Now, take a deeper look at Mac NTFS compatibility. We test the NTFS device on different MacOS versions. See operations that are not in a locked state natively.

Test NTFS in macOS Ventura

We connect an NTFS drive with Macbook Pro (macOS 13.6.1) without changing any system configurations. What are the default capabilities of macOS to handle NTFS-formatted drives?

Read documents and files in the drive.

Once the NTFS drive is connected, an external drive icon will show up automatically. Double-click it and you can see the documents. Info can also be seen.

is ntfs supported by mac

Copy and move the file to another folder.

Select a file and right-click. Options like ‘Copy to’ and ‘Move to’ are included. These mean that you can transfer the NTFS file from the drive to your Mac device.

can mac compatible ntfs

As you can see there are more operations listed in the menu. However, it does not mean that those are usable. Options like compress, convert or create PDF are grey.

In addition, copying files from Mac and moving them to the NFTS drive is not supported.

More on Windows NT File System on Mac, We Get Reply from Apple's Official Reply

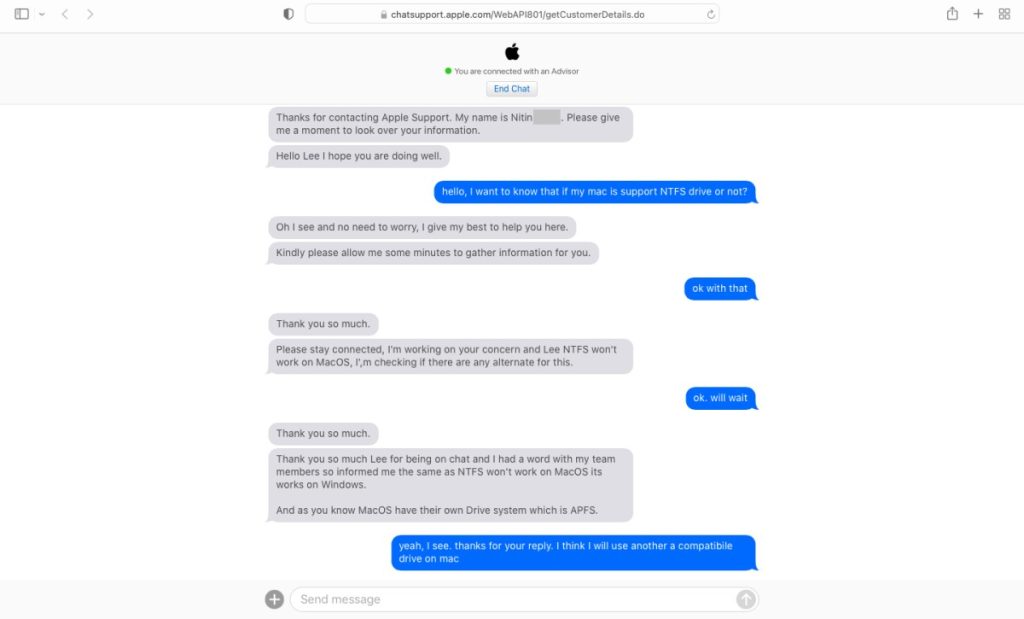
We contact Apple Support to confirm the compatibility issue. And this is the answer that we get.

“I’m working on your concern and see NTFS won’t work on MacOS, ...... and I had a word with my team members so informed me the same as NTFS won’t work on MacOS......”

is ntfs compatible with mac

The customer support clearly stated that Mac has its own drive system - APFS, and NTFS is for Windows and not supported by MacOS.

How to Activate Writing Support for NTFS on Mac?

To enable full access to NTFS on Mac, especially the writing support, you have two methods to go with.

The first one is to use a third-party NTFS for Mac software. It is the easiest way that you can use NTFS without limitations on Mac.

A simple guide to using NTFS for Mac software:

Step 1: Download and install Kingshiper NTFS for Mac.

Step 2: Drag it to Applications.

Step 3: Connect your NTFS drive to the Mac and open it via Kingshiper.

Step 4: Now you can click these actions - Delete, Copy, Paste, Edit, and more.

mac ntfs compatibility

Note: please note that third-party software could be trapped in "kernel extension being blocked," which leads to usage failure. This is because Apple takes more security measures on its operating system. Kernel extensions are used to extend the core functionality kernel so that software can provide additional system features on the device, such as adding new drivers.

You can choose a workable software and test it before transferring your NTFS files. In this way, you can write NTFS on Mac successfully.

Another method to enable NTFS writing access on Mac is using the built-in Terminal application. This requires some command script knowledge.

Step 1: Open Terminal on Mac and connect your NTFS drive.

Step 2: Paste the following command texts one by one and type Enter.

1) “diskutil list” and then “diskutil info /dev/disk2.” This is to get the info device identifier of the NTFS drive.

2) “sudo diskutil unmount /dev/disk2s1.” Use the info you get in step one. And this step is to unmount the drive so as to change configurations.

3) “sudo mkdir /Volumes/NTFS.” This is to create a mount point.

4) “sudo mount -t ntfs -o rw,auto,nobrowse /dev/disk2s1 /Volumes/ntfs.” This command will enable the read-write support for the NTFS drive.

Step 3: Verify if the writing support is activated. You can use this command “‘mount | grep ntfs” to check if there is a “rw” (read-write).

If you wish to learn more about the command, such as its meaning and functions, click here for more info.

Which File Systems Are More Compatible with Both MacOS and Windows?

NTFS is a Windows-designed system; it performs well in Windows systems but is less compatible with macOS. Using an NTFS drive is quite inconvenient for people who want to transfer and share files between Windows and Mac devices.

Are there any other file system formats that work well in both macOS and Windows?

FAT and ExFAT are the solutions.

As mentioned in Apple's Disk Utility User Guide, these two formats are supported by macOS High Sierra and, later, including macOS Sonoma 14. If you want to format a disk on a Mac and use it with Windows, try FAT and ExFAT.

The difference between the two lies in Windows volume storage space. ExFAT is used for larger volumes than over 32 GB, while FAT is used for less than 32 GB.

Latest Articles