Multimedia Tools
Video Tools
Audio Tools
Image tools
Record and Edit Porfessional Videos on Mac
Windows Desktop Screen Recording Software
Easy and Fast Way to Compress Video and GIF
Screen Mirroring App for iPhone/Android/PC/Pad
All-in-one video toolkit that supports converting over 1000+ formats
Portable audio format converter, which supports common audio format conversion, multiple audio merging, audio compression, audio segmentation, and one click batch conversion of audio formats
Karaoke Maker and Vocal Extractor on Mac
Cut, copy, paste, insert audio, add effects and other editing functions, which can easily re edit the recorded audio files and make ringtones, adding a unique personality to your life.
Extract vocals and instrumentals from any audio and video track with the latest AI technology.
Best Voice Recording Software for All Windows Users
Convert Audio/Video to MP3/WAV/FLAC/OGG
Utilities
Office Utilities
Simple and powerful office solution for file compression, extraction, transferring, and sharing. Easily to process multiple files in seconds!
A powerful, simple and easy to operate PDF to word converter, which supports the conversion between PDF documents and multiple formats such as doc, ppt, pictures and txt documents; The software has the functions of fast conversion, batch conversion, high-quality identification, etc
Fast Way to Reduce Your File Size
The best and perfect tool to convert various ebook files with ease.
Convert Videos, Audios, Images, PDFs, and Word with Ease
Seamless Conversion for PDF to JPG & JPG to PDF
Shrink size of PDFs, images, and videos without losing quality
Extract & Manage & Compress Files in Seconds
System & Recovery
Mac Cannot Write to NTFS by Default.
Writing to NTFS refers to the operations of saving, modifying, and deleting files on the drive. Mac laptops and desktops do not allow users to do so. Instead, these Apple devices only support reading access and copying NTFS files to the device itself.
Users of both NTFS and Mac devices can be caught in a dilemma. It seems that they need to accommodate one of them - either use a computer compatible with NTFS or a file system compatible with Mac.
Is there a solution that takes into account both NTFS and Mac? Well, there it is. Try the following methods to enable NTFS writing support on Mac.
To enable write access to NTFS drives on a Mac, you typically need third-party software. Alternatively, if you prefer a free method, you can use disk partitioning to enable write to NTFS on mac, but this approach is not recommended for critical data. Always ensure to back up your data before making changes to file system settings.
Here are two solutions with detailed steps. One is to use the third-party app, and the other is to use the native tools on Mac device.
Activating the write access cannot be simpler as using NTFS for Mac software. These tools are designed to make NTFS no different from other macOS-compatible file system types. This solution is best for those looking for the simplest and quickest way to write on NTFS on Mac.
One tool you can use is Kingshiper NTFS for Mac. It’s quite easy to use and will mount the NTFS drive automatically once it connected to a Mac.
See how it can help Mac to write on NTFS in seconds.
Step 1. Install Kingshiper NTFS for Mac and enable kernel extension.
Note: Kingshiper is a safe and reliable software that values security. However, due to system incompatibility, you need to turn off SIP (System Integrity Protection) and enable kernel extension to gain full access to NTFS drives.
Step 2. Log into Kinshiper and open the NTFS drive. Continue with the free trial button and the read-write support will be activated immediately.
Step 3. Check if the read-write access is enable. If yes, you can now add, edit, and delete files formatted by NTFS on Mac.
During the free trial, you can enjoy all features without limitations.
Disk partitioning is to create two or more storage rooms that can be managed separately. In a word, you can divide a drive into two separate sections, one with NTFS format, and the other using a different file system.
This method is the best way for people who point up file transferring between macOS and Windows; and who perfer a free and native method to write NTFS on Mac.
Mac supports reading and copying NTFS files. Fortunately, you can make good use of these limited features to maximize the use of the NTFS drive. For example, NTFS files can be edited on a Windows PC first and then read and copied to your Mac. As for transferring files from Mac to Windows using the NTFS drive, you can copy the Mac files to the newly created partition formatted by exFAT.
To partition the NTFS drive on Mac, please open Disk Utility.
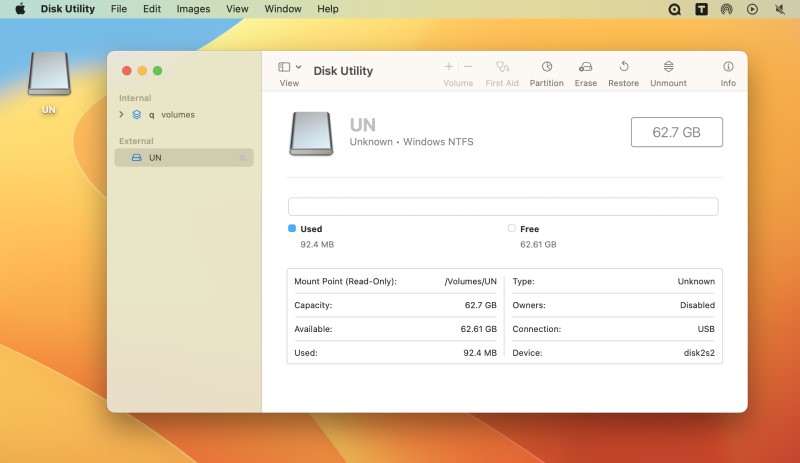
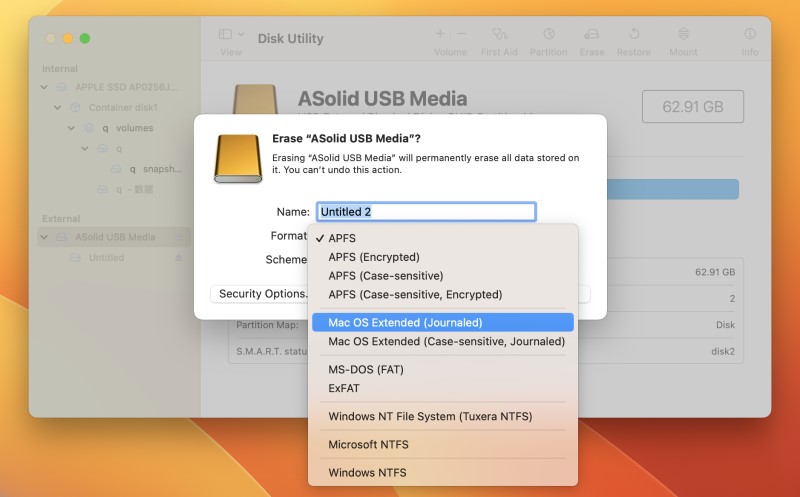
Step 1. Insert the NTFS drive to your Mac and open it in Disk Utility. Find the drive’s name in the left sidebar and click it.
Step 2. Erase it. Click Erase and choose Mac OS Extended (Journaled).
Note: You should first convert the NTFS drive into Apple’s own file system type, or the Partition feature is unusable.
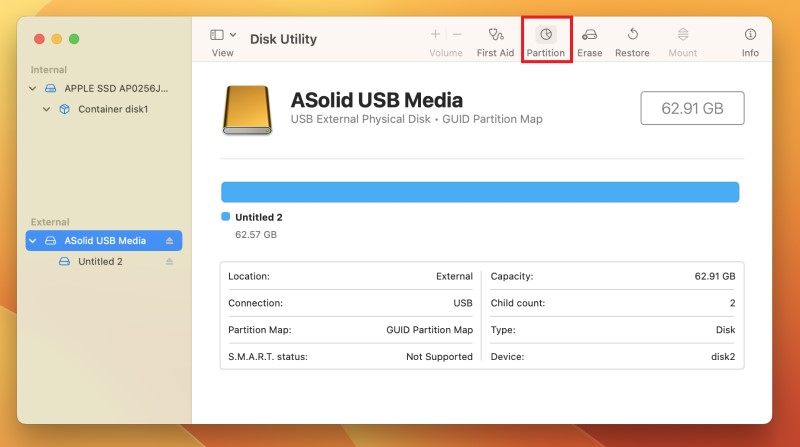
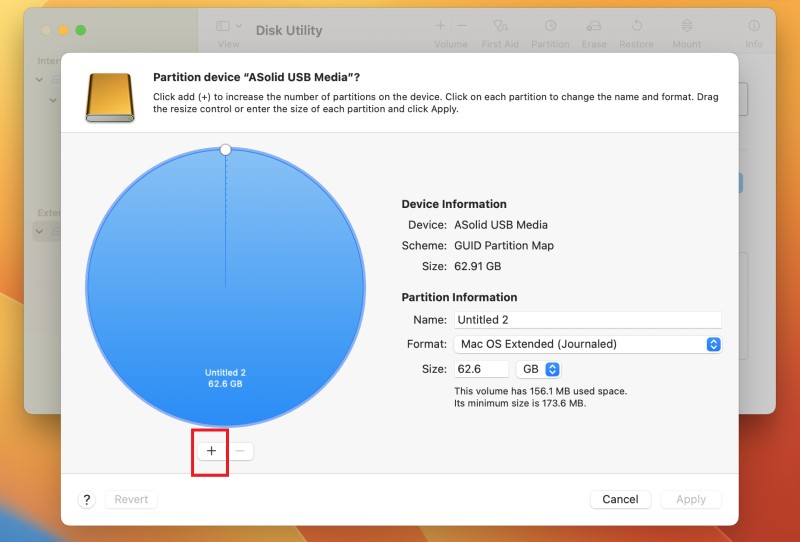
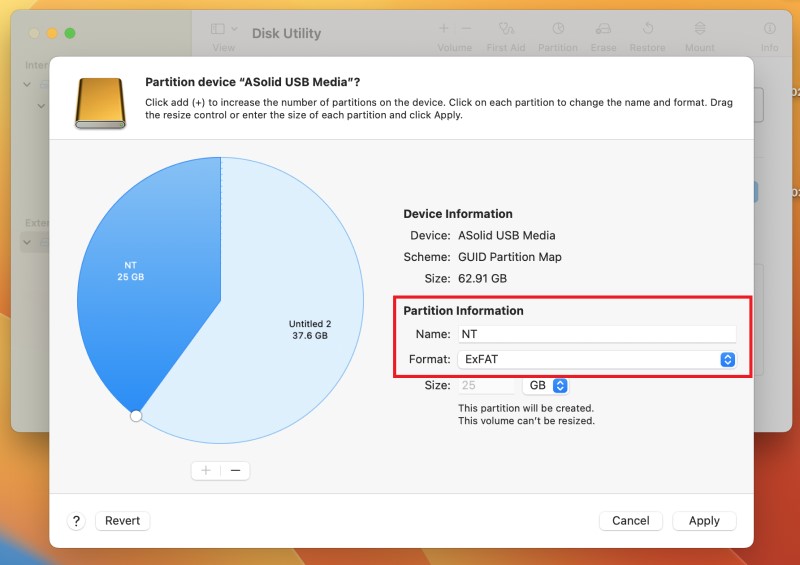
Step 3. Click Partition in the toolbar. Then you will proceed to a panel. Now, click “+.”
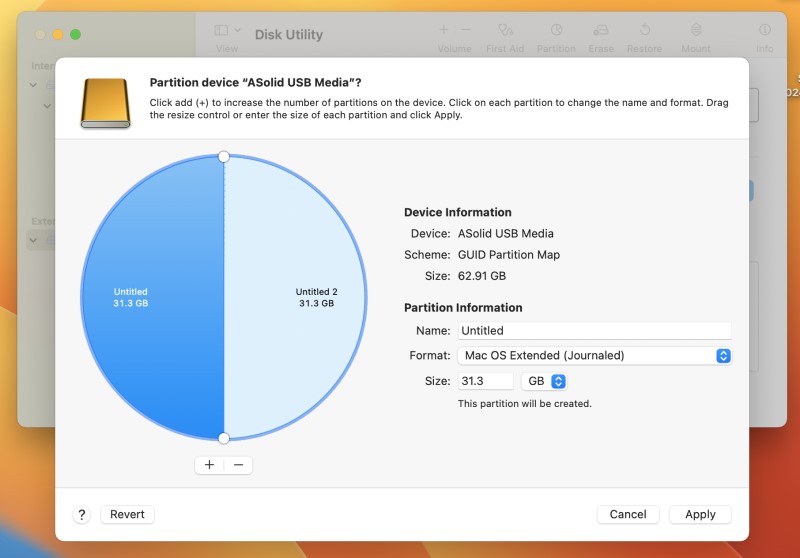
The drive will be split in half automatically, but you can allocate space as needed.
Step 4. Rename the partition and choose a format.
As an illustration, you can name NT and choose ExFAT (ExFAT works well in Windows and macOS). Then click on another one and use EF to name the partition.
After setting, click Apply > Partition. You will see two disk icons appear in the decktop.
Step 5. Turn the NT partition into NTFS format on a Windows PC.
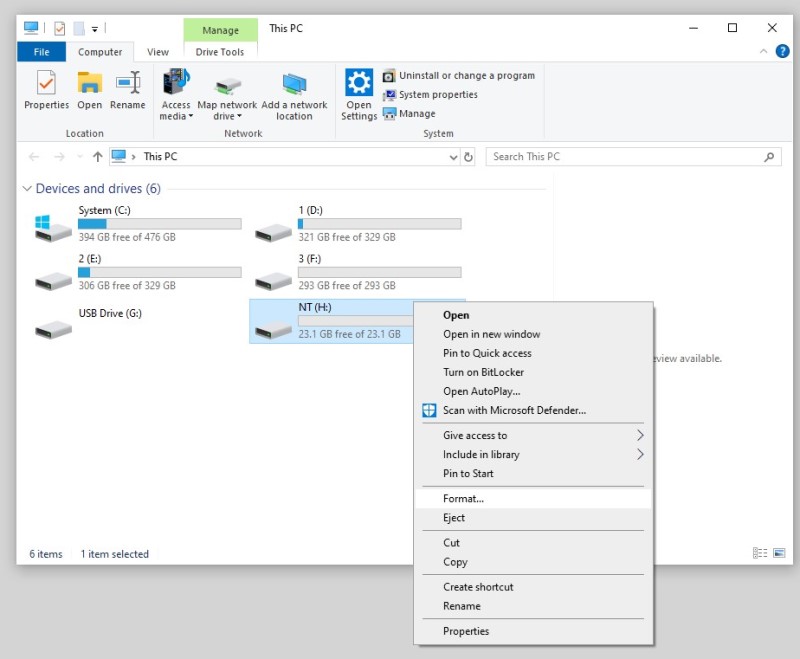
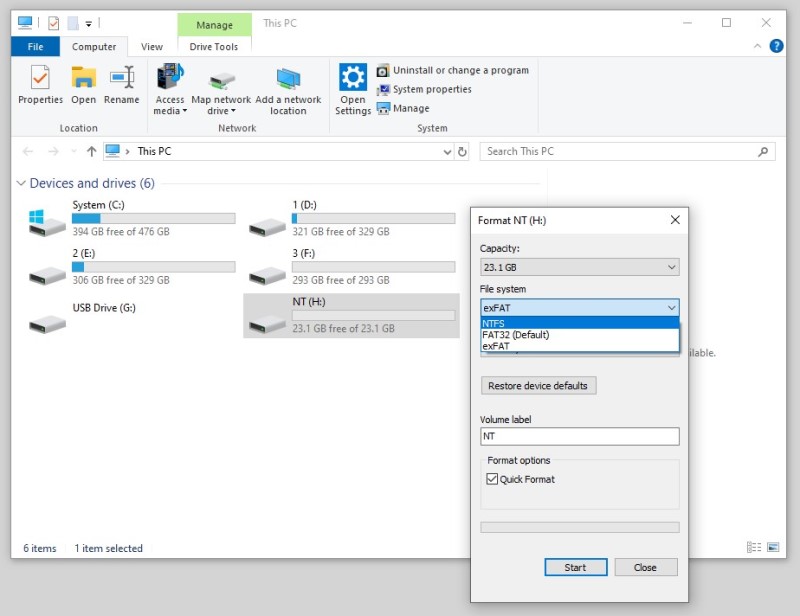
This partition is formatted as ExFAT on Mac. Now, you can reformat it as NTFS in Windows.
Just open This PC and find the partition name. Right-click it and choose Format. In the dropdown menu, NTFS is listed. Next, proceed the operation by clicking
Step 6. The EF partition remains as Mac OS Extended format. You can change it into ExFAT with Disk Utility directly.
By this time, your NTFS drive has two different file systems within. And each meets OS capabilities that are able to read and write files conveniently. Now you can write on NTFS on mac.
Indeed, the limited NTFS support on Mac presents a challenge for many users. However, over time, there is no sign of addressing the needs of users.
But why? Apple has its own priorities.
Firstly, promoting a self-developed file system is another reason. Certainly, Apple loves to retain users in its ecosystem. So, from the perspective of commercial purposes, the incomplete NTFS is perfect to use on Mac.
More, the money. NTFS is owned by Microsoft. Thus, if Apple wants to give full NTFS support on macOS, it needs to pay for the license so that it can use NTFS legally.
Technical challenges might also play a role. NTFS uses a different architecture and can complicate integration with macOS. This increases risk in system stability and performance.
NTFS (New Technology File System) was created by Microsoft and released as an enhancement of FAT16 and FAT32. It’s best to handle very large files or volumes and supports Access Control Lists (ACLs) for security.
However, this powerful file system has obvious disadvantages, or, to put it directly, poor compatibility. NTFS is not a perfect choice to use on macOS, and on Android. In addition, devices like IoT devices, game consoles, cameras, and some media players do not support NTFS.
The more you use devices other than Windows, the more inconvenience you can find with NTFS. If you’re looking for a way out, take these alternatives into consideration.
Supported OS: Windows, macOS, Linux
Maximum File Size: 256 TB
Security: does not support file permissions or encryption
Best for: flash drives and external storage
Supported OS: macOS, iOS
Maximum File Size: 9 quintillion files on a single volume
Security: supports encryption, snapshots, and file permissions
Best for: fast file access and has been optimized for SSDs
Supported OS: FreeBSD, Linux, macOS
Maximum File Size: 16 exbibytes
Security: supports encryption, compression, and checksumming
Best for: large datasets