Mounting an NTFS partition is fundamental to its accessibility. The process decides whether the OS can identify the file system and access to data of the external NTFS drive or not. If the mounting fails, you can do nothing on the drive.
Failures happen from time to time on Mac devices. Sometimes, it's due to system updates and sometimes because of software issues. How to fix NTFS for Mac that failed to mount? Try these three methods. Every solution has been tested and proven effective.
Signs That NTFS for Mac Is Not Mounting
Some circumstances indicate your NTFS drive is not mounting on Mac. When one of the following signs occur, you need to realize the issue.
1. NTFS Drive Not Visible
As you connect the NTFS drive to the Macbook, it should show up automatically on the Desktop or in Finder. Normally, it's a driver-like icon. But if you see nothing, this means that the NTFS drive is not working, let alone mounting.
2. Inaccessibility of Files
Though Mac is not perfectly compatible with NTFS, your device is able to read the files and documents stored in the drive. That is to say, the Mac will mount the NTFS drive automatically once it is connected and make its data accessible. If you're unable to open files, the NTFS drive is not mounting properly.
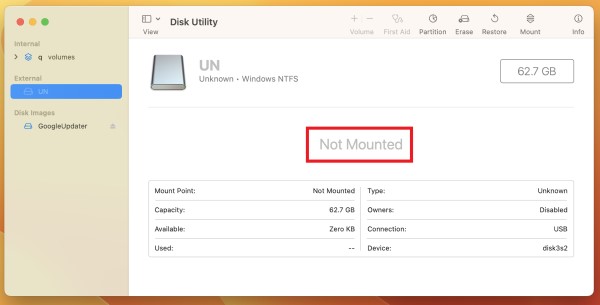
You can find the NTFS drive via Disk Utility. Click it, and you will see the mounting status of the drive. If the NTFS is not mounting, the "Not Mounted" message will be listed ( as shown).
Diagnosing NTFS Mount Failures on macOS
Once you notice the NTFS drive is not mounting on Mac, it's time to find out the reason.
It's quite necessary to detect what causes mounting failures of NTFS for Mac before rushing to solutions. This way, you can take targeted and appropriate methods to solve it.
You have five directions to figure out the failures - OS incompatibility, OS update, bugs of NTFS for Mac software, file system corruption, and physical connection.
1OS incompatibility
NTFS is a file system for Windows initially. Thus, it is not surprising that there may be compatibility issues when the NTFS drive is used on macOS. And the mounting process is to tell whether the file system is compatible with the device system or not.
MacOS has limited native support for NTFS, which only allows reading but no writing access. If the OS version is outdated, the device may not recognize the NTFS format and is unable to mount.
2OS updates
NTFS drives can be mounted on the Mac by default. But, since Apple continuously updates macOS versions, like minor updates, it could cause NTFS mounting failures.
Many said their NTFS External hard drives can not be read after updating macOS. Mostly, it's due to security update. For example, an error message of "com.apple.DiskManagement.disenter error 49221" occurred when mounting the NTFS drive.
3Bug of NTFS for Mac software
This is the most common reason that makes NFTS failed to mount. A lot of Mac users reported that their NTFS for Mac software was not working. And Paragon is the one mentioned frequently.
4File system corruption
NTFS itself may have underlying issues when accessed by macOS. It could be version issues or virus attacks.
5Physical connection
An NTFS drive may be broken. For example, the interface of the device itself and the data cable can lead to connection issues.
How to Diagnose NTFS Drive Not Mounting on Mac?
Follow this step-by-step guide to identify the cause.
Step 1. Check if the connection is working well.
Connection issues have the most recognizable signal - no response when connecting the NTFS drive with the Mac. You can open Disk Utility to see if there is an external hard drive name appear. If no, you need to identify further what caused the connection issue.
Possible reasons: bad sectors of devices, faulty USB cables or ports, broken drivers, corrupt file system, etc.
Step 2. Check system info.
This includes the macOS and NTFS versions. You need to see if the current system version of the two devices is compatible.
Step 3. Check for third-party software.
See if your using NTFS for Mac software is out of date. It's very common that bugs in software break features that worked well previously. When the current software does not fix them, it can cause mounting issues.
Step 4. Check for NTFS drive status.
A damaged NTFS drive will not mount. It would help if you saw whether the unmounting problem is because of the drive corruption.
Step 5. Check the drive permission.
When the drive is configured with certain access, it can prevent the drive from mounting on Mac.
How to Fix Ntfs for Mac Not Mounting? Detailed Solutions for Specific Issues
In this part, we will list the reasons that most likely cause NTFS to fail to mount on a Mac and give specific solutions to solve them. You can use the corresponding method based on your actual condition. Just to remind, make sure you have backup all your data before starting; otherwise, you will have an extra workload for recovery.
Issue 1:NTFS drive not mounting after OS update
Many Macbook users have reported that they have mounting problems after updating to the newest macOS version. It is a perennial topic. Apple repairs security vulnerabilities in its new OS version. And it will raise incompatibilities and conflicts between systems or tools. The mounting task can be turned off.
How to Fix:
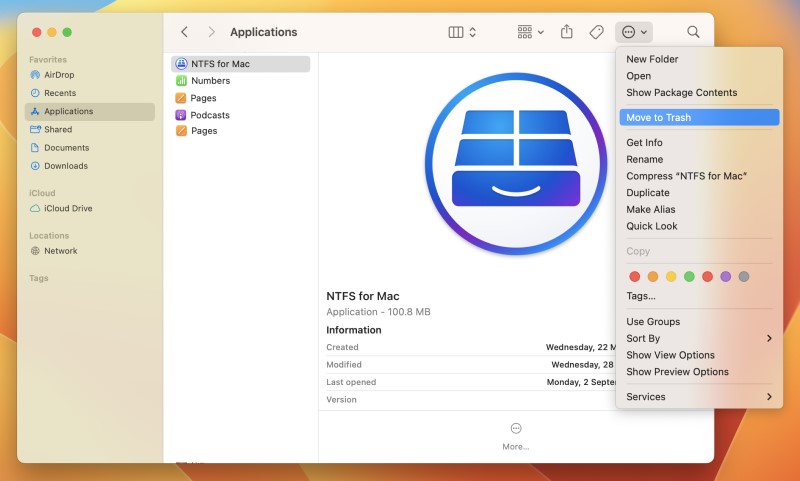
Step 1: Uninstall NTFS for Mac software that you used.
Open "Finder - Applications" and then click the software. Next, click "Action" in the upper right corner and "Move to trash."
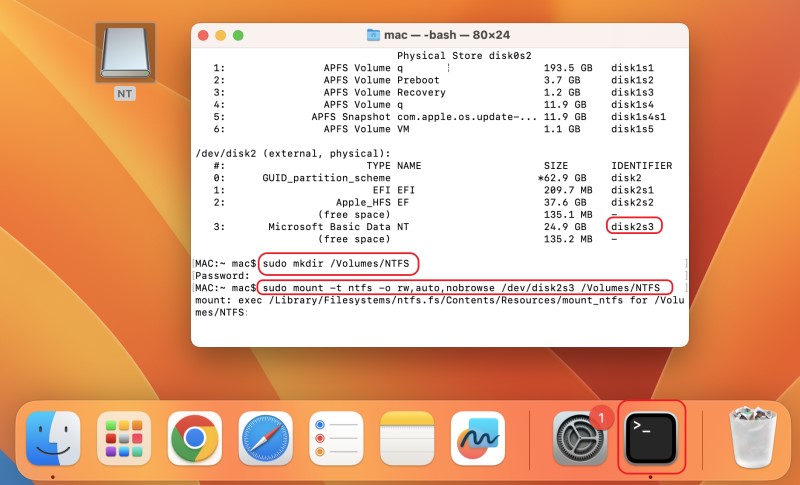
Step 2: Open "Terminal" and connect your NTFS drive to the Mac.
Step 3: Type the following scripts to execute mounting commands.
diskutil list
list all connected drives; the NTFS drive may be displayed as /dev/disk2s3.
sudo mkdir /Volumes/NTFS
create a mount point; a mount point is a directory that make drives accessible by the OS.
sudo mount -t ntfs -o rw,auto,nobrowse /dev/disk2s3 /Volumes/NTFS
this is the command to mount NTFS drives.
Step 4: Access the drive via Finder.
Issue 2:NTFS for Mac software not working as well as mounting
Some have NTFS for Mac software installed, but found that it is not working, for example, Paragon or other tools. Originally, those tools should help mount the NTFS drive automatically. However, a functional failure occurred and failed to mount NTFS on Mac. It usually happens after software or system updates as the software version does not match the device system.
How to Fix:
Step 1: Check the current version of the using NTFS for Mac software.
Then, go to its official website to see if the tool supports your macOS version. Like Paragon NTFS, it should be at least 15.11.840 to support macOS Sonoma.
Step 2: Install the latest version of the software or the one that is compatible with your device system.
Step 3: If the failure still exists, please choose other alternatives.
Kingshiper is one of the lists. It's free to use and without limits for NTFS read-and-write support on Mac.
Typically, you can see the connected NTFS drive in Disk Utility. And when you click its name, you're able to see the drive status. But if you cannot see the drive icon or a warning message showing up, such as "The disk you inserted was not readable by this computer," you're now on the road of testing and excluding possible reasons.
How to Fix:
Step 1: Go to Finder - Settings and see whether you have ticked "External disks" in "Show these items in the desktop." If yes, then test the next one.
Step 2: Change a cableand connect the NTFS drive to your Mac again. Or, you can use another drive/Macbook to test if everything works.
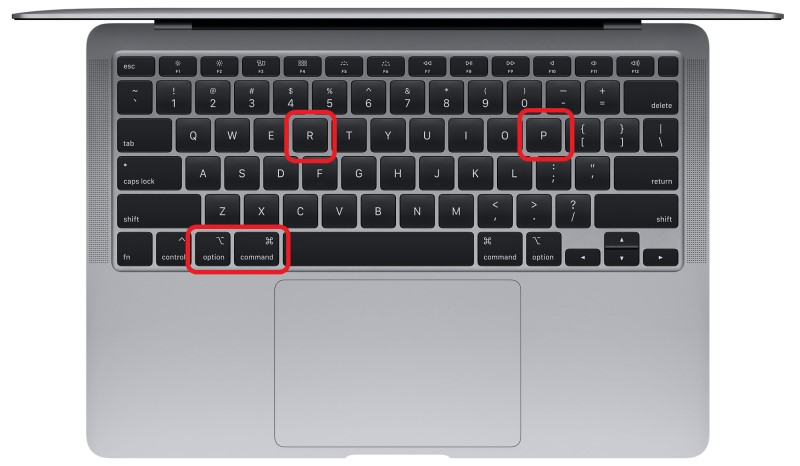
Step 3: Reset Mac's NVRAM/PRAM.
It will clear stored settings related to hardware, including startup disk preferences and device connections.
Firstly, shut down your Mac device. Then, power it up and press Option (⌥) + Command (⌘) + P + R at the same time. You need to keep the action for about 10 seconds until you see the Apple logo again. Lastly, wait for the booting.
Step 4: Install NTFS for Mac software to make NTFS format accessible on Mac.
The incompatibility issue is a major cause of unrecognized drives. It can be fixed by using NTFS for the Mac tool.
Step 5: Use Windows device to repair the NTFS drive.
Sometimes, drive corruption can lead to unrecognized issues. Since NTFS is for Windows system, you can easily resolve the problem by using the Command Prompt.
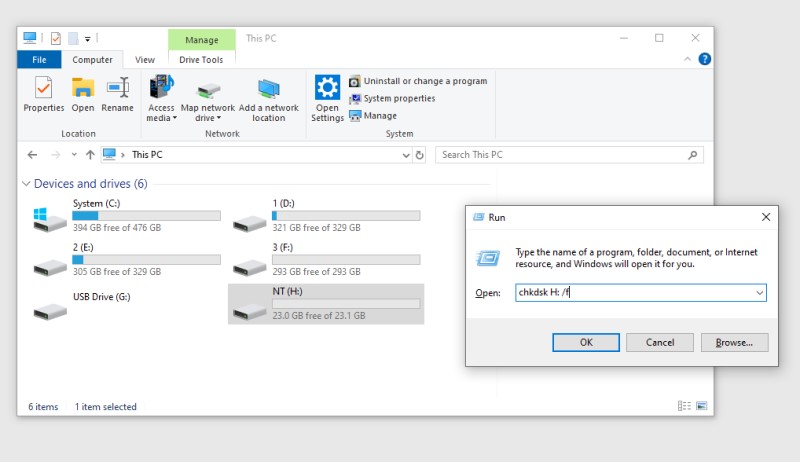
a. Open Command Prompt by pressing Windows Key + R.
b. Type chkdsk H: /f. (Note: H is the drive to fix, you need to replace it with your NTFS drive.)
Step 6: Format the NTFS drive to Apple’s official file system format.
This should be the last step to consider. If none of the above methods work, it means that your NTFS drive is unable to be used on a Mac. You need to turn it into an Apple-supported file system format so that you can use it smoothly.
Learn More: How Mounting Works on Mac?
Mounting on a Mac device refers to the process of making a storage device available for accessing, reading, copying, deleting, etc. And it works as follows.
When you connect an external hard drive to your Mac, macOS detects the hardware. Then, the system will identify the file system type used by the drive, such as APFS, NTFS, or exFAT. Next, macOS will create a mount point in the file system hierarchy, usually under the /Volumes directory. This is the location where the device will appear in Finder. Lastly, the device system will check the metadata of the file system including file structure and permissions.


 All
All