Get Started
Please follow these steps to download, install, purchase and activate the software.
1.1 Download & Install
Step 1. Download the Software to Your PC.
You can download Kingshiper PDF to Word Converter conveniently with the button below. Or, visit this page to get the installation package.

Step 2. Install Kingshiper PDF to Word Converter.
Double-click the EXE file to start the installation. As you see the window show up, choose the location you would like to keep the software by clicking "Customize" or you can just have its defaults by changing nothing. Next, tick the "term of service" and then click "Install."
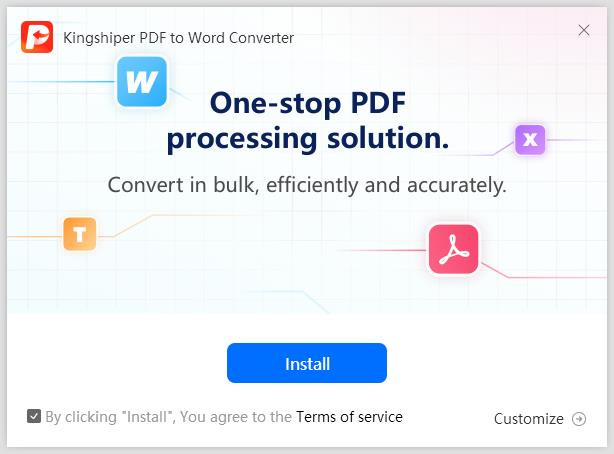
Step 3. Start the Program.
The "Start Now" button will show up in the pop-up after the installation. Now, you can click it to use the software.
1.2 Login with Kingshiper Account(Register) & Update & Uninstall
1.2.1 Login Kingshiper with Your Account.
Access your account by clicking the "Login" button in the upper right corner to unlock additional Kingshiper services. If you don't have an account, click "Create Account" to sign up.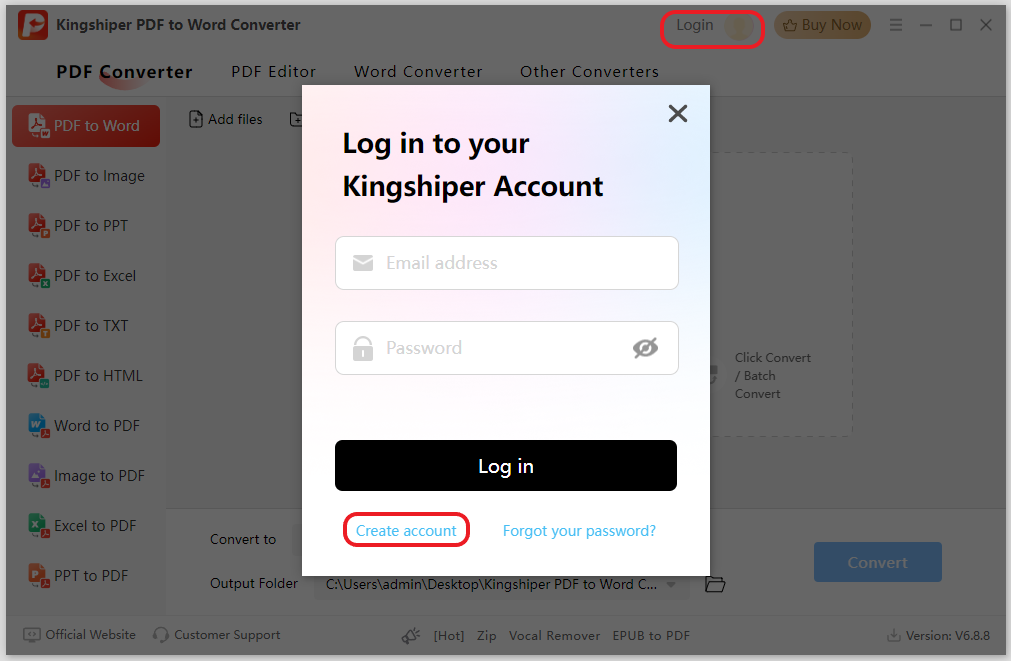
1.2.2 Features of Trial Version.
Kingshiper PDF to Word Converter is free to use. You can enjoy all features with the trial version but with these limitations: 1 page limit, without fast conversion, and cannot use batch conversion.
(image for free trial)
1.2.4 Features of Premium Version.
Check the advanced features below.
(image for features)
1.2.3 How to Unlock Premium Version of Kingshiper PDF to Word Converter?
Click "Buy Now" and go to the pricing page. Choose a plan and click the "Buy Now" button under the plan. You will need to complete the payment then.
(image for pricing)
1.2.5 What Are the Benefits of Having a Kingshiper Account?
Click the Person icon once you log into Kingshiper, and you're able to enter the Account Center. Here you can:
- Check Order Info in My Order. Find your purchased items, prices, expired data, and status here.
- Edit Personal Information in Profile.
- Change Password in Security.
1.2.6 Update
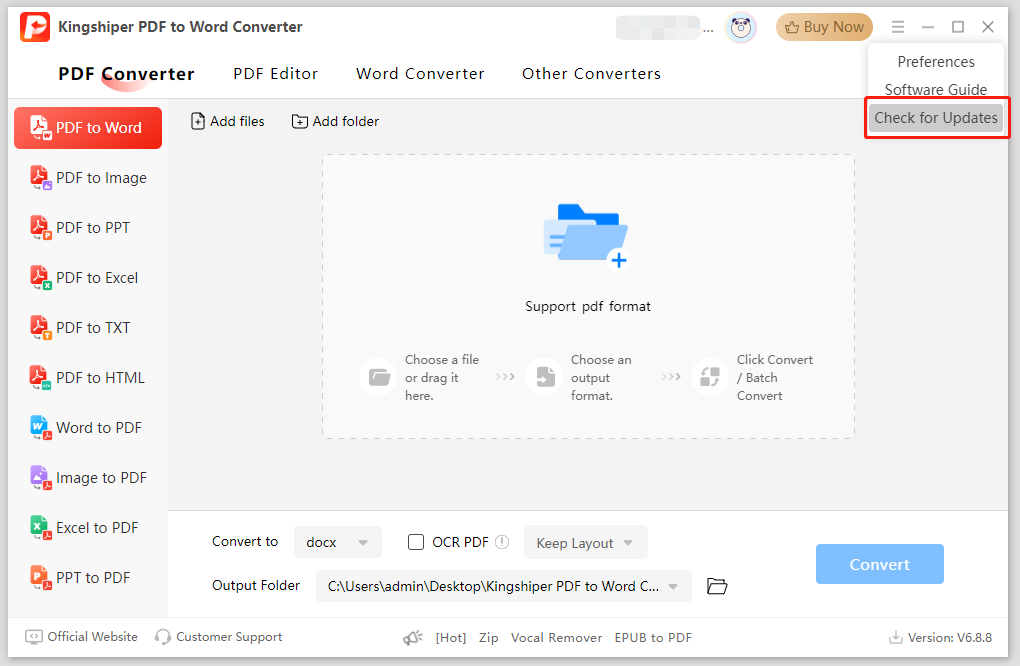
To access the newest version of Kingshiper PDF to Word Converter, update the software by selecting the "Menu" icon in the upper right corner.
Step 1. Click Check for Updates.
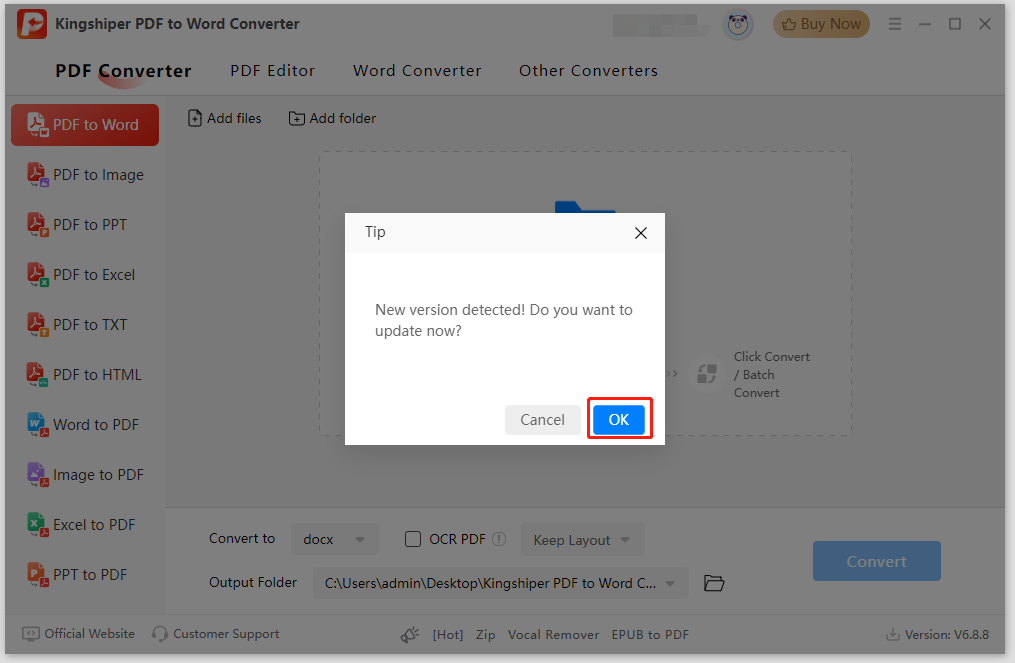
Step 2. Click OK to update software.
1.2.7 Uninstall
If Kingshiper PDF to Word Converter does not meet your expectations or you don't want to use it anymore, uninstalling the software is quite easy. There are two methods to go with.
Method 1: Use JxUninst.exe to uninstall.
Find the installation folder on your PC. Then, find JxUninst.exe, which is marked as a trash icon. Double-click it and then click "OK."
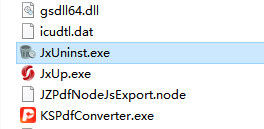
Method 2: Use the system Control Panel to uninstall.
You can right-click the Start button and select "Control Panel" from the menu. Then, open the Control Panel and go to Programs > Programs and Features > Uninstall.
1.3 Brief Introduction
Kingshiper PDF to Word Converter is a one-stop PDF file processing tool to convert PDF to Word, Excel, PPT, TXT, HTML, Image, and others. Of course, you can use it for reverse conversion.
In addition to converting features, Kingshiper is available for splitting, merging, compressing, extracting, encrypting, decrypting, and watermarking PDFs. For more detailed features please check below.
1.3.1 Toolbar & Detailed Features
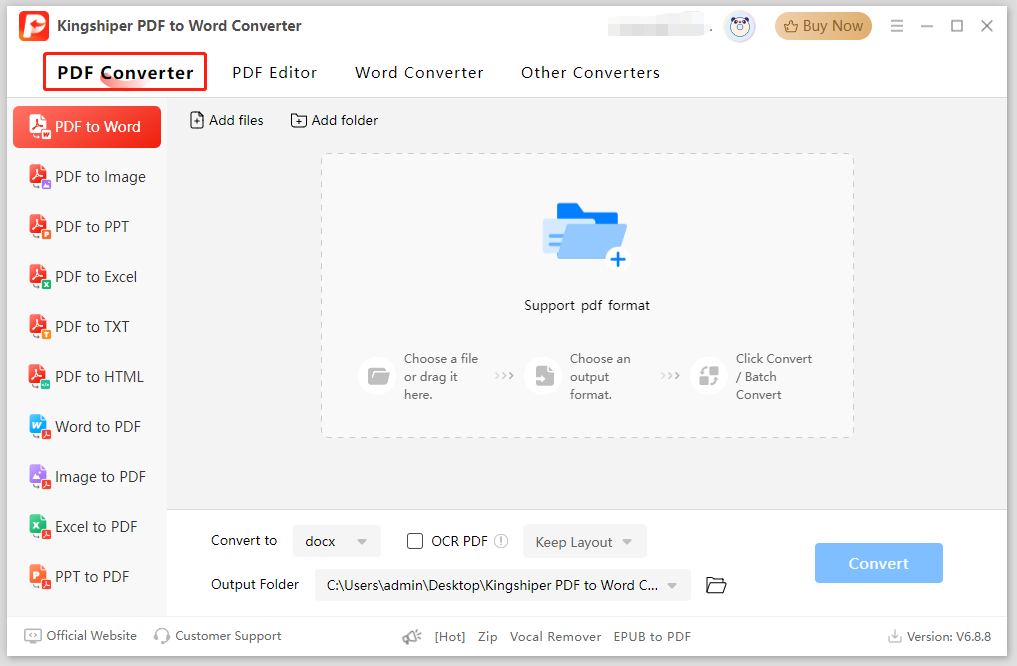
PDF Converter
Multiple format conversions are put here including: PDF to Word; PDF to Excel; PDF to PPT; PDF to HTML; PDF to TXT; PDF to Image; Word to PDF; Excel to PDF; PPT to PDF; and Image to PDF.
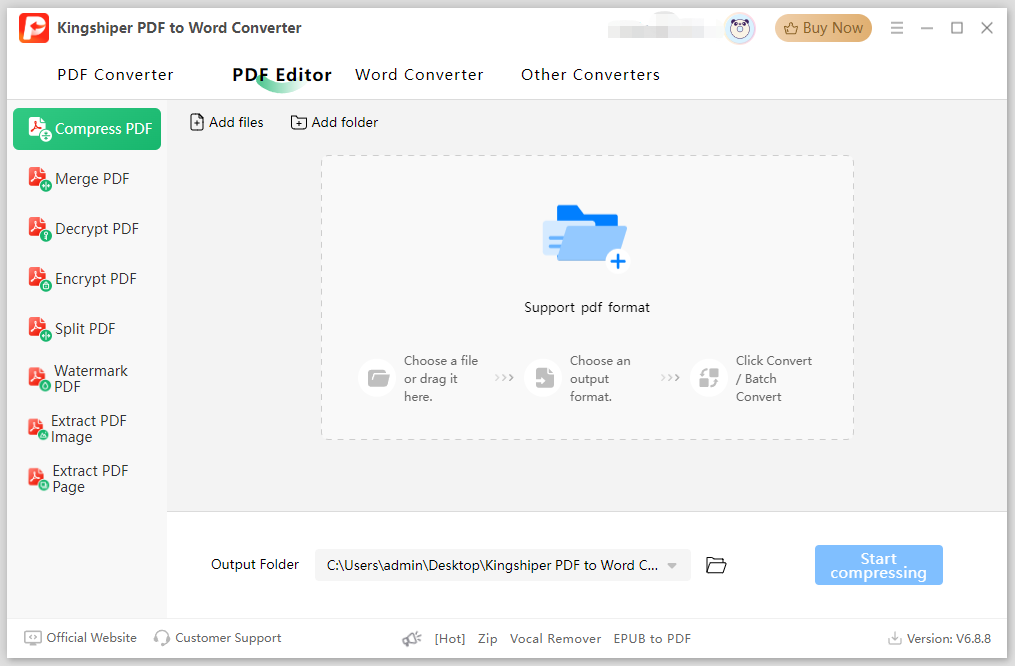
PDF Editor
There are various editing options to help you modify the PDF, such as Split PDF, Merge PDF, Compress PDF, Encrypt PDF, Decrypt PDF, Watermark PDF, Extract PDF Images, and Extract PDF Pages.
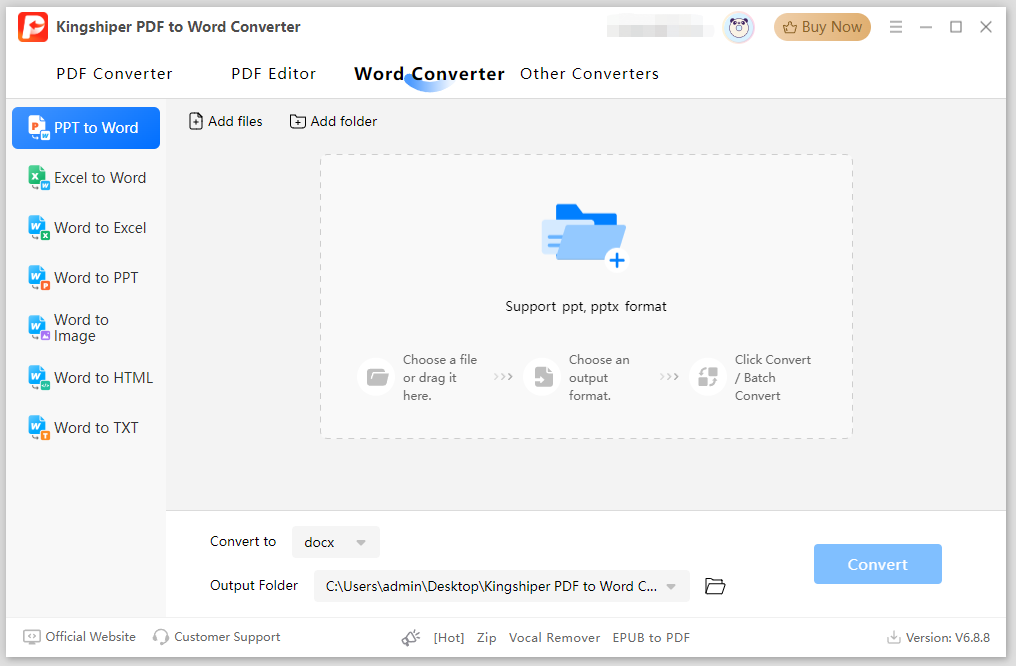
Word Converter
This feature allows users to easily convert documents from various formats, such as PPT to Word, Excel to Word, Word to Excel, Word to PPT, Word to Image, Word to HTML, and Word to TXT.
Other Converter
It contains converting Excel to PPT and PPT to Excel; converting PPT, Excel to Image, to TXT, and to HTML.
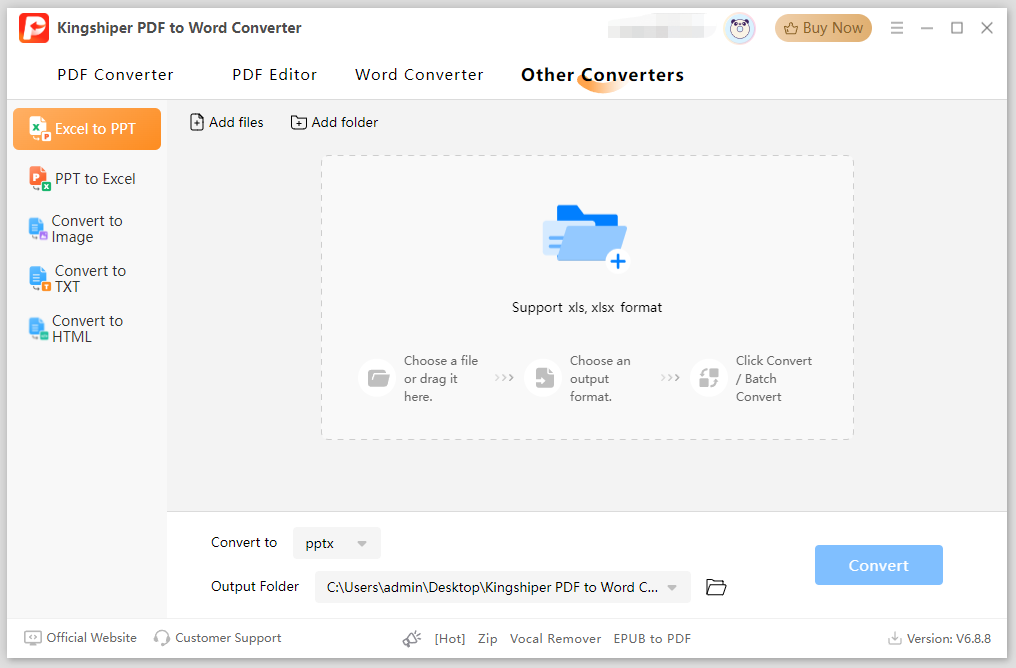
1.3.2 Supported Import Formats
PDF, doc, docx, xls, xlsx, ppt, pptx, BMP, PNG, JPG, JPEG, TIFF, GIF
1.3.3 Supported Output Formats
pdf, doc, docx, xls, xlsx, ppt, pptx, bmp, png, jpg, txt, html
How to Use
2.1 How to Use PDF Converter
2.1.1 Convert PDF to Word
Step 1. Click "Add files" or drag the PDF file into the panel.
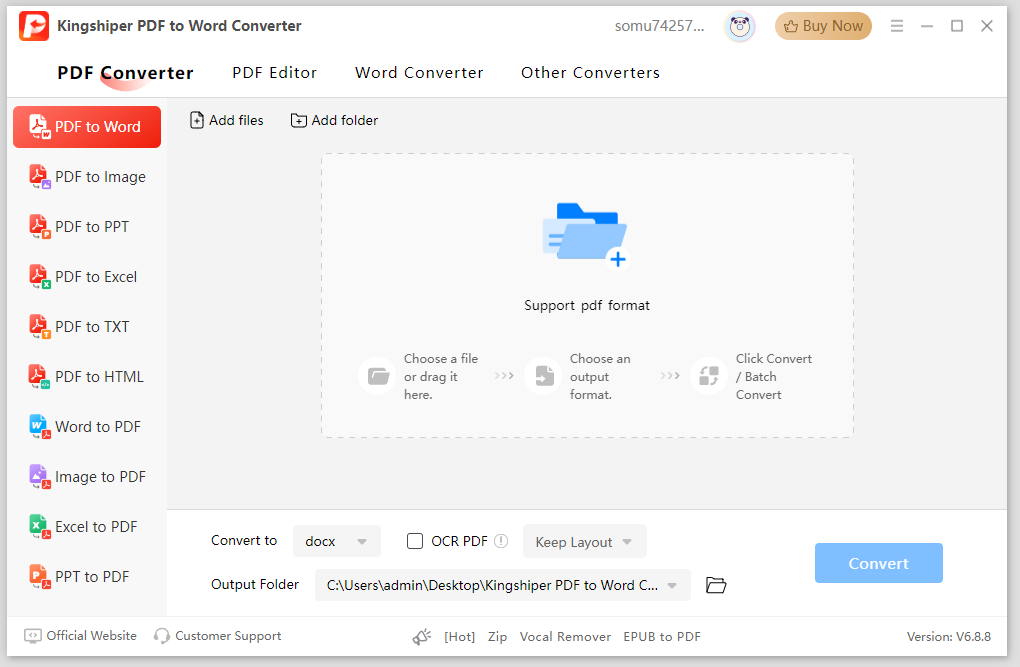
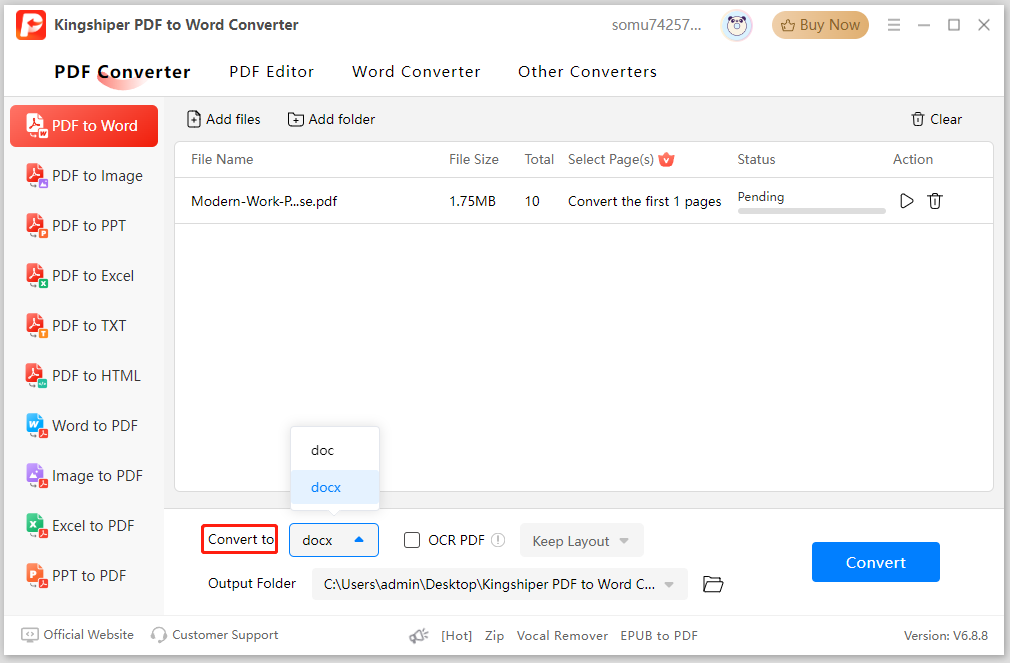
Step 2. Expand the dropdown menu of "Convert to" and select a format.
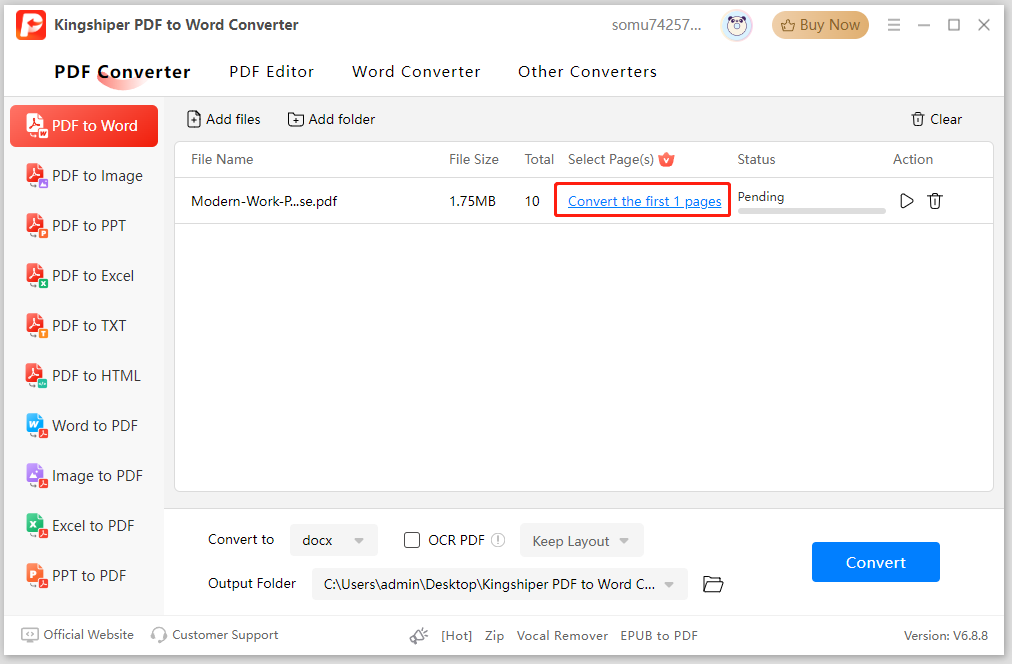
Step 3. Selected pages that you want to convert.
You can choose from Select all, Select the first pages, Select the last pages, Select only Odd/Even pages, and Customize.
Step 4. (Optional) Tick "OCR PDF" based on needs.
The OCR feature is used to convert scanned documents or images of text into editable and searchable formats. It recognizes and extracts text from images, allowing users to edit, copy, and search the content easily.
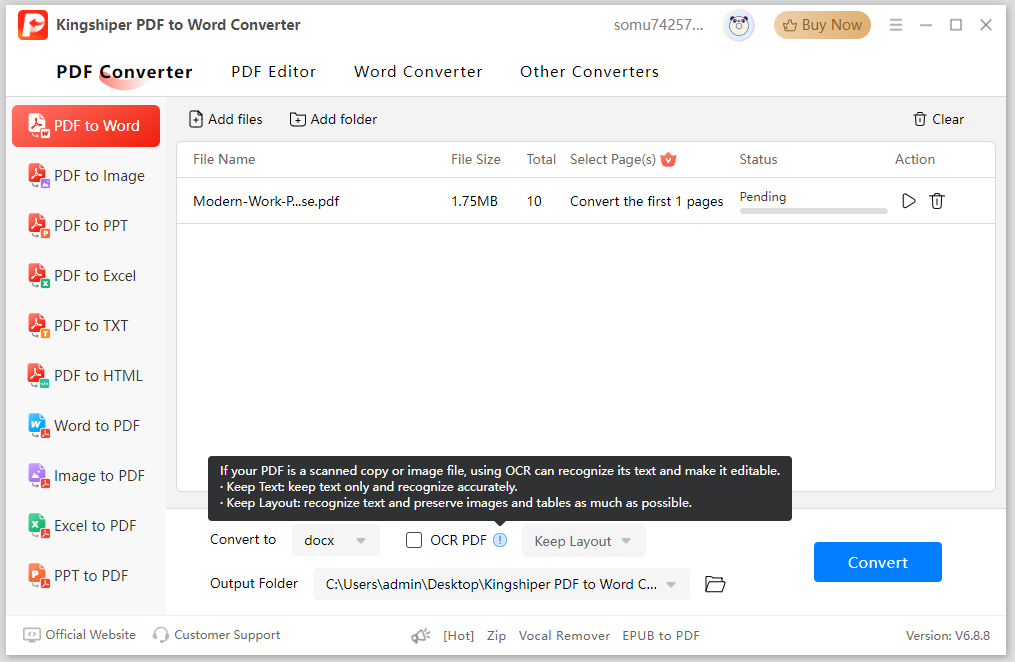
Here you can choose to keep text or keep layout.
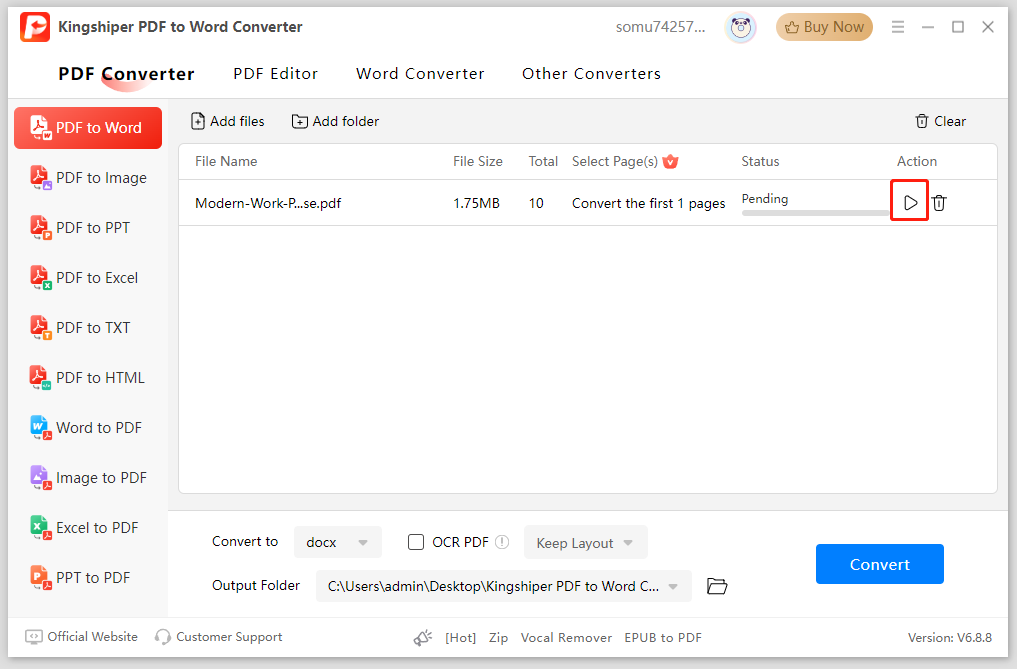
Step 5. Choose an output folder.
You can use the default folder, same as the source file directly, or customize by yourself.
Step 6. Click "Start."
2.1.2 Convert PDF to Image
The step of adding files is the same as mentioned above and will not be repeated here.
Step 1. Choose an image format in "Convert to."
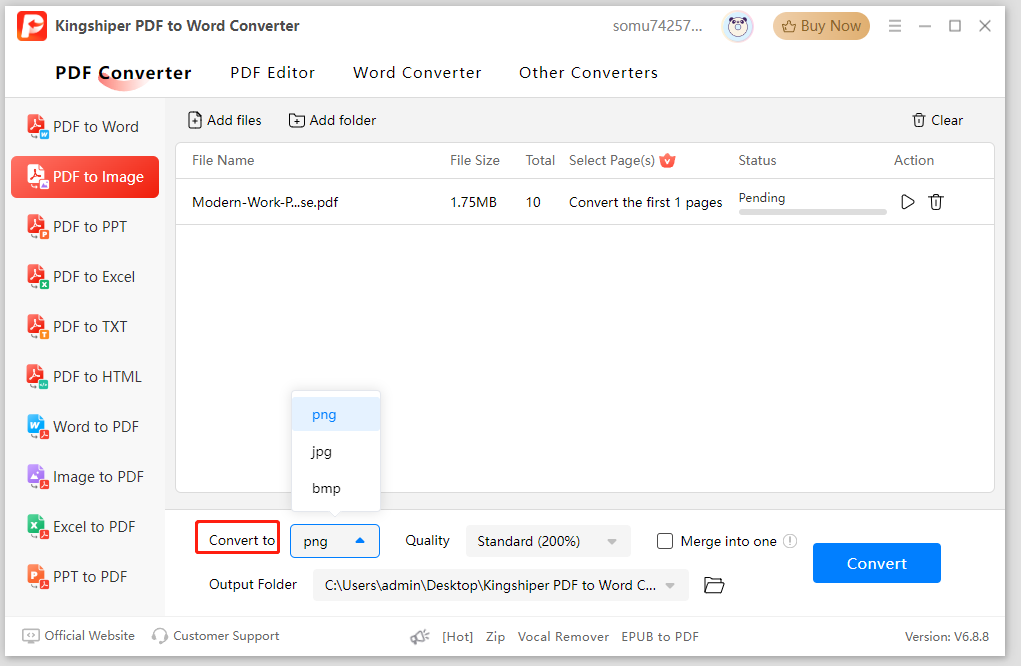
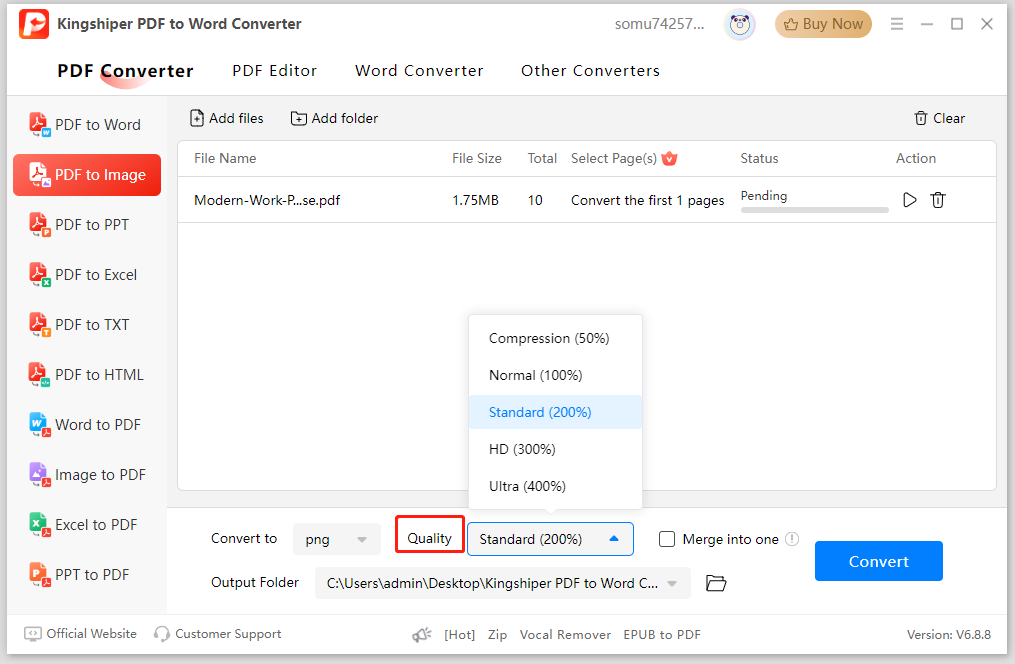
Step 2. Select the quality for conversion.
There are five levels you can choose from. The higher the percentage, the better the image quality after conversion.
Step 3. (Optional) Tick "Merge into one" based on needs.
If selected, the PDF file will be turned into a vertical image.
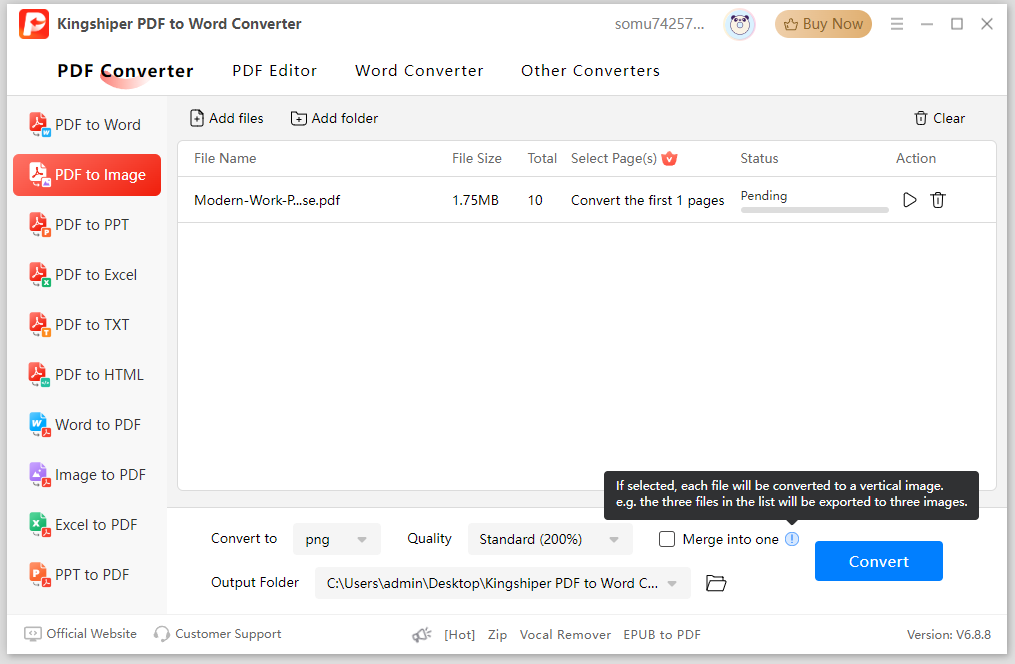
Step 4. Choose an output folder and click "Start."
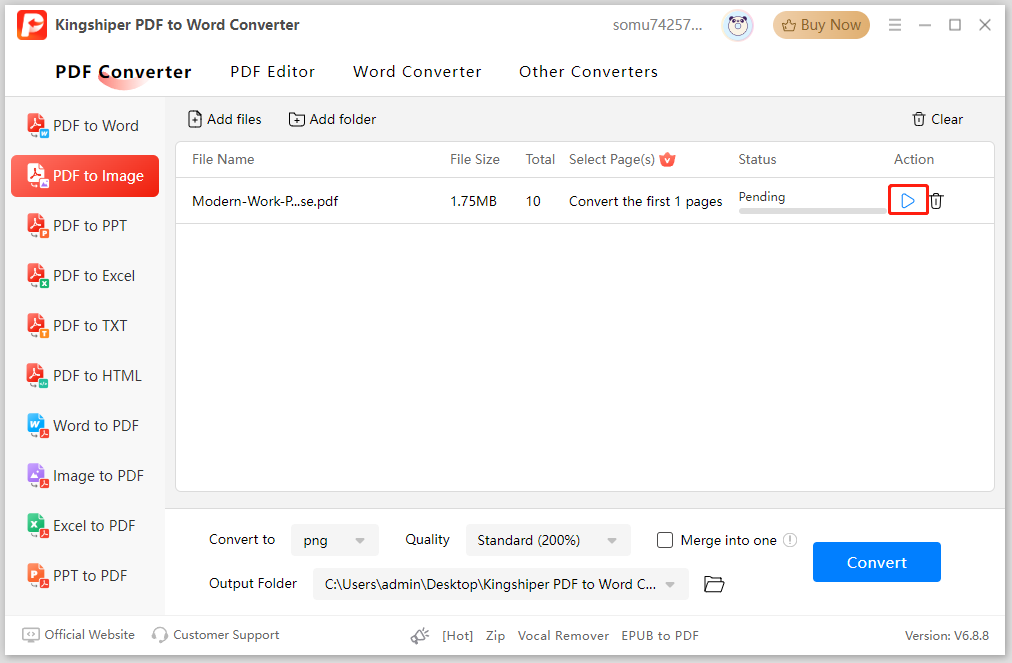
2.1.3 Convert Word to PDF
Step 1. Add a Word file by clicking "Add files."
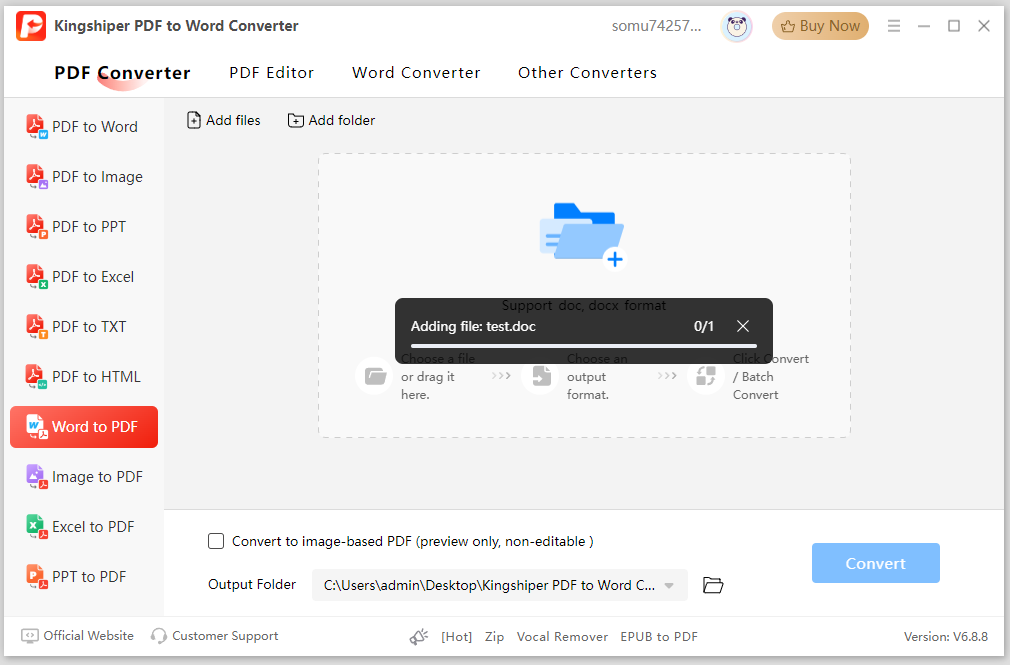
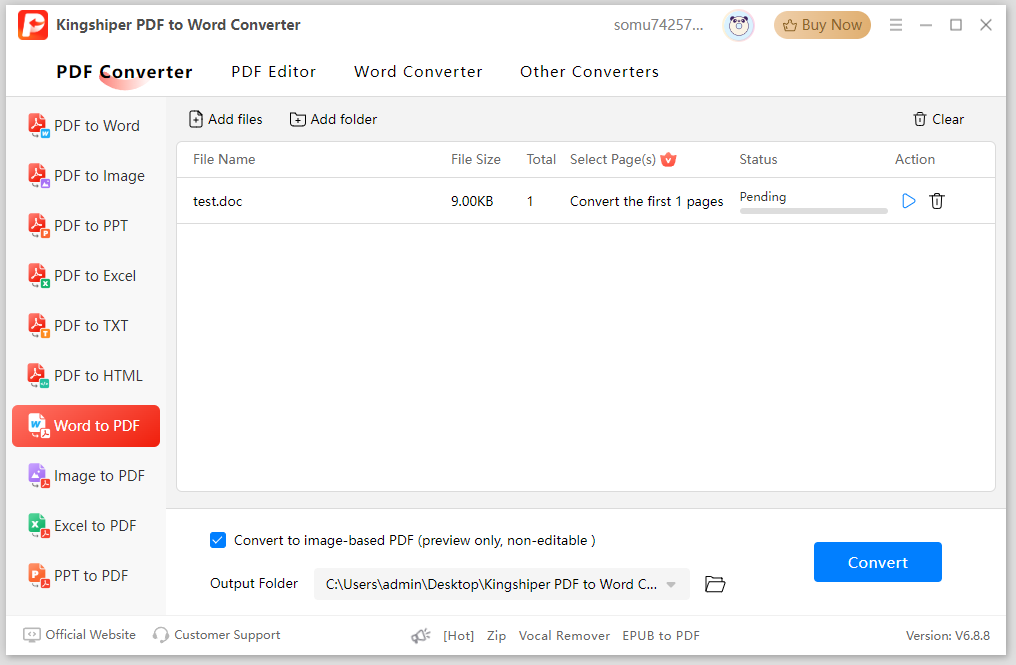
Step 2. (Optional) Tick "Convert to image-based PDF (preview only, non-editable)."
This feature allows you to make the PDF pages look the same as images which can only be viewed.
Step 3. Choose an output folder and click "Start."
2.1.4 Convert Image to PDF
Step 1. Add an image or more.
Step 2. Reorder images by clicking "Up" and "Down" buttons.
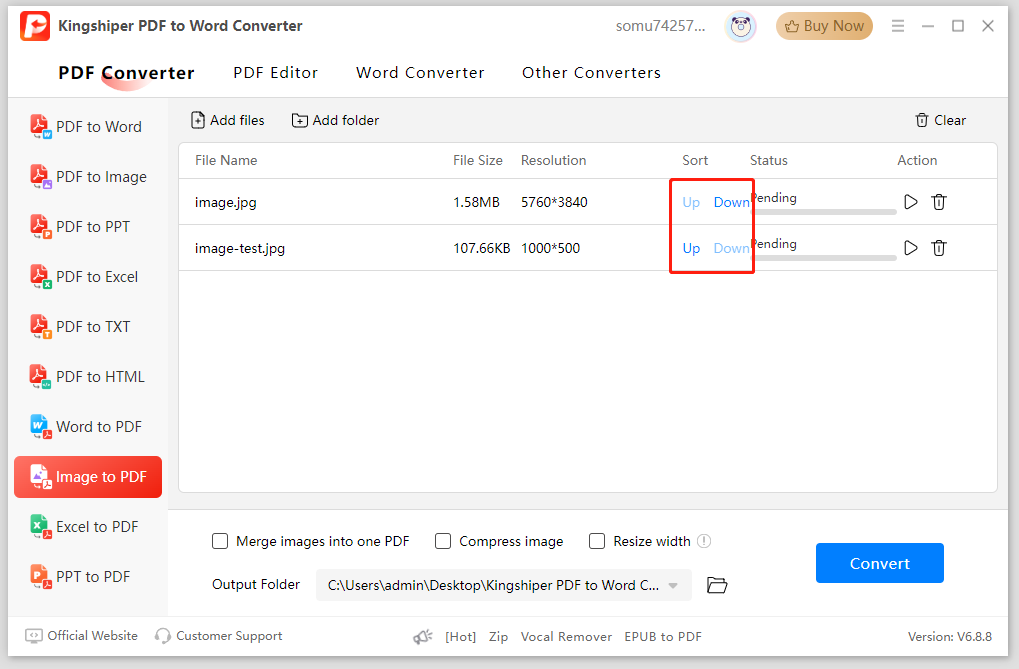
Step 3. (Optional) Choose "Merge images into one PDF" if you have added multiple images and want to get only one PDF file.
Step 4. (Optional) Choose "Compress image" if you want to reduce the image size.
Step 5. (Optional) Tick "Resize width" when the image sizes are different. Using it will standardize page width and make them the same.
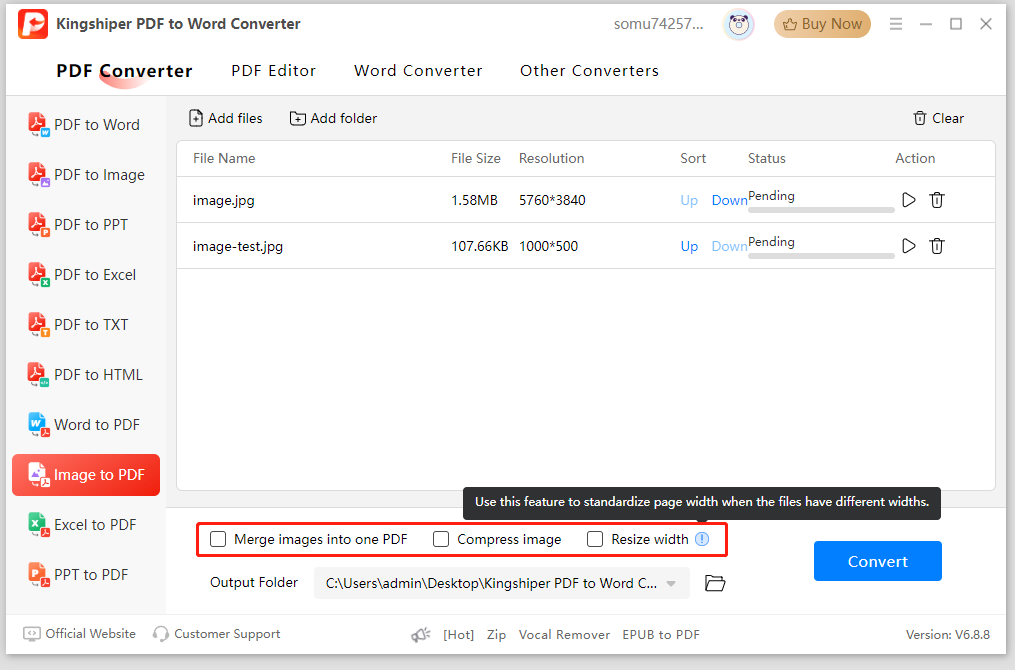
Step 6. Choose an output folder and click "Start."
Tips: You can batch convert multiple files in the panel. Just click "Add folder" to import all supported files and click the "Convert" button. Tasks will be finished at once.
2.2 How to Use PDF Editor
2.2.1 Compress PDF
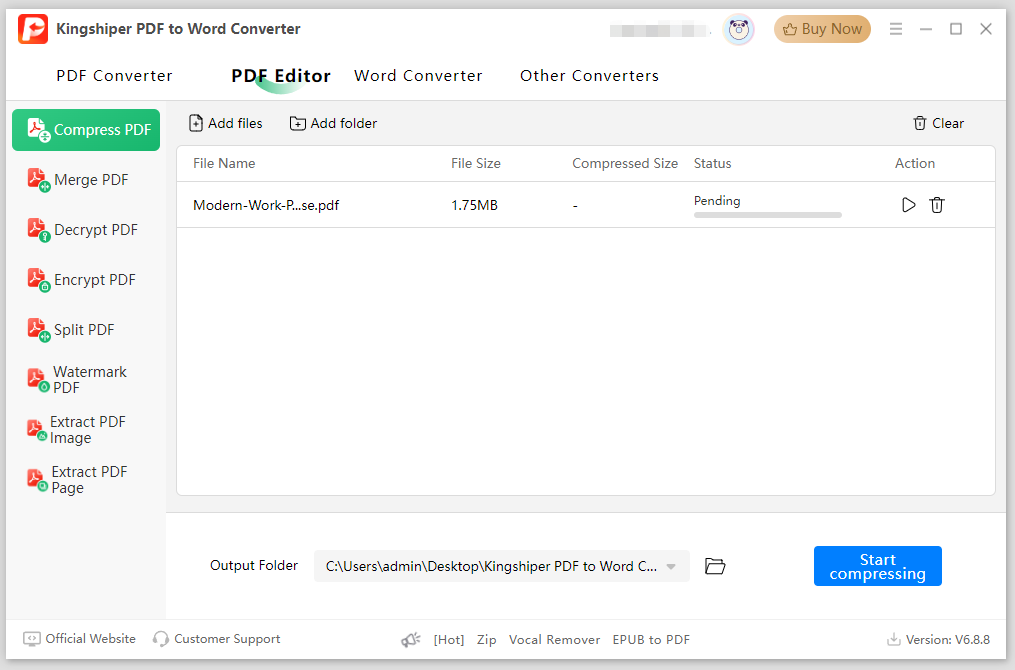
Step 1. Add your PDF file. You can one or add in bulk.
Step 2. Choose an output folder.
Step 3. Click "Start" to compress an individual PDF or click "Convert" for batch conversion.
2.2.2 Merge PDF
Step 1. After adding PDFs, you can change their order by using "Up" and "Down" in the Sort menu.
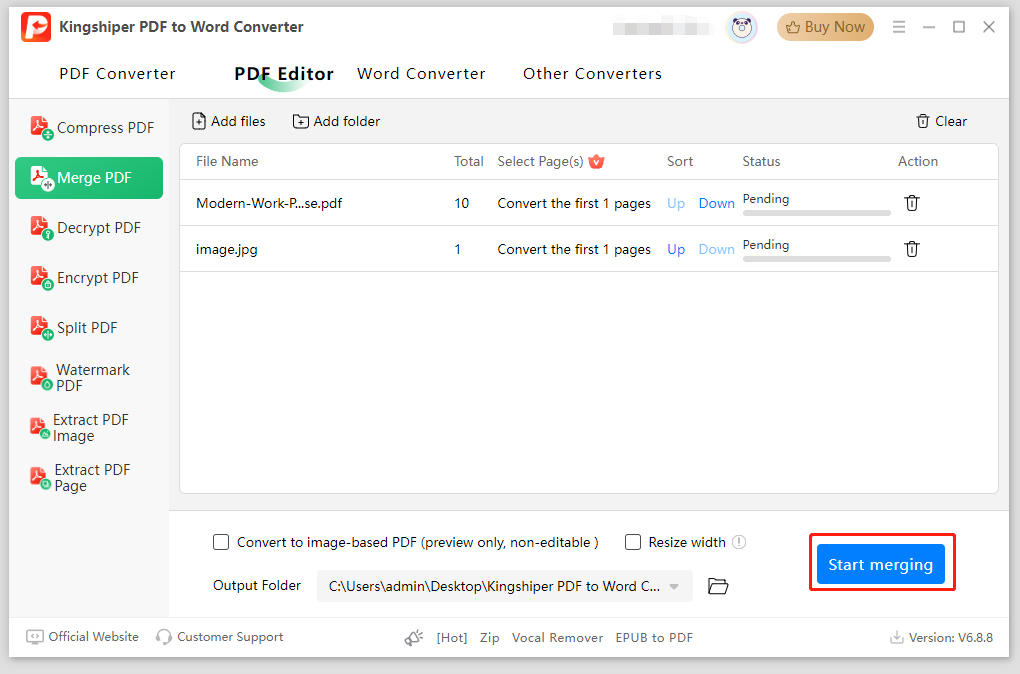
Step 2. (Optional) Choose "Convert to image-based PDF (preview only, non-editable)" and "Resize width." You can tick them selectively of course.
Step 3. Select an output folder.
Step 4. Click "Start merging."
2.2.3 Decrypt PDF
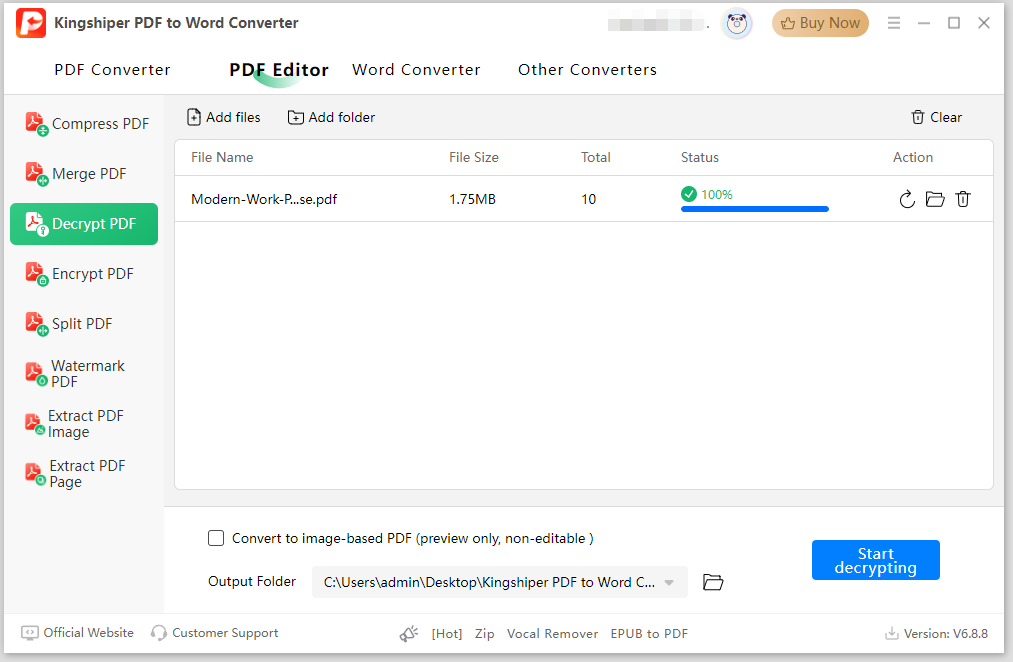
Decrypting a PDF removes any password protection or encryption applied to the file, allowing users to access, edit, copy, or print the document without restrictions.
Steps to decrypt a PDF are simple. Firstly, add the PDF. Next, choose the folder you want to export the file. Lastly, click "Start decrypting."
2.2.4 Encrypt PDF
PDF encryption helps securing the file with adding a password. This prevents unauthorized viewing, editing, or printing, thereby protecting sensitive information.
Step 1. As you add a PDF, click "Start."
Step 2. You will see a pop-up window for entering a password.
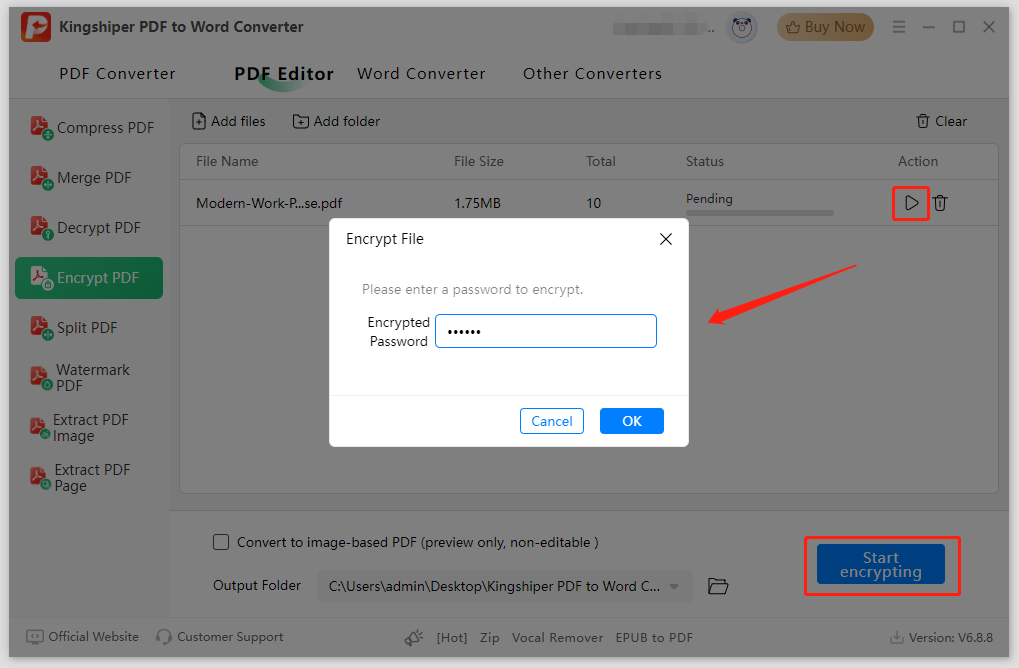
Step 3. Click "OK" and the encrypting operation will be done automatically.
2.2.5 Split PDF
You can use this feature to break a large document into smaller, more manageable files.
Step 1. Select a split mode in "Batch Split" after you have added a PDF.
There are two options for the batch operation.
Page Split: save per certain number pages as one PDF.
Custom: use a comma to separate the pages you want to split.
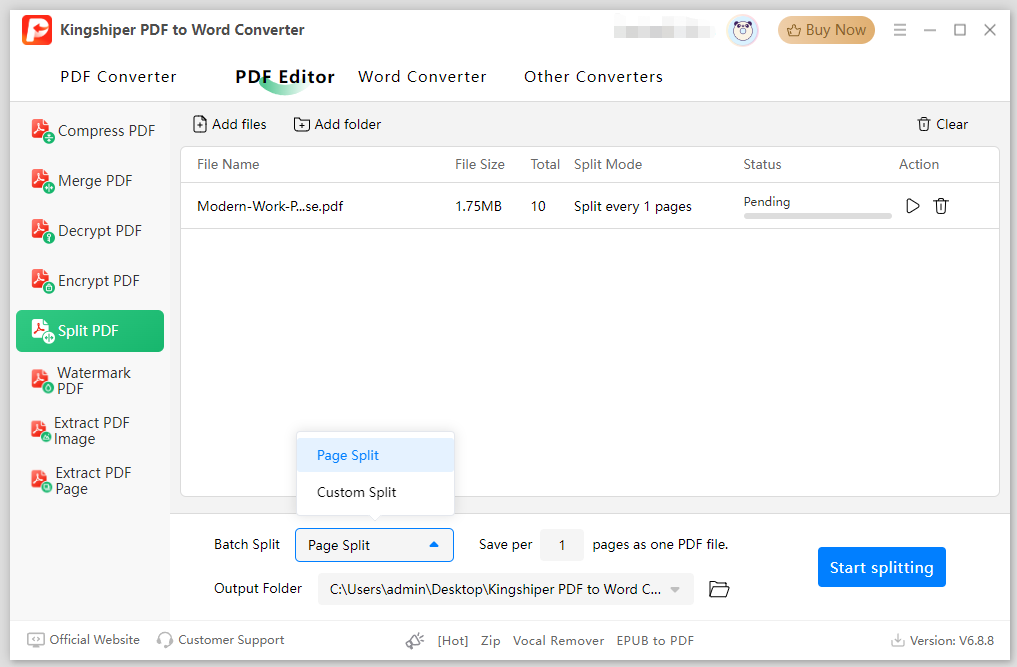
Step 2. Now click the "Start" button after setting the output folder.
2.2.6 Watermark PDF
Adding a visual mark or text to the PDF is necessary for copyright protection and blocking unauthorized use.
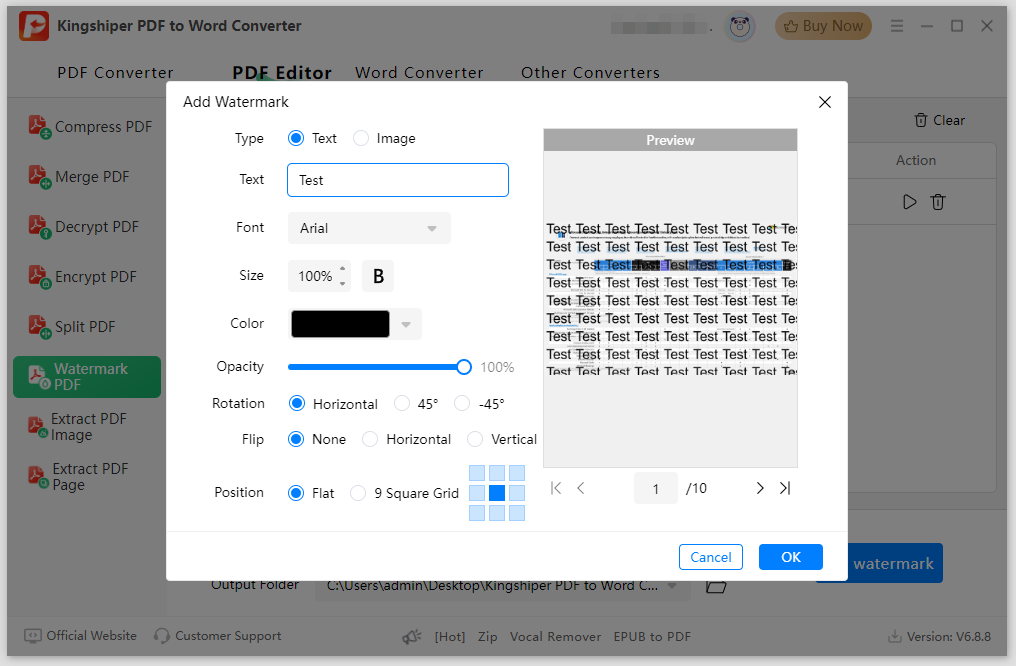
Step 1. Click "Start" or "Set watermark" button to go to the setting window.
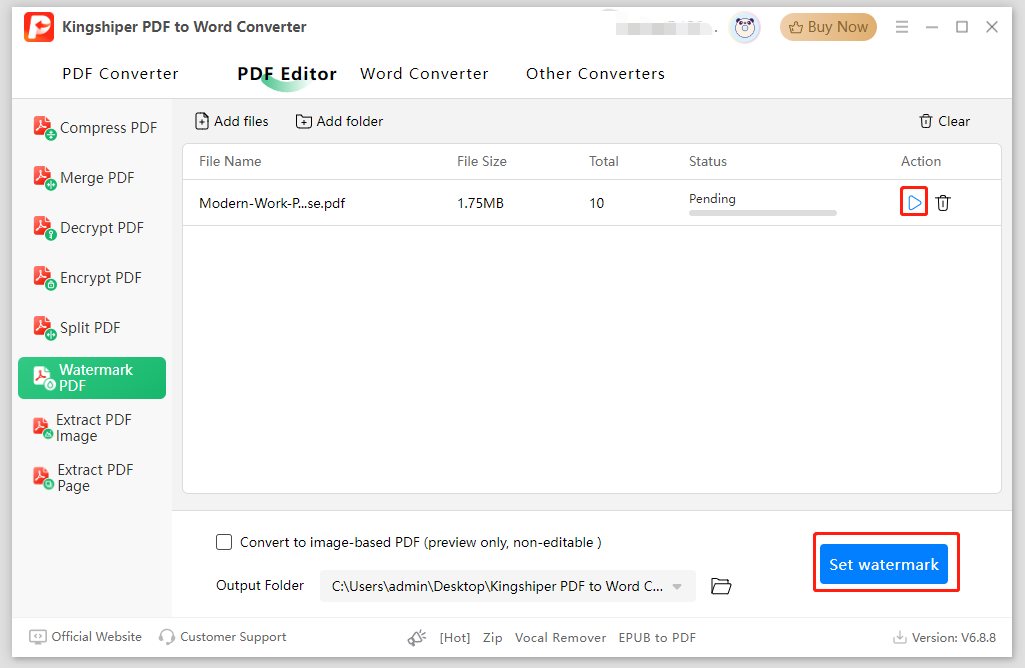
Step 2. Choose a watermark type between "Text" and "Image."
Step 3. For Text watermark, you need to enter the text. Then, select a font you perfer, such as Arial (you can find over 60+ fonts in the menu). Next, set size, bold, color, and opacity. Now, choose how you want the text displayed in the file. In Rotation, you can choose Horizontal, rotate 45° or -45°. In Filp, you can choose None, Horizontal or Vertical. Moreover, you can choose the position.
For image watermark, you need to upload a picture in "Choose Picture." And you're able to set size, opacity, rotation, flip, and position.
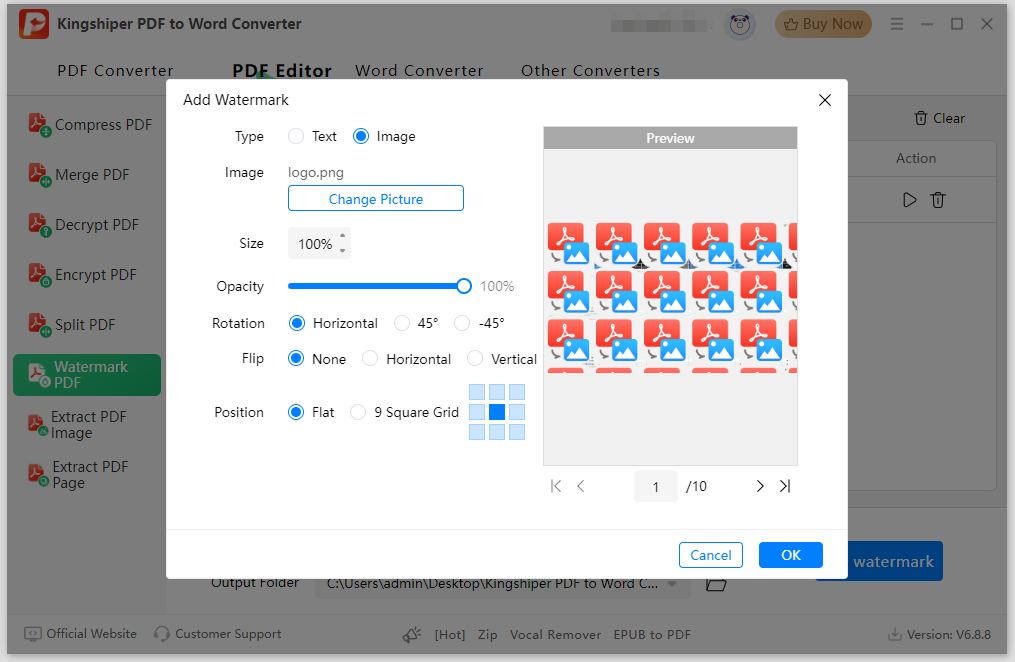
Step 4. To make sure the effect, you can preview the watermark on each page by clicking page-turning buttons under "Preview."
Step 5. Click "Start" again or use "Set watermark."
2.2.7 Extract PDF Image
Step 1. Choose image format from png, jpg or bmp.
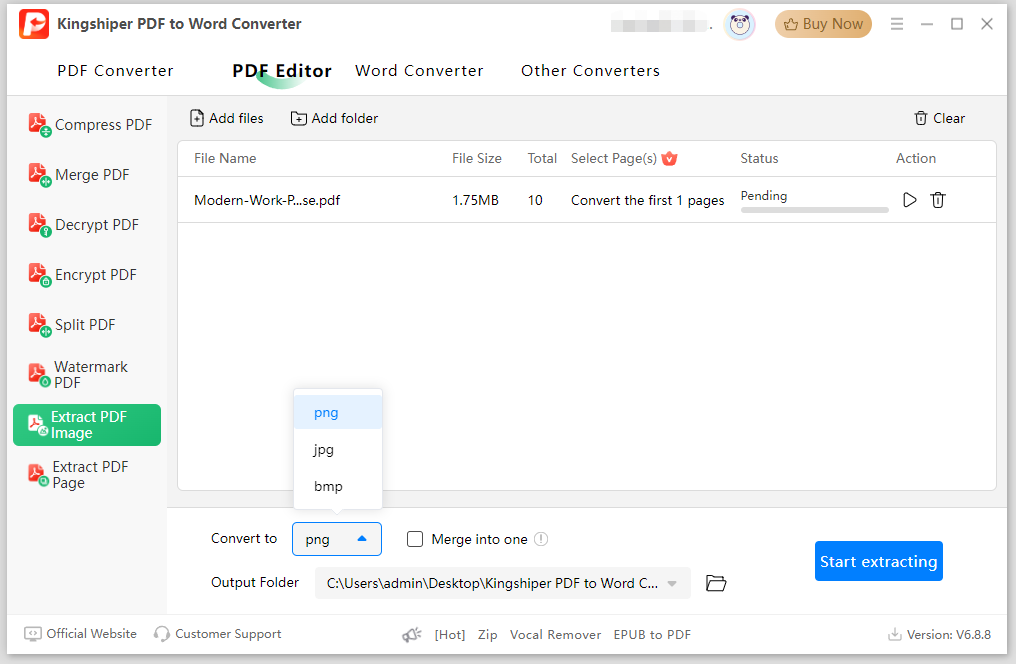
Step 2. (Optional) Select "Merge into one" if you want to combine all extracted images.
Step 3. Click "Start extracting" to proceed.
2.2.8 Extract PDF Page
Step 1. Choose an output method, for example,
Output by page: Create a separate PDF for each page.
Output by file: Create a separate PDF for each file.
Combine into one: Combine all extracted pages into one PDF.
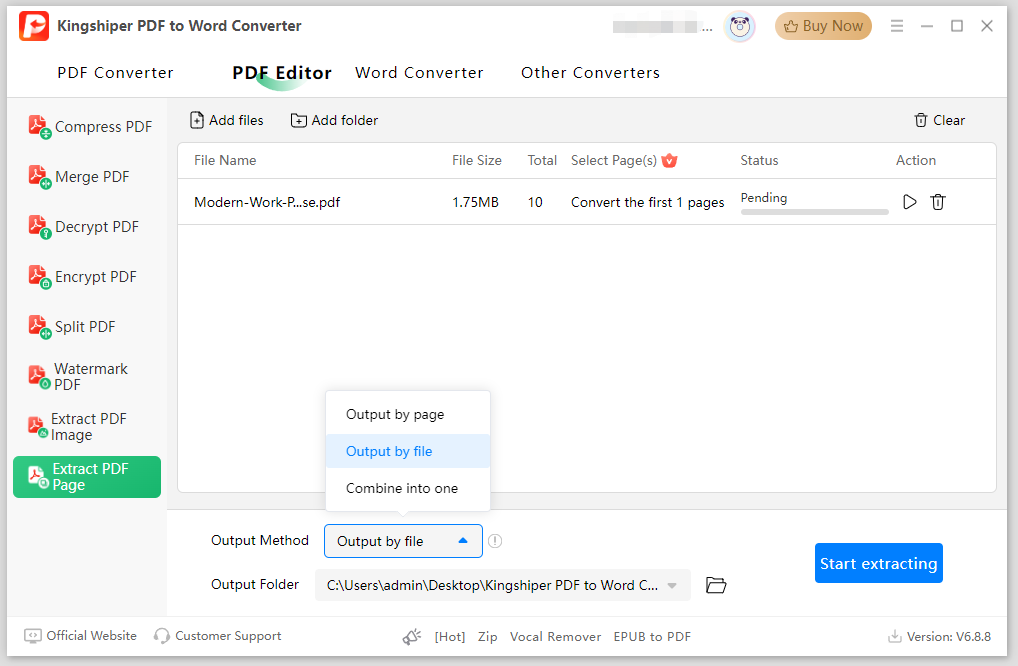
Step 2. Click "Start extracting" to proceed.
2.3 How to Use Word Converter
Whatever you want to convert PPT/Excel to Word or to convert Word to PPT/Excel/Image/HTML/TXT, you can use this feature to convert Word files easily.
Step 1. Add supported files in the corresponding menu bar.
Step 2. Choose the format you want to export.
Step 3. Click "Start" or "Convert" to proceed.
2.4 How to Use Other Converters
In this panel, you're able to convert Excel to PPT and PPT to Excel. Besides, you can turn PPT/Excel to Image, TXT, and HTML.
Steps are similar. Firstly, add files in the right menu. Then, click the convert button to complete the conversion.
Support and Help
If you have any feedback or suggestions on Kingshiper File Manager, please do not hesitate to let us know. We are also enthusiastic about replying to all your questions about using it.
Submit Tickets: https://www.kingshiper.com/contact
Email: [email protected]


 All
All


 All
All


 All
All


 Hot Products


