Got it

6 Latest WAV Recorders to Record WAV File [No Quality Loss]

People usually record audio files in the WAV format due to its lossless sound quality, making it the preferred option for both audio enthusiasts and professionals. If you need to convert audio to WAV format or directly record WAV files, the best way for you is to use some practical WAV Recorders. Below are several methods for recording WAV files:

How to record WAV file on Windows 10:

Step 1. Download and launch Kingshier Screen Recorder.
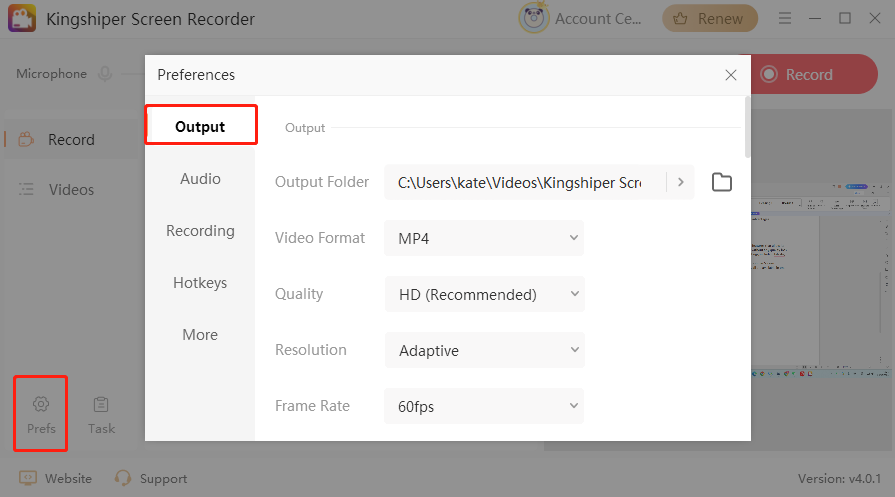
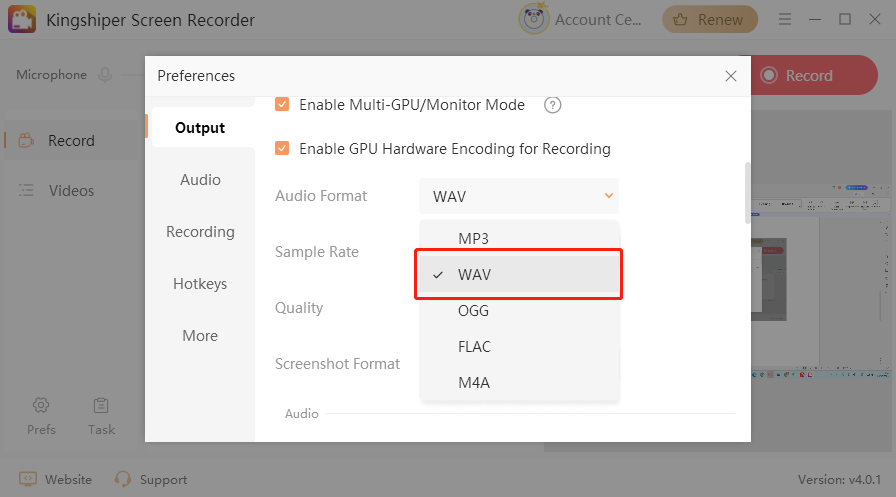
Step 2. Click on the "Prefs" at the bottom left of the interface, find the “Audio Format” option in “Output”, and set it to “WAV” format.
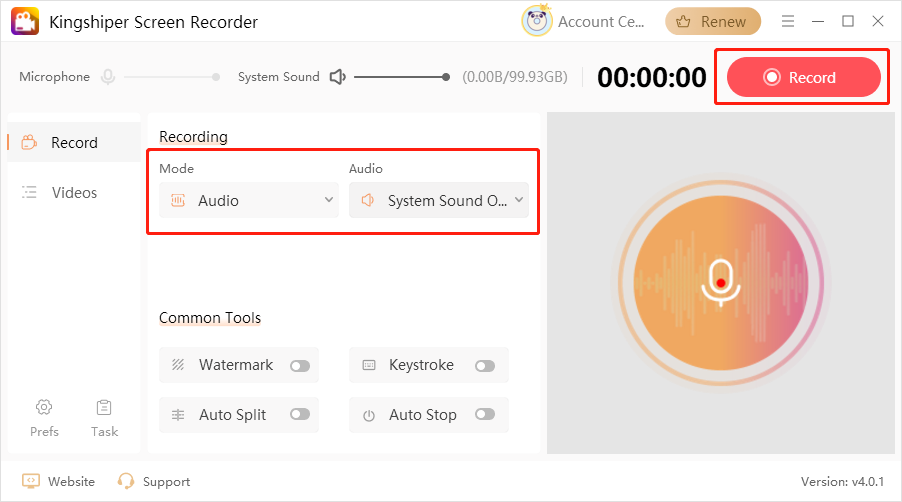
Step 3. Select the Audio on the Recording mode, and choose the sound you want to record, and click "Record" to start recording. Try this lossless WAV recorder now!

This post introduces 5 useful WAV recorders that are compatible with Windows, Mac, and online. Moreover, you know how to record WAV file in each section.

Top 3 Latest WAV Recorders Offline

Here, 3 desktop software are provided for Windows and Mac. Each one has its advantages.

Record WAV File on Windows

2 recorders are provided here to record WAV file on a PC.

1. Kingshiper Screen Recorder

Although Kingshiper Screen Recorder is a screen recording software, it has other features that allow its users to record WAV audio files. With this software, you can record WAV files without any quality loss. Moreover, you can use Kingshiper Screen Recorder to customize recording settings, including bitrate, audio quality, and many more!

Kingshiper Screen Recorder

Official

Download

Besides the audio recorder, you can also record both screen and audio with Kingshiper Screen Recorder. Whether you're recording audio or capturing your computer screen, all are available in one software. Pretty, awesome, isn’t it?

Features of Kingshiper Screen Recorder:

  • Record audio in 5 audio formats, including MP3, WAV, OGG, FLAC, and M4A
  • Record both screen and audio, or audio-only
  • GPU acceleration for faster recording
  • Record screen without any lag
  • Customize output settings for your recorded files

How to record WAV file using Kingshiper Screen Recorder:

Step 1. Go to “Prefs” and choose the “Output” setting on the left sidebar.

kingshiper-screen-wav-recorder

Step 2. Scroll down and set the “WAV” in the “Audio Format”. Once all settings are done, you can close the window.

kingshiper-screen-wav-recorder-2

Step 3. In the recording mode, select "Audio" mode. Choose the audio or microphone sound you wish to record. Then, click the "Record" button.

kingshiper-screen-wav-recorder-3

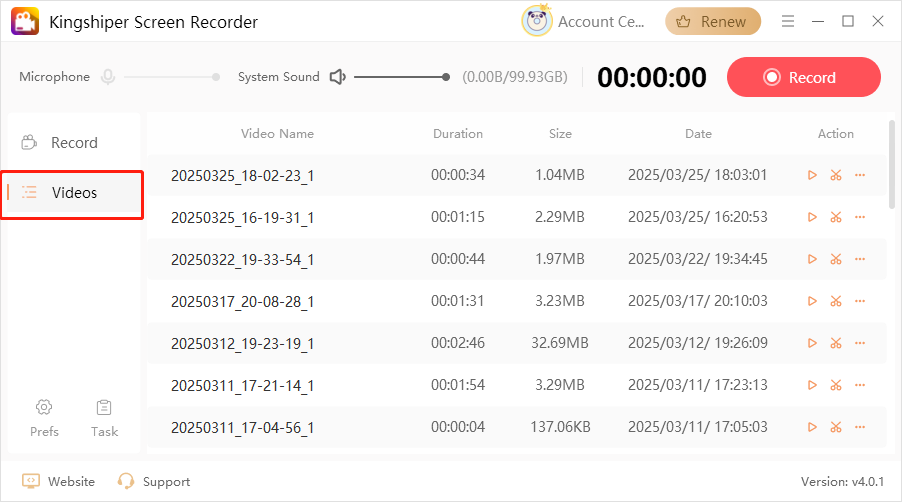
Step 4. When the recording is done, you can view the recorded audio in the “Videos” tab.

kingshiper-screen-wav-recorder-4

2. Kingshiper Voice Recorder

Kingshiper Voice Recorder is a real-time audio recorder that enables you to record the microphone, system sound, and other external audio. It provides features such as scheduled recording, microphone boost and noise enhancement, and sound checker before recording. It is a comprehensive and professional recording software.

Kingshiper Voice Recorder

Official

Download

Features:

  • Best audio converter with advanced features
  • Change voice in real time during recording
  • Multiple audio formats are supported

How to use Kingshiper Voice Recorder as WAV recorder:

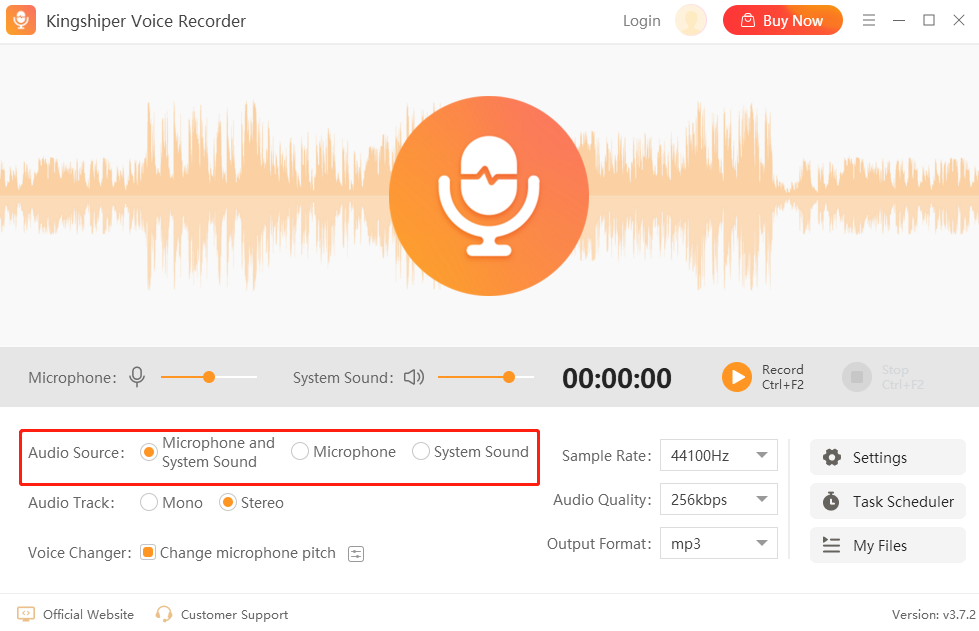
Step 1. Open the Kingshiper Voice Recorder on your Windows computer. Choose the audio you want to record in the Audio Source. Moreover, you can adjust the Audio Track or Voice Changer as needed.

kingshiper-voice-recorder-1

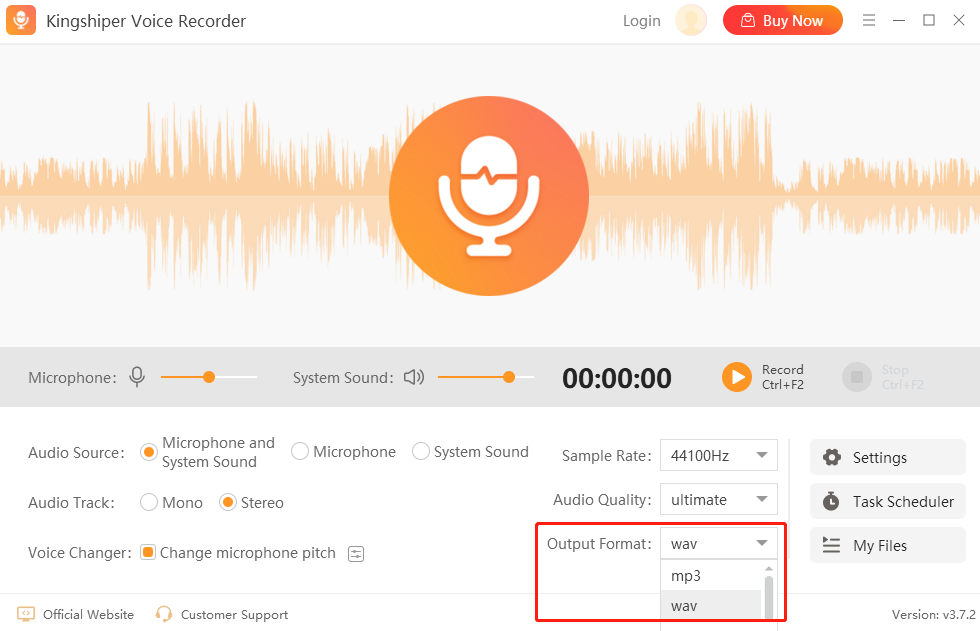
Step 2. Go to the “Output Format” to set the audio file in “WAV” format. You can also click on the “Settings” to adjust more advanced features.

kingshiper-voice-recorder-2

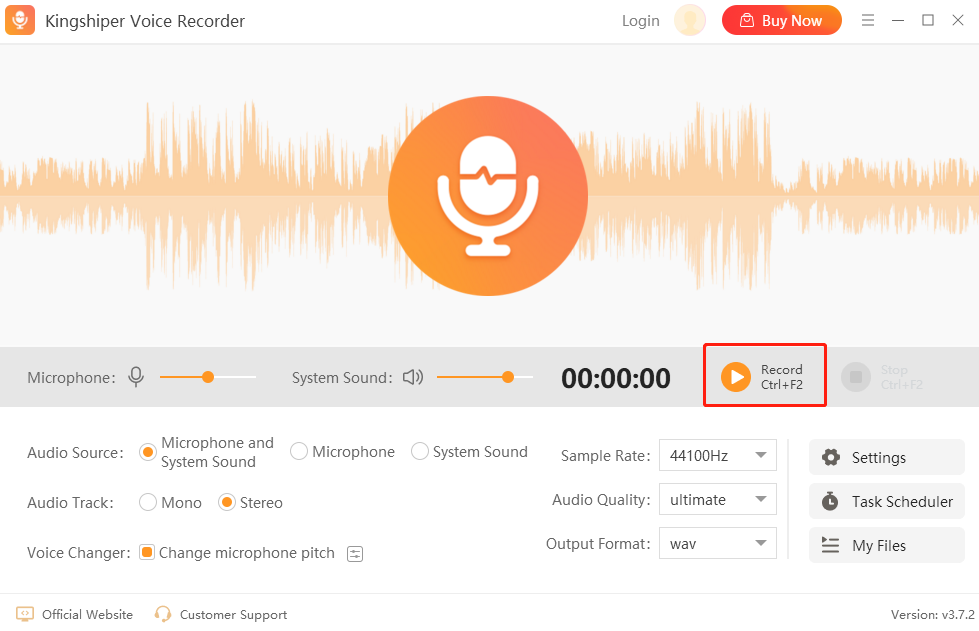
Step 3. When everything is in the right way, click on the “Record” or press “Ctrl + F2” to record the audio.

kingshiper-voice-recorder-3

Record WAV File on Mac

If you are a Mac user, you can also record audio in lossless WAV with a lot of freeware. Here we will show you an open-source freeware - Audacity, and detail on how to record WAV file on your Mac computer. As an easy to use audio recorder, it is intuitive to use and keeps the original sound quality perfectly.

Features:

  • Record audio in multitrack
  • Best free recorder for Mac
  • Combines recording, editing, and mixing features
  • Supports WAV recording with up to 32-bit/384kHz sample rate

Steps to Record WAV Files with Audacity on Mac:

Step 1. Download and install Audacity on Mac. Launch the software, click the “Record” button.

Step 2. Once done, click on the “Stop” button. Go to the “File” > “Export Audio” > “Export to computer”.

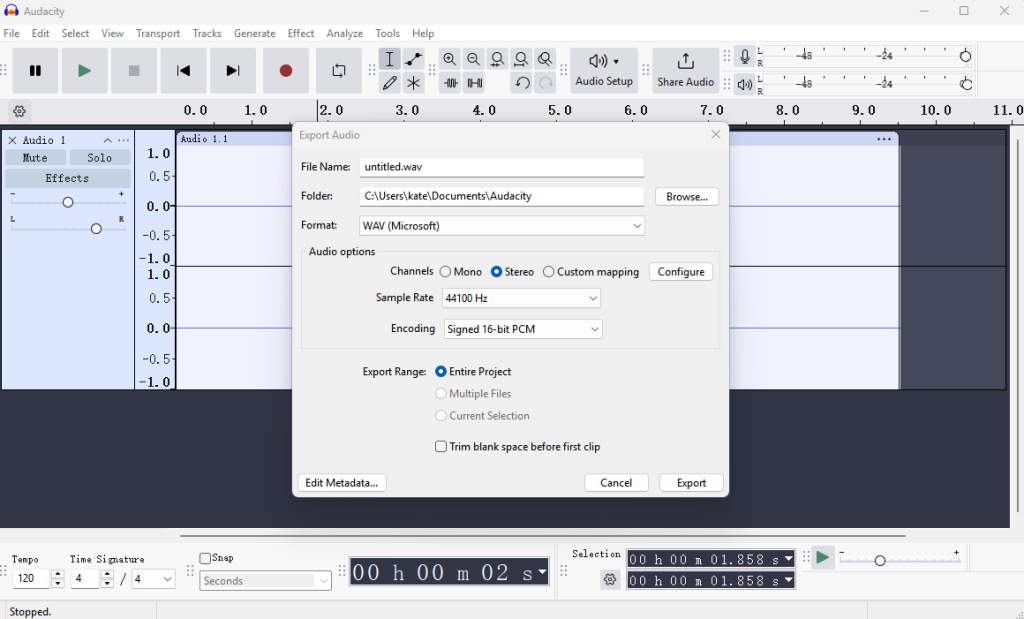
Step 3. In the Export Audio window, select the WAV (Microsoft) in the “Format” option and click “Export” to save it on your computer.

audacity-wav-recorder

Top 3 WAV Recorders Online

Three conversions are introduced in this part. Choose one of them if you want to record online.

Top 1Aspose Audio Recorder

When you need to record WAV file in your browser, you can use one of the many online WAV recorder tools to get this job done. Aspose Audio Recorder is an online audio recorder that you cannot miss. It enables you to record WAV files on any device, which is suitable for quickly recording professional audio like meetings, interviews, or music creation.

Features:

  • High-quality WAV audio recording
  • Cloud storage with multi-platform synchronization

How to record WAV file online:

Step 1. Head over to the Aspose Online Audio Recorder website.

Step 2. Grant the microphone access.

Step 3. Choose to save as “WAV” format and click on the “Start Recording”.

aspose-wav-recorder

Top 2Reverb Online Voice Recorder

The second recommended online tool is Reverb, which is known for its simple interface and seamless WAV recording. It's smart algorithms automatically enhance voice quality and even offer multi-track mixing for more advanced audio projects.

Features:

  • AI-powered noise reduction and echo cancellation
  • Share audio to Spotify or YouTube platforms in one click

Here is the detailed tutorial:

Step 1. Go to the Reverb website and tap on the “RECORD NOW”, sign in with your Google account.

Step 2. Click on the “START RECORDING” icon to record the audio.

Step 3. When you’ve finished, click “STOP RECORDING” and download it as a “WAV” format.

reverb-wav-recorder

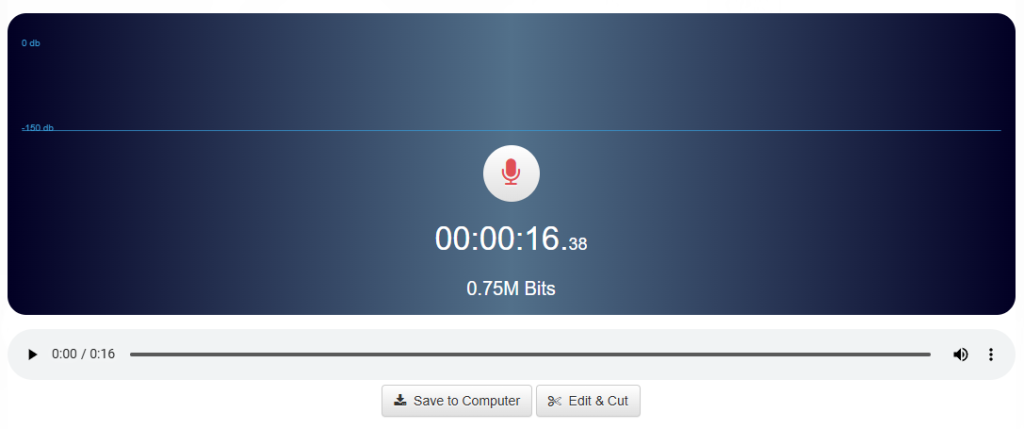
Top 3Online Voice Recorder & Cutter

The last option we suggest is to use Online Voice Recorder & Cutter, which combines both recording and editing features. After recording, you can export the file as a WAV, then continue to use the tool to trim the audio or add fade-in and fade-out effects. 

Features:

  • Unlimited WAV recording
  • Built-in audio recorder and editor

Look at the step-by-step guide below:

Step 1. Search for “Online Voice Recorder & Cutter” on Google and open the website.

Step 2. Click on the red “Record” button. Once finished, click on the square stop button.

Step 3. Click “Save to Computer” and export it as a “WAV” output format.

online-wav-recorder

Final Words

Above are all the latest and best WAV recorders that can help you record WAV file without any quality loss. All of the programs and methods we've discussed have their own pros and cons. To help you make a more informed decision, we've written their key features and steps for each tool.

However, if you want to pick the best option, then go for Kingshiper Screen Recorder. It's easy to master and enables you to record WAV audio file. In addition, it has many other perks, like video recording and webcam recording.

Latest Articles