Multimedia Tools
Video Tools
Audio Tools
Image tools
Record and Edit Porfessional Videos on Mac
Windows Desktop Screen Recording Software
Easy and Fast Way to Compress Video and GIF
Screen Mirroring App for iPhone/Android/PC/Pad
All-in-one video toolkit that supports converting over 1000+ formats
Portable audio format converter, which supports common audio format conversion, multiple audio merging, audio compression, audio segmentation, and one click batch conversion of audio formats
Karaoke Maker and Vocal Extractor on Mac
Cut, copy, paste, insert audio, add effects and other editing functions, which can easily re edit the recorded audio files and make ringtones, adding a unique personality to your life.
Extract vocals and instrumentals from any audio and video track with the latest AI technology.
Best Voice Recording Software for All Windows Users
Convert Audio/Video to MP3/WAV/FLAC/OGG
Utilities
Office Utilities
Simple and powerful office solution for file compression, extraction, transferring, and sharing. Easily to process multiple files in seconds!
A powerful, simple and easy to operate PDF to word converter, which supports the conversion between PDF documents and multiple formats such as doc, ppt, pictures and txt documents; The software has the functions of fast conversion, batch conversion, high-quality identification, etc
Fast Way to Reduce Your File Size
The best and perfect tool to convert various ebook files with ease.
Convert Videos, Audios, Images, PDFs, and Word with Ease
Seamless Conversion for PDF to JPG & JPG to PDF
Shrink size of PDFs, images, and videos without losing quality
Extract & Manage & Compress Files in Seconds
System & Recovery
Explore these four ways to screen record browser tabs. Whether you're looking for solutions to record just one single tab, one window while doing other tasks, or a certain area of the browser, you get tools and how-to guide here. Pros and cons of each tools are included.
More, browser setup tips for optimal audio recording are included at the end.
Simple shortcuts or just a few taps, you can screen record a browser with convenience using the device native recorder. They often integrate well with the OS, with less compatibility issues and optimal video quality.
This Method is Ideal for:
● Full screen capture of the browser.
● Free, without time limit and watermark.
● No installation, skip memory-heavy installs.
● Basic capture capabilities but with high-quality.
Factors Against:
● Possibly fail to capture audio if DRM or security measures are in place.
● Limited recording mode.
● Sharing is tough, especially large files.
If you find that you prioritize convenience and just for basic needs, built-in screen recorders are for browser tab recording. Check the shortcuts based on your device system.
Device OS | Built-in Screen Recorder | Shortcut |
Win 10/11 | Xbox Game Bar | ▷ Win + G: to open ▷ Win + Alt + R: to record/stop ▷ Win + Alt + Print Screen: to screenshot |
macOS | a. Screenshot Toolbar b. QuickTime Player (No default shortcut) | Shift + Command + 5 |
ChromeOS | Screen Capture Tool | ▷ Shift + Ctrl + Show windows key: to open ▷ Search + Shift + X: to stop |
Android 10+ | Native Screen Recorder | Quick Settings > Tap |
iOS / iPadOS | Screen Recording | Control Center > Tap |
To start browser tab recording, for example, to record Chrome tab, you can open it first, and then press the shortcut key.
Web-based screen recorders are also good choices to go. Similarly, these tools are very convenient - instant use upon page opening, no account needed.
Online screen recorders leverage browser APIs which allow them to access your browser content as well as your device screen, and capture video and audio streams in real-time.
To record browser tab with online screen recorder, 3 steps are enough. Here is an example for recording Chrome tab.
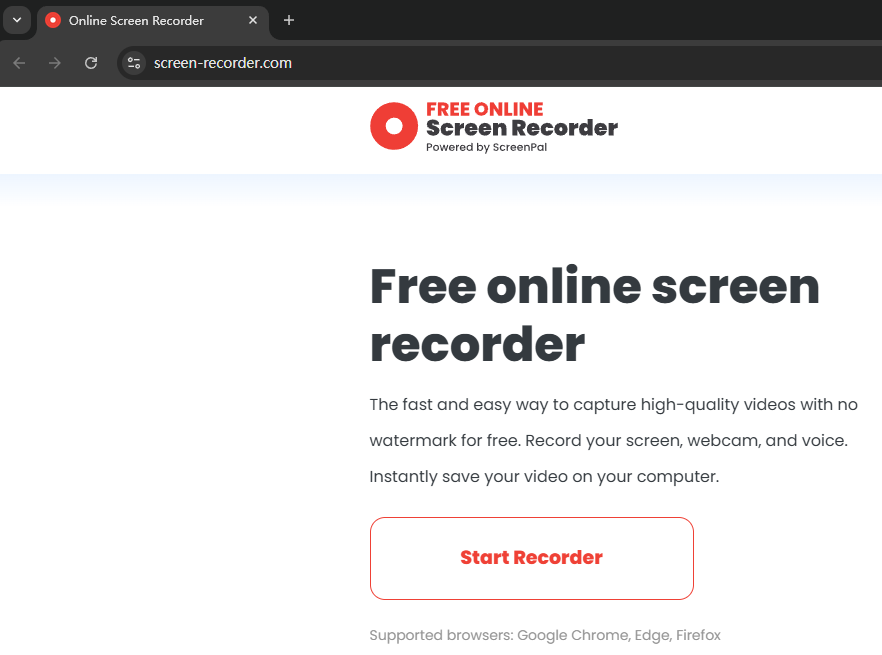
Step 1. Go to an online screen recorder website and click Start.
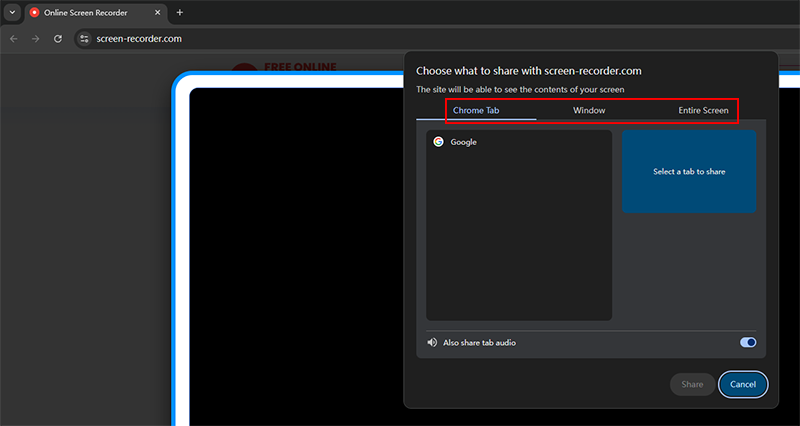
Step 2. Choose a tab, window, or entire screen from the pop-up window to share.
This action will give permissions to the tool in order to capture the screen and audio.
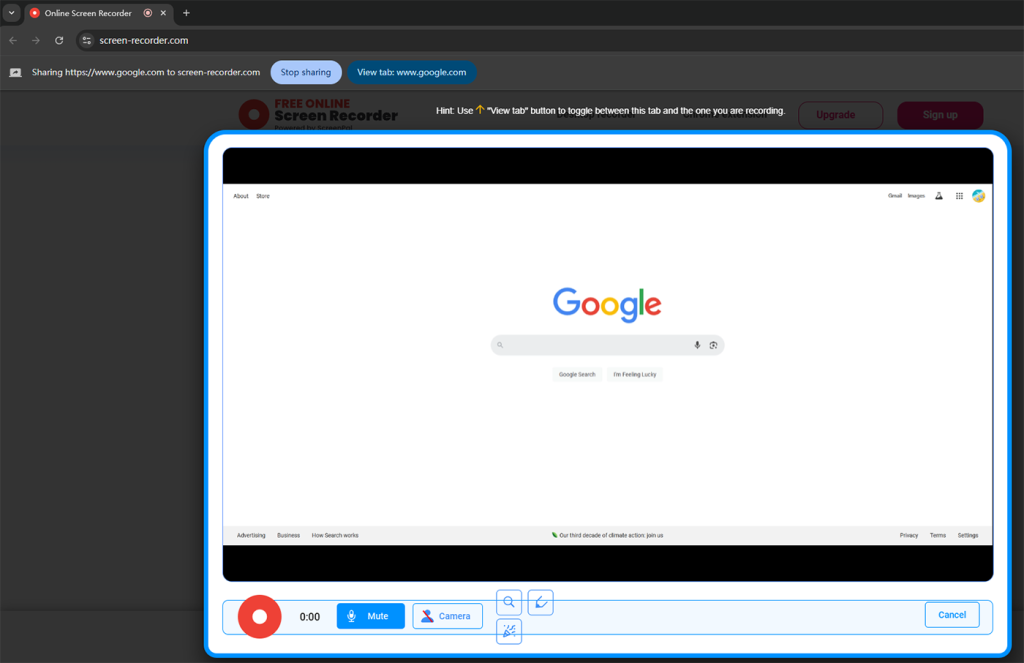
Step 3. The capture area will show up the tab you choose. Click the record button to start.
Popular online screen recorders includes ScreenPal, Screen Capture by Movavi, and VEED. Tools follow largely the same steps.
This Method is Ideal for:
● Flexible capture sources; available for a specific tab, the browser application window, the entiren device screen, or even the webcam (depend on tools).
● Free, no signup, and installation.
● Downlaod the file locally or upload to the cloud.
● No need to consider device systems or types.
Factors Against:
● Limit duration.
● Rely on stable internet.
● Trouble handling high-resolution or long-duration recordings.
To record only a tab while doing other tasks on the same browser, like opening or searching in another tab, it works. Recording will not pause when you switch.
But, if you need high-quality video, or need to record for a long time, online screen recorders may not be your best option.
For Chrome tab recording, consider an extension. The setup is simple. And many extensions will automatically save recordings to the cloud and give you a shareable link.
Recommendations: Screencastify, Loom, Movavi Screen Recorder for Chrome, and more.
This Method is Ideal for:
● Record Chrome tab.
● Record only the tab; won’t accidentally record notifications on desktop.
● Easy sharing with generated links.
Factors Against:
● Only basic recording options.
● Limited settings.
Prefer advanced screen recording capabilities? A screen recorder program is what you need.
Some desire effects like: record multiple browser tabs simultaneously; customizable screen area without a toolbar or something; adjust resolutions or file format; editing, trimming or cropping; etc.
With a powerful software, things couldn't be easier. Here are two tools you can use.
This tool is available for custom area recording, picture-in-picture recording, and scheduled recording. And you can use it on Windows or Mac devices.
How to use Kingshiper to record browser tab?
Step 1: Install the software on your computer and launch it.
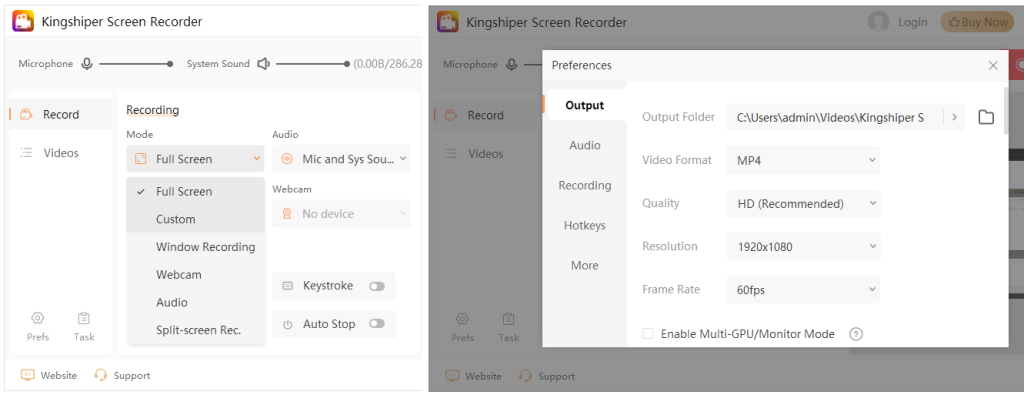
Step 2: Configure these settings to bring a quality video:
○ Audio - select Mic & System Sound
○ Video Format - use MP4 or AVI
○ Quality - choose HD
○ Resolution: choose 1920×1080 or 2560×1440 (2k)
○ Frame Rate: 60 fps or above
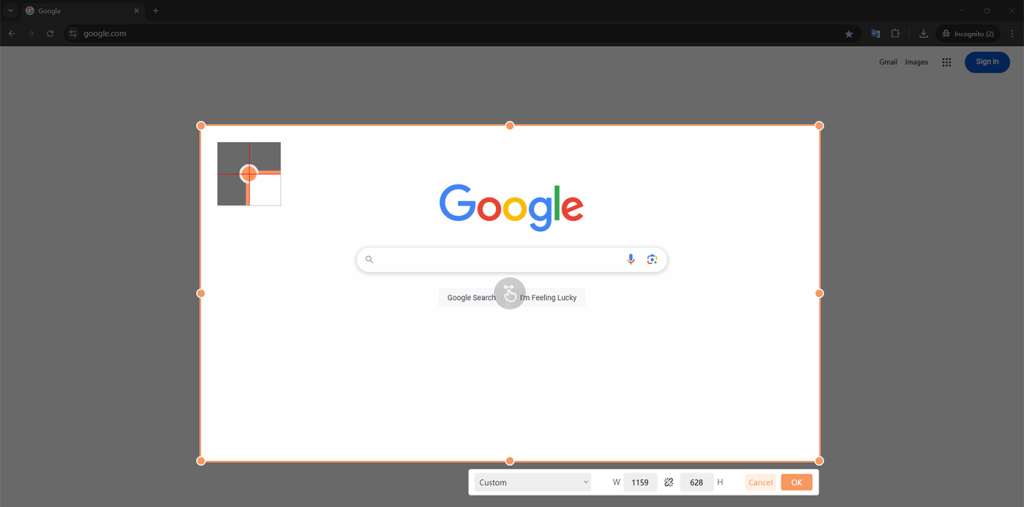
Step 3: Open the browser and choose Custom in Kingshiper.
You will see a window for adjusting capture area. Here you can decide what to record.
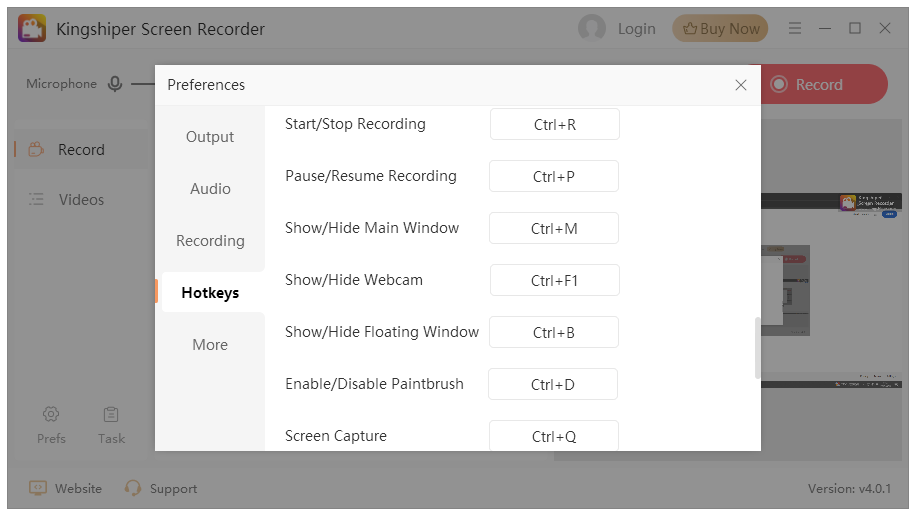
Step 4: Press the Record button or use hotkey "Ctr +R" to start.
Why choose Kingshiper:
● Multiple recording mode
● Capture both system and mic audio sound
● Support high resolution up to 2048x1024
● Auto start or stop recording possible
● Basic editing feature such as watermark, mouse click effect, etc
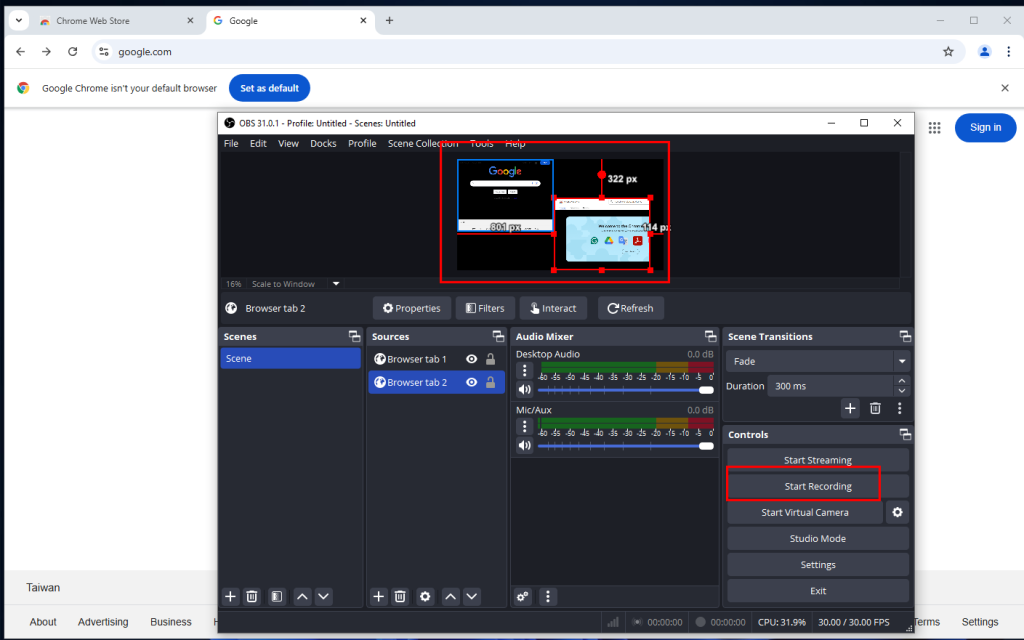
OBS is a free and open-source tool that combine streaming and recording features. It provides powerful capture options to help record multiple tabs of your browser. More, you can record different video and audio sources at the same time as well. Its preview area is able to manage them.
How to use OBS to reccord multiple browser tabs?
Step 1: Open the tabs in one window or separately.
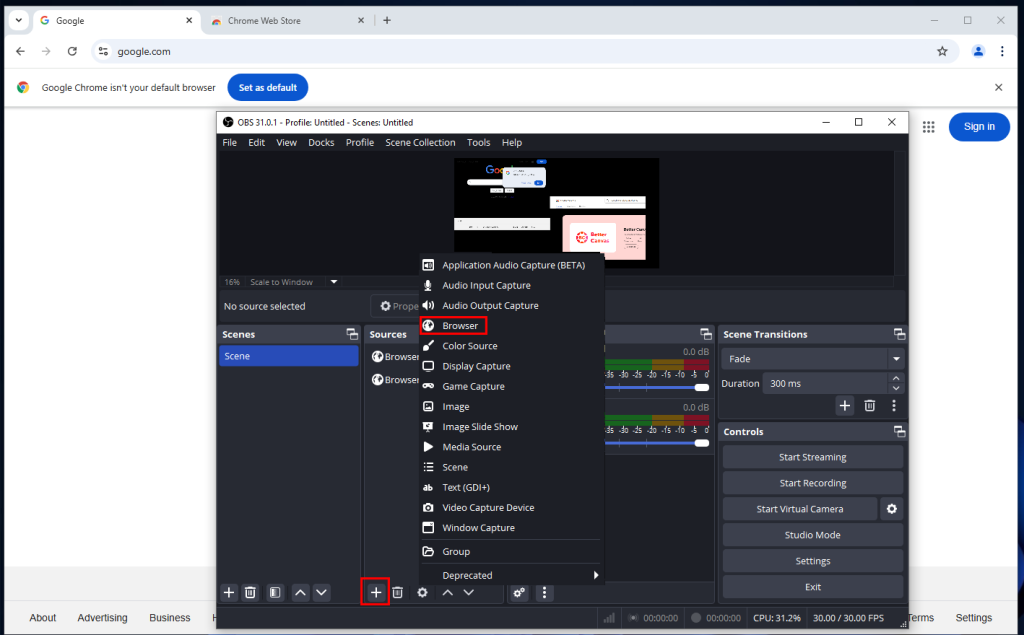
Step 2: Open OBS > Sources > click +.
Step 3: Select Browser > Name it as tab 1.
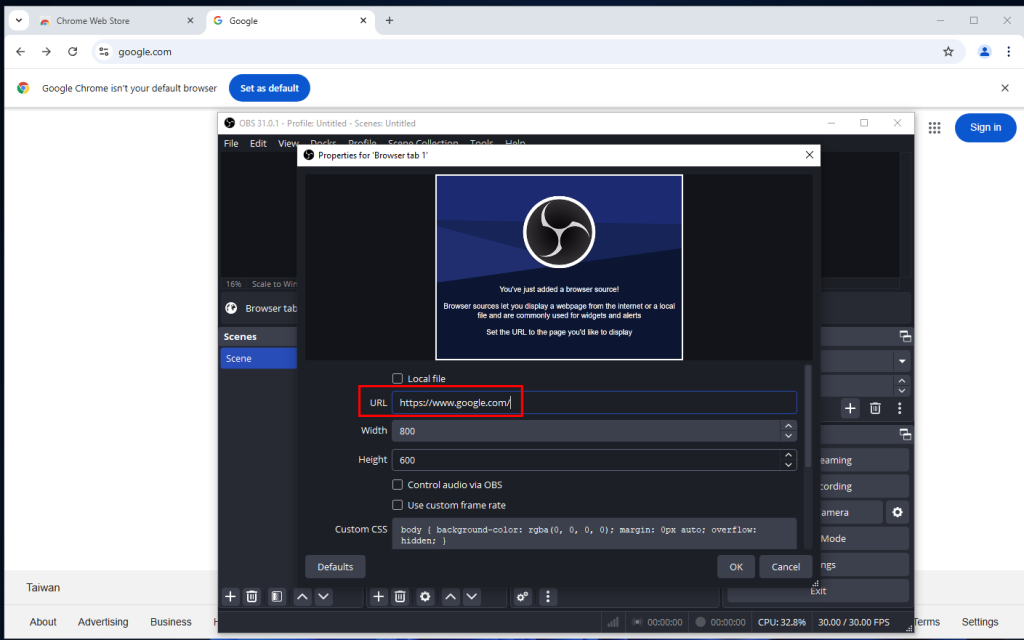
Step 4: Enter the URL in the window. Then click OK.
Step 5: Repeat the previous step. This time, name it tab 2 and enter another URL.
Step 6: Rezie these two browser capture sources in the preview area.
Step 7: Click Start Recording.
This Method is Ideal for:
● Advanced recroding needs; with basic editing features.
● Available to catpure multiple sources at the same time and record.
● Audio control possible.
● High-quality output settings and format settings.
Factors Against:
● Overkill for simple tasks.
● Use more CPU and RAM.
Browsers like Chrome, especially on macOS, can’t just start recording immediately. Without permissions, even if the browser is working fine, you’ll see a black screen or record no sound.
To avoid potential issues, you can follow these steps.
a. Allow Camera and Microphone Access in Browser Settings.
In Chrome, go to Settings > Privacy and security > Site Settings > Camera/Microphone > set the permission to Allow.
In Edge, go to Settings > Cookies and site permissions > All sites, find the site, and ensure Camera and Microphone are allowed.
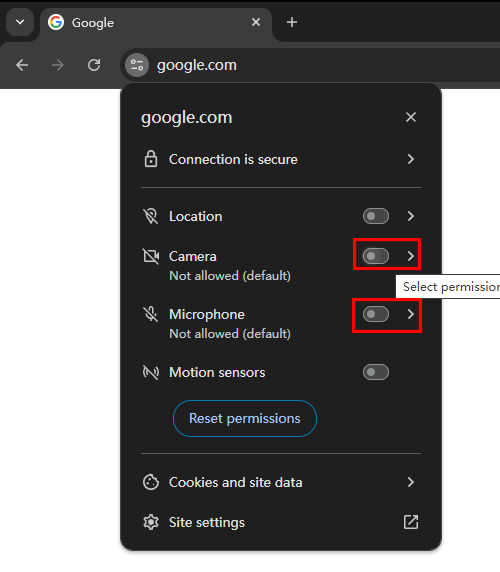
b. Grant Permissions for a Specific Website.
Take Chrome browser as an example.
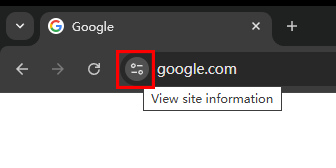
When you open a website in the tab, there is a circular icon in front of the URL.
Click it, the "View site information" button.
Turn on the toggles for camera and microphone.