Multimedia Tools
Video Tools
Audio Tools
Image tools
Record and Edit Porfessional Videos on Mac
Windows Desktop Screen Recording Software
Easy and Fast Way to Compress Video and GIF
Screen Mirroring App for iPhone/Android/PC/Pad
All-in-one video toolkit that supports converting over 1000+ formats
Portable audio format converter, which supports common audio format conversion, multiple audio merging, audio compression, audio segmentation, and one click batch conversion of audio formats
Cut, copy, paste, insert audio, add effects and other editing functions, which can easily re edit the recorded audio files and make ringtones, adding a unique personality to your life.
Karaoke Maker and Vocal Extractor on Mac
Extract vocals and instrumentals from any audio and video track with the latest AI technology.
Best Voice Recording Software for All Windows Users
Convert Audio/Video to MP3/WAV/FLAC/OGG
Utilities
Office Utilities
Simple and powerful office solution for file compression, extraction, transferring, and sharing. Easily to process multiple files in seconds!
A powerful, simple and easy to operate PDF to word converter, which supports the conversion between PDF documents and multiple formats such as doc, ppt, pictures and txt documents; The software has the functions of fast conversion, batch conversion, high-quality identification, etc
Fast Way to Reduce Your File Size
The best and perfect tool to convert various ebook files with ease.
Convert Videos, Audios, Images, PDFs, and Word with Ease
Seamless Conversion for PDF to JPG & JPG to PDF
Shrink size of PDFs, images, and videos without losing quality
Extract & Manage & Compress Files in Seconds
System & Recovery
If you've ever recorded a video on your computer, you’re likely familiar with the convenience of screen recording. Whether it’s capturing gameplay, tutorials, or video conferences, screen recording has become an integral part of our daily lives. Although it might seem complicated at first, the good news is that with today’s technology, there are plenty of tools that make screen recording straightforward and easy to manage.
With the increasing performance of Acer laptops, they now provide different ways to record your screen. Even if you're a beginner, you don’t need to worry, as there are simple methods that can help you screen record on Acer laptop.
Key Takeaways:
● Windows 10/11 comes with built-in tools like Xbox Game Bar and Snipping Tool, which are perfect for basic screen recording needs.
● For more advanced features, professional software like Kingshiper Screen Recorder provides greater control.
● Hardware acceleration settings can have a big impact on the performance of screen recording.
Before we start screen recording on your Acer laptop, there are a few things you should know:
First, you can screen record on Acer laptop primarily using Windows built-in tools. Alternatively, you can use third-party recording software for more customizable features.
While the basic requirements are pretty basic and you should already have them, we recommend double-checking your device compatibility. Below are the essential conditions for different recording methods:
If you don’t want to download a third-party screen recorder on your laptop or you just want to record some simple pictures, you may try the built-in recording function. Below are two common methods to screen record on Acer laptop with the preinstalled recording tool.
To screen record on an Acer laptop, the built-in Snipping Tool in Windows is a simple and practical option. Besides capturing static images or partial screen content, the latest version of Windows 11 also supports screen recording.
Now, follow the steps below to screen record on Acer laptop:
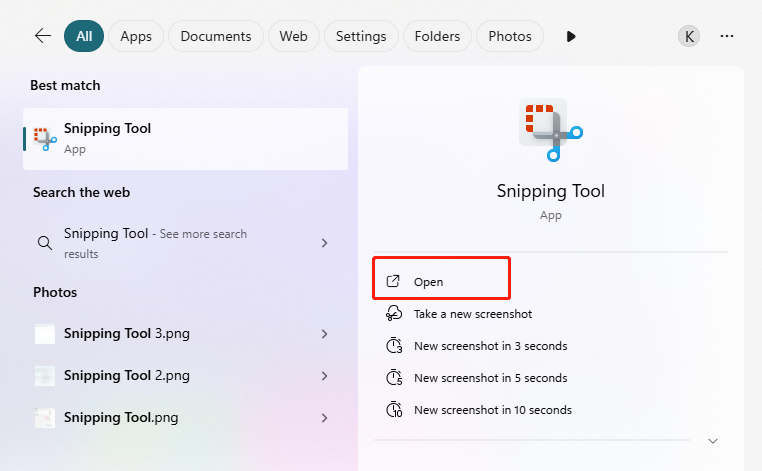
Step 1. Press “Win + S”, search for Snipping Tool, and click on the “Open” button to launch it.
Step 2. In the Snipping Tool window, click on the “Record” option and select “New”.
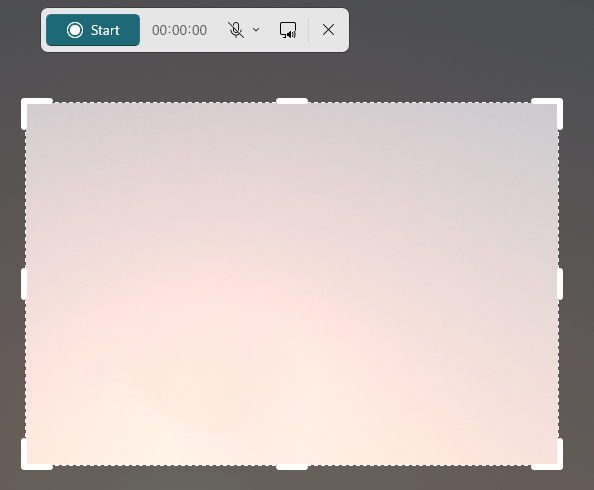
Step 3. Drag your mouse to select the recording area, then click “Start” to begin the recording.
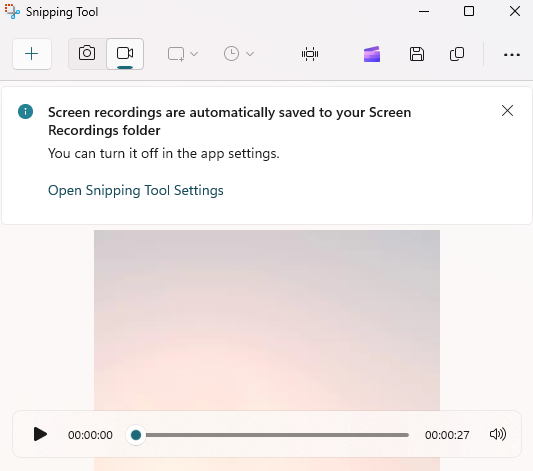
Step 4. Once finished, click “Stop recording”. The recording will be automatically saved, and you can play, edit, or share it easily.
Xbox Game Bar is another great screen recorder on Acer laptops. Unlike other Snipping Tools, Xbox Game Bar integrates a range of powerful features, specifically designed for game recording but equally suitable for capturing any screen activity.
It not only supports quick recording startup but also lets you take real-time screenshots and record audio during the recording. With its deep integration into the Windows system, Xbox Game Bar provides a simple yet efficient recording solution to have a seamless recording experience.
Here’s how you can screen record with Xbox Game Bar:
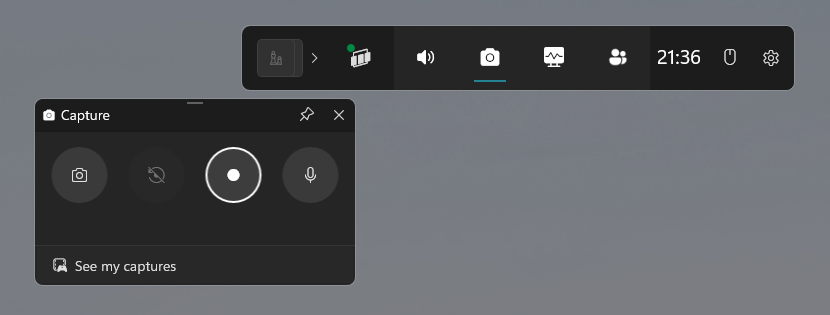
Step 1. Press “Win + G” to open the Xbox Game Bar. Then, click the “Capture” widget in the toolbar.
Step 2. Press “Win + Alt + R” on your keyboard or click the “Start Recording” icon.
Step 3. To stop recording, press “Win + Alt + R” again or click the “Stop Recording” icon in the Capture widget.
Step 4. After stopping the recording, the video file will automatically be saved in the “See my captures” folder.
Tired of searching for a smooth, fast, and high-quality screen recording method on your Acer laptop? Kingshiper Screen Recorder is your ultimate solution. It supports HD recording and works seamlessly on both Mac and Windows devices, capturing every detail with ease. Even better, you can use this screen recorder to record both screen and audio at the same time, edit video in real-time, customize hotkeys, and export the recording in various formats. Unlike other tools, it also features hardware acceleration optimization to ensure a lag-free, frame-perfect recording experience.
How to screen record on Acer laptop with Kingshiper Screen Recorder:
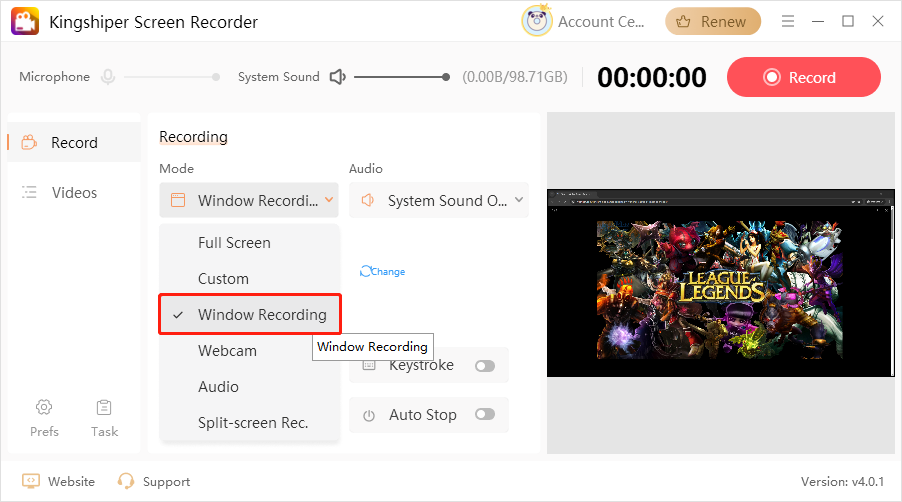
Step 1. Launch “Kingshiper Screen Recorder” and choose your desired recording mode to record your screen. If you want to record a specific window, select “Window Recording”. Then, pick the application in the pop-up window and click “OK”.
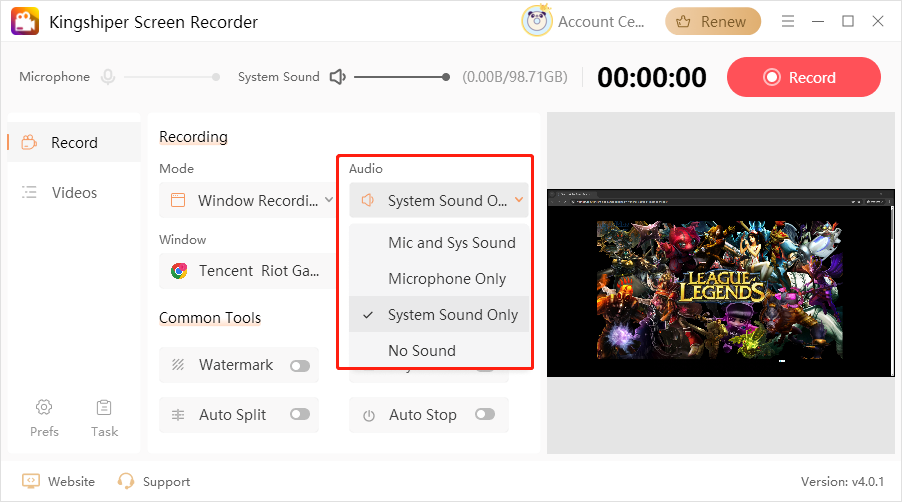
Step 2. (Optional) If you are going to record both screen and audio, choose the audio input in the “Audio” section. You can also choose to record your webcam.
Step 3. Once selected, click on the “Record” button to record your Acer laptop screen. Then click on the corresponding button on it to pause or stop the recording.
Don’t know which method to choose? Don’t worry, we’ve created a comparison table to help you make an easy decision.
Features | Kingshiper Screen Recorder | Windows Built-in Screen Recorder |
Recording Time Limit | ❌ | ❌ |
Scheduled Recording | ✅ | ❌ |
Customize Video/Audio Quality | ✅ | ❌ |
Choose Recording Format | ✅ | ❌ |
Add Custom Watermark | ✅ | ❌ |
Add Annotations | ✅ | ❌ |
Download & Install | ✅ | ❌ |
From the comparison, it’s clear that if you're willing to install third-party software for a higher quality and more customizable screen recording experience on your Acer laptop, Kingshiper Screen Recorder is definitely the better choice. Download it right now!