Multimedia Tools

Video Tools

Audio Tools

Image tools
-

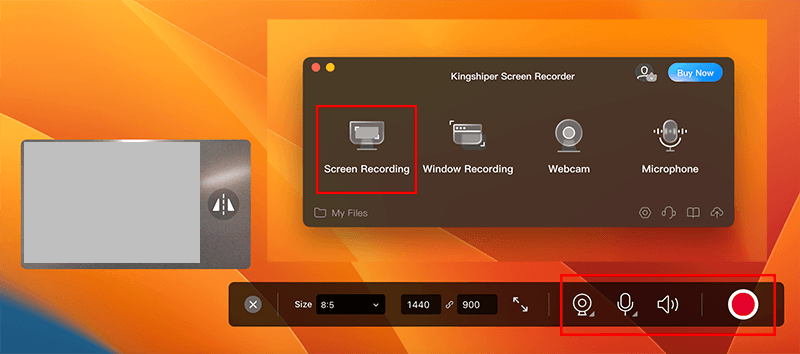
Kingshiper Screen Recorder for Mac
Record and Edit Porfessional Videos on Mac
-

Kingshiper Screen Recorder
Windows Desktop Screen Recording Software
-

Kingshiper Video Compressor
Easy and Fast Way to Compress Video and GIF
-

Kingshiper Screen Mirroring
Screen Mirroring App for iPhone/Android/PC/Pad
-

Kingshiper Video Converter
All-in-one video toolkit that supports converting over 1000+ formats
-

Kingshiper MP3 Converter
Portable audio format converter, which supports common audio format conversion, multiple audio merging, audio compression, audio segmentation, and one click batch conversion of audio formats
-

Kingshiper Audio Editor
Cut, copy, paste, insert audio, add effects and other editing functions, which can easily re edit the recorded audio files and make ringtones, adding a unique personality to your life.
-

Kingshiper Vocal Remover for Mac
Karaoke Maker and Vocal Extractor on Mac
-

Kingshiper Vocal Remover
Extract vocals and instrumentals from any audio and video track with the latest AI technology.
-

Kingshiper Voice Recorder
Best Voice Recording Software for All Windows Users
-

Kingshiper MP3 Converter for Mac
Convert Audio/Video to MP3/WAV/FLAC/OGG


 All
All

Utilities

Office Utilities
-

KingshiperZip
Simple and powerful office solution for file compression, extraction, transferring, and sharing. Easily to process multiple files in seconds!
-

Kingshiper PDF to Word Converter
A powerful, simple and easy to operate PDF to word converter, which supports the conversion between PDF documents and multiple formats such as doc, ppt, pictures and txt documents; The software has the functions of fast conversion, batch conversion, high-quality identification, etc
-

Kingshiper File Compressor
Fast Way to Reduce Your File Size
-

Kingshiper EPUB to PDF Converter
The best and perfect tool to convert various ebook files with ease.
-

Kingshiper File Converter
Convert Videos, Audios, Images, PDFs, and Word with Ease
-

Kingshiper JPG to PDF Converter
Seamless Conversion for PDF to JPG & JPG to PDF
-

Kingshiper PDF File Compressor
Shrink size of PDFs, images, and videos without losing quality
-

Kingshiper File Manager
Extract & Manage & Compress Files in Seconds
All
System & Recovery