[3 Options] How to Eject NTFS Hard Disk Safely on Mac
- Support
- Dynamic News
- Kate
560
- 2023-11-13 14:55:45
NTFS(New Technology File System) is a widely used file system in Windows-based computers. However, When using an NTFS-formatted hard disk on Mac, it's essential to follow proper procedures to ensure data integrity and prevent potential damage. This article will teach you how to safely eject an NTFS hard disk on Mac to minimize the risk of data loss and maintain the health of your storage device.
Option 1: Eject Disk via Kingshiper NTFS for Mac
If your connected volume is an NTFS disk, resorting to a free third-party tool is a good choice. Kingshiper NTFS for Mac is a powerful tool that supports Mac to read, write, mount external storage devices, and safely eject. One click lets you safely remove storage devices.
Click to download Kingshiper NTFS for Mac:
How to safely eject NTFS disk by Kingshiper NTFS for Mac:
Step 1. Open the software on a Mac computer, select the NTFS disk that you want to eject, and click "Eject" in the upper right corner.

Step 2. Click "OK" in the pop-up window and then, the disk is successfully ejected without affecting the saved files and data.

Why you need Kingshiper NTFS for Mac:
1. Fast speed - Edit and save files to external drives at a high speed. No need to wait on Mac.
2. Compatible with multiple storage devices - hard drive, external hard drive, SSD, SD card, etc.
3. Customer Support - Provides professional customer services to help you solve any problems when using.
Option 2: Eject Disk via Desktop
Step 1. Click on the software icon in the top navigation bar on Mac.

Step 2. Select the NTFS disk in the drop-down list of NTFS disks and choose “Eject X(name)”.

Note: The “Eject” here means that the disk will be ejected on Mac. If you need to edit it again, you should connect your disk to the pc before you start it.
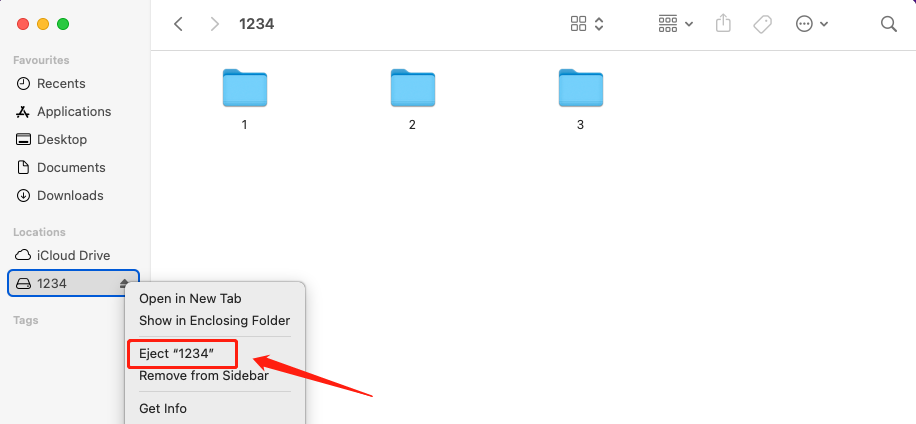
Option 3: Eject Disk Via Finder
Step 1. Open Finder by pressing the "Option+Command+Space" shortcut.
Step 2. Go to “Locations” and the connected external disk will list under that tab. Click the eject icon next to the drive name.

Final Words
Here are three methods to help you safely eject an NTFS disk on a Mac, ensuring the integrity of your data. Choose the method that suits your file type and requirements. If you need to edit the files on the NTFS disk, it is strongly recommended to use the KingShiper NTFS for Mac software for a wonderful and fantastic experience.
You May Also Like
1. How to Eject the NTFS Disks Safely in 2023
2. How to Read NTFS Drive on Mac
3. How to Enter Recovery Mode in Kingshiper NTFS for Mac


