How to Repair NTFS Disks on Mac and Windows? [2023 Updates]
- Support
- Dynamic News
- Kate
1854
- 2023-11-09 13:59:27
When users frequently switch NTFS disks between Mac and Windows computers, it's easy to encounter issues due to the differences in how each operating system handles the NTFS file system. Macs can natively read NTFS disks but cannot write to them without third-party software or tweaks. Therefore, if an NTFS disk is not safely ejected or if there's a write operation interruption when using a third-party tool on a Mac, it could lead to disk errors. These errors might prevent the NTFS disk from being mounted or opened when plugged into either a Mac or a Windows system.
To mitigate these risks, users should always safely eject their NTFS disks and ensure they're using reliable third-party software if they need write access on a Mac. However, if a user encounters an error, there are methods to repair the disk.
Method 1. Repair NTFS disks on Mac
Kingshiper NTFS for Mac is a professional solution designed to bridge the compatibility gap between Mac and NTFS drive. NTFS is the default file system used by Windows operating systems, offering features such as enhanced security, file compression, and larger partition sizes. However, macOS has limited native support for NTFS, often resulting in read-only access to NTFS disks and potential compatibility issues. With Kingshiper NTFS for Mac, users can get full access to read and write NTFS drives, provide partition management and ensure data integrity and prevent data loss. If you're puzzled about these problems, why not download it now and quickly access NTFS disks with one click?
Step 1. Launch Kingshiper NTFS For Mac on your computer.

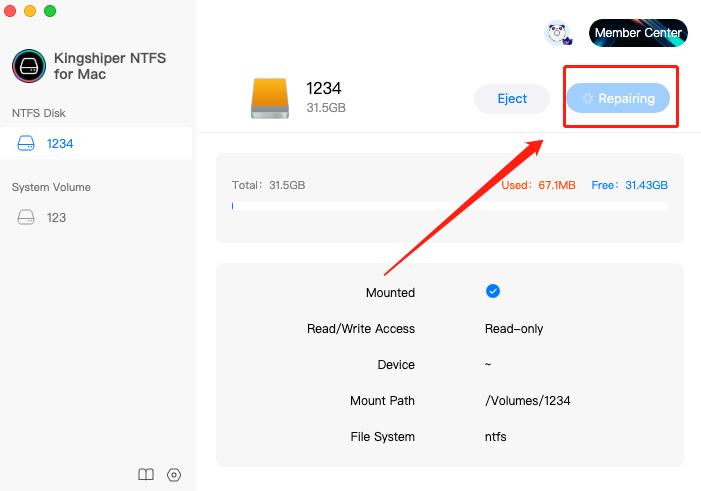
Step 2. Connect the NTFS disk that needs to be repaired with the pc, and then the software will automatically detect and repair the disk, click "OK" in the pop-up windows.

Step 3. As shown in the picture, the "Open" button in the buffer state means that it is repairing now. At this time, remember not to shut down the computer or the software.

Step 4. After the repair is complete, the software can mount and open the NTFS disk normally.

Method 2. Repair NTFS disks on Windows
If the above method has been followed and the disk still cannot be opened, or mounted, or if other error messages are displayed, you may consider attempting to repair NTFS disks on a Windows computer. The process for repairing NTFS disks on Windows is relatively straightforward.
Step 1. Connect the disk to a Windows computer and wait for the system to detect and mount the disk. Once the disk is successfully mounted, you can find it listed in "My Computer" with a corresponding drive letter, such as "Local Disk (D:)".
Step 2. Use the shortcut Win+R to bring up the “Run” dialog box. Type "cmd" in the dialog box and press Enter. This will launch the "Command Prompt" window

Step 3. Type "chkdsk /f D:" (take D disk as an example) in the “Command Prompt”, and then press “Enter”. The repair is starting now...

Final Words
Now you should know how to repair NTFS disks on Mac/Windows. Following these steps and using Kingshiper NTFS for Mac will easily help you effectively troubleshoot and resolve issues related to NTFS disks.
You May Also Like
1. How to Eject the NTFS Disks Safely in 2023
2. How to Check if System Integrity Protection (SIP) is Enabled


