


[4 Methods] How to Use NTFS Drive on Mac 2023
- Support
- Dynamic News
- Kate
 782
782- 2023-11-14 11:16:49


As Mac users, we often find ourselves facing compatibility challenges when working with external storage drives formatted with NTFS (New Technology File System). By default, macOS provides read-only support for NTFS drives, which means you can view files but not write, delete, or modify them. However, with advancements in software and technology, enabling full NTFS drive support on your Mac is now possible. In this article, we will explore four effective methods to enable NTFS to drive support on your Mac in 2023, providing you with the convenience and flexibility to access and manage your files seamlessly.
In this article
Method 1. Enable NTFS Drive on Mac with - Kingshiper NTFS for Mac
Method 2. Enable NTFS Drive on Mac using Terminal
Method 3. Enable NTFS Drive on Mac using FUSE for macOS with NTFS-3G
Method 4. Enable NTFS Drive with Boot Camp Assistant
Method 1. Enable NTFS Drive on Mac with - Kingshiper NTFS for Mac
Kingshiper NTFS for Mac acts as a bridge, effectively removing the limitations that Mac users face when working with NTFS drives. While macOS inherently supports reading from NTFS drives, it falls short in granting write permissions. Kingshiper NTFS for Mac fills this gap by providing a user-friendly interface to enable both read and write access, promoting a smooth data transfer experience.
Step 1. Open Kingshiper NTFS for Mac on your desktop, select the NTFS drive, and click "Open" in the upper right corner.

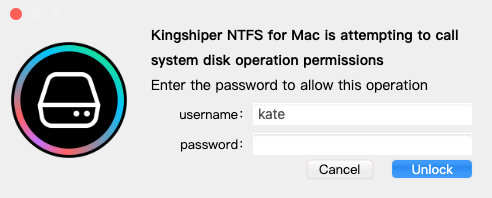
Step 2. Enter the password to allow this operation. Then click “Unlock” to allow Kingshiper NTFS for Mac to get the read/write access.
Step 3. Kingshiper NTFS for Mac will pop up a window to help you Edit the NTFS drive:
After the disk is opened, you can directly edit the file for further operations:
Various formats of files on the NTFS drive can be opened to preview and edit, including common audio and video, PPT, Word, Excel, and other data.
In addition, it is easy to edit, delete, copy, and paste files.

Method 2. Enable NTFS Drive on Mac using Terminal
An intricate yet viable approach to enabling NTFS write support on a Mac involves using the built-in utility called Terminal.
This versatile tool is commonly employed for editing and modifying various aspects of Mac systems and storage devices. With Terminal, you can extend its functionality to make NTFS drives writable on your Mac computer. Below are the steps you can take to finish this task
Step 1. Connect the NTFS disk and Launch Terminal on your Mac.
Step 2. Enter the command: sudo nano /etc/fstab and press Return.
Step 3. Add the following line to the file: LABEL=DRIVE_NAME none ntfs rw,auto,nobrowse (Replace DRIVE_NAME with the name of your NTFS drive.), then press Return.
Step 4. Press Control+O to save and Control+X to exit.
Step 5. In Finder, click Go > Go to Folder > Type: /Volumes, and click "Go" to access it.

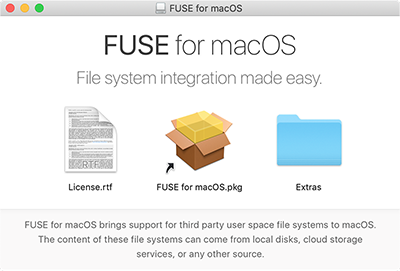
Method 3. Enable NTFS Drive on Mac using FUSE for macOS with NTFS-3G
FUSE (File System in User Space) is an open-source software interface that allows users to create their own file systems without requiring kernel-level code changes. When combined with the NTFS-3G driver, FUSE can be used to enable NTFS to write support on macOS.
Step 1. Go to Finder > Applications > Utilities > Terminal and type: xcode-select --install.
Step 2. Type the following command on the Terminal window and hit the return key: [/usr/bin/ruby -e "$(curl -fsSL <a href="https://raw.githubusercontent.com/Homebrew/install/master/install)/" "="">https://raw.githubusercontent.com/Homebrew/install/master/install)"
Step 3. Install FUSE for macOS and NTFS-3G through the following command: brew install homebrew/fuse/ntfs-3g.
Step 4. Restart your Mac and hold down Command + R until you see the Apple logo.
Step 5. Click Utilities > Terminal, type "csrutil disable" on the Terminal window, and hit Return. Then, reboot your Mac.
Step 6. Go to Finder > Applications > Utilities > Terminal.
Step 7. Run the following command: sudo mv /sbin/mount_ntfs /sbin/mount_ntfs.original sudo ln -s /usr/local/sbin/mount_ntfs /sbin/mount_ntfs.
Step 8. Hit Enter.
Method 4. Enable NTFS Drive with Boot Camp Assistant
An alternative method to gain write access to an NTFS drive on a Mac is through BootCamp. Ideal for experienced Mac users, BootCamp addresses Mac boot-related concerns. To gain NTFS write privileges, users will need to boot their Mac into the Windows operating system. However, it is noted that utilizing BootCamp for NTFS access may erase your Time Machine backups. Ensure you have saved backups of your essential files before proceeding.
Step 1. Go to Finder > Applications > Utilities > Boot Camp Assistant.
Step 2. Launch Bootcamp, click "Continue" and set it to boot into Windows on Mac.
Step 3. Restart the Mac computer and wait for the computer to boot into Windows.
Step 4. Connect the NTFS drive to the Mac computer and then you can access and write to files in the drive.

Final Words
Read and write NTFS drives on Mac in 2023 have become significantly more accessible and user-friendly. On this page, you should know 4 ways to use NTFS drives on your Mac. But the easiest way for you is to use Kingshiper NTFS for Mac which can automatically mount your drive and allow you to edit or do anything without any extra operations. Download it and give it a try now.

You May Also Like
1. Can Mac Read & Write NTFS? 2023 New Guide
2. exFAT vs NTFS: Which is Better
3. [2023 Update] What is NTFS and Why is it useful


