


[2 Methods]How to Format External Hard Drives to NTFS on a Mac
- Support
- Dynamic News
- Kate
 635
635- 2023-11-14 11:17:51


If you're a Mac user who frequently works with external hard drives, you may have encountered compatibility issues when transferring files between your Mac and Windows-based systems. The reason behind this is the difference in file systems used by these two operating systems.
As we all know, external hard drives are versatile storage devices used for various purposes, such as data backup, file storage, and media sharing. While macOS primarily employs the HFS+ or APFS file systems, there are instances where you may need to format an external hard drive to NTFS. New Technology File System is the standard file system used in Windows, and formatting an external drive to NTFS can enhance compatibility, allowing it to be read and written on both Mac and Windows systems. In this post, we will guide you through the process of formatting external hard drives to NTFS on a Mac.

Can I format an External Hard Drive to NTFS?
The answer to whether you can format an external hard drive to NTFS on a Mac is Yes. We can format an external hard drive to NTFS on a Mac, but the process is not as straightforward as it is on a Windows PC. This need arises when you want to use an external hard drive across both Windows and macOS platforms, as NTFS is the default file system for Windows.
Mac computers primarily use the HFS+ or APFS file systems, and while they can read NTFS-formatted drives, they don't offer native write support for NTFS. As a result, you'll need to employ some workarounds to achieve NTFS formatting on a Mac.
Method 1. Use Terminal to Format External Hard Drives
For those who prefer more control or want to format to NTFS specifically, you can use Terminal to format your external hard drive. Be cautious when using Terminal, as this method is more advanced and can result in data loss if not done correctly. For users who prefer the command-line interface and require more control over the process, Terminal provides an alternative way to format your external hard drive to NTFS.
Step 1. Connect the external hard drive to your Mac. Go to "Launchpad" > "Terminal".
Step 2. Type: diskutil list and press Enter. Then, it will show the information of all detected drives on your Mac. Note down the identifier of the target drive.
Step 3. Type: diskutil eraseDisk NTFS LABEL /dev/diskx.
Note: 1. Replace “LABEL” with the new name you want to give to the drive.
2. Replace “diskx” with the exact disk number like disk1.
Step 4. Press Enter to start formatting the external hard drive to NTFS.

Method 2. Use Disk Utility to Format External Hard Drives
If you only need read-only access to NTFS drives on your Mac, you can utilize Disk Utility to format your external hard drive. Disk Utility is a built-in macOS tool that allows you to manage disks and partitions, including formatting external hard drives. This method doesn't enable write support but is suitable for users who only need to copy files from NTFS drives.
Step 1. Go to "Launchpad" to find the Disk Utility. Then, launch Disk Utility on your Mac.
Step 2. Select the external drive and click the Erase button.
Step 3. In the new window, click the drop-down icon next to Format and select Microsoft NTFS.
Step 4. If you’ve finished, click "Erase" to format the external hard drive to NTFS on Mac.

How to Write NTFS Drives with Kingshiper NTFS for Mac?
Kingshiper NTFS for Mac is a third-party application that provides the easiest and most powerful solutions for users to edit, copy, delete, and even modify files on Mac. Its intuitive interface makes it a convenient choice for those who do not have professional computer knowledge.
Step 1. Launch Kingshiper NTFS for Mac and connect your NTFS drive to Mac.

Step 2. Log in to your account and then click "Open" to get the writable access.

Step 3. Enter your admin password if any.
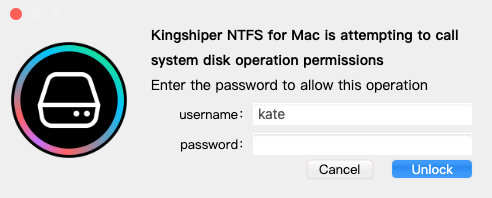
Step 4. Click "Open" again, now you can edit, copy, and even delete files here.

The Bottom Line
By now, you should know how to format an external hard drive to USB on Mac. It is not a tough thing if you can make full use of these built-in tools.

You May Also Like
1. How to Change Read-Only File Systems on Mac? 100% Free
2. [2023 Updates]FAT32 VS NTFS VS exFAT, Which is the Best File System
3. [2023] 3 Useful Methods to Delete Files From NTFS on Mac


