3 Ways to Change Permissions on External Hard Drives, 100% Works
- Support
- Dynamic News
- Kate
1445
- 2023-12-22 18:10:33
External hard drives are a needed tool for Mac users looking for flexible storage options, whether for backing up large datasets or sharing files with others. These devices facilitate data management and accessibility. However, to maintain data security, effectively control shared access, and address potential issues, having the ability to modify permissions on an external hard drive is crucial. In this comprehensive guide, we'll delve into three essential methods tailored for Mac users, enabling them to take full control of permissions on their external hard drives.
Method 1. Use Kingshiper NTFS for Mac to Change Permissions
If you're using a Mac and need to change permissions on an external hard drive with NTFS formatting, Kingshiper NTFS for Mac can be a handy solution. This software not only allows you to read and write to NTFS drives but also facilitates permission adjustments. You can easily mount and unmount NTFS drives with a single click, ensuring that your external storage devices are always accessible when you need them and safely disconnected when you're finished. If you are a regular user who needs to edit NTFS files on a PC often, this tool will be a good choice for you. Here are some main features of Kingshiper NTFS for Mac:
One-click to read and write NTFS drives
Mount external hard drives automatically
Ensure data integrity and privacy
Support users to safely remove disks
One-on-one technical support
If the above features can fully satisfy your needs, give it a try now.
Step 1. Launch Kingshiper NTFS for Mac and connect the NTFS drive to your Mac.
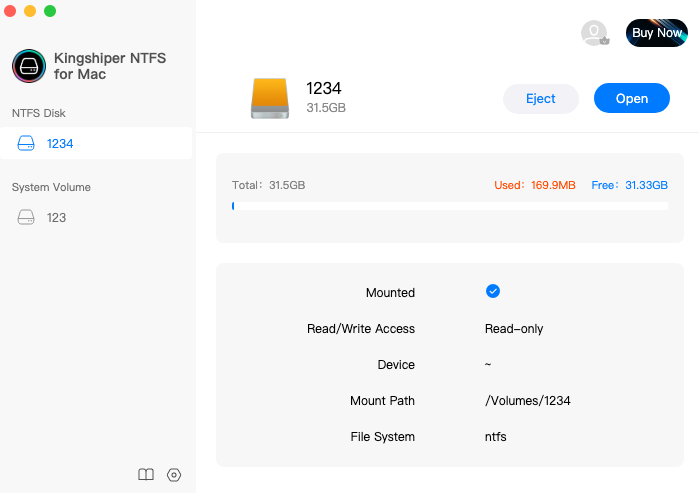
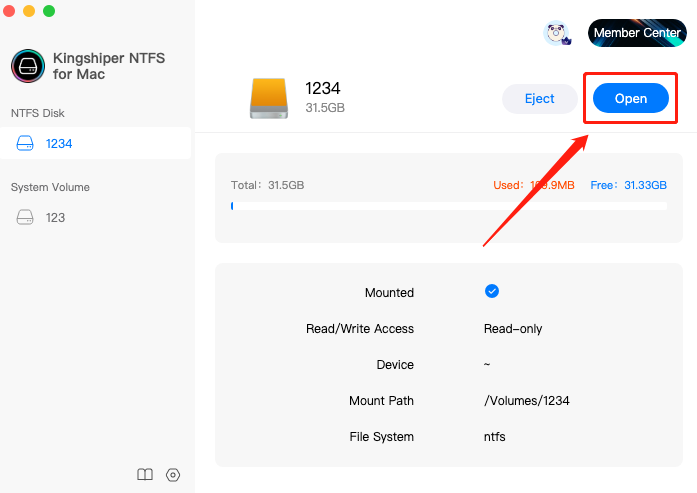
Step 2. Select the NTFS and click "Open".
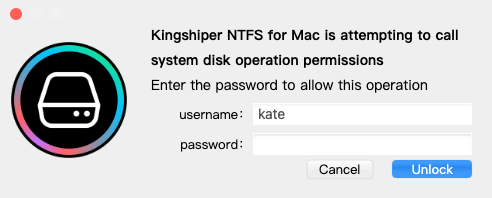
Step 3. Enter the password to get writable access to open the drive and click "Unlock".
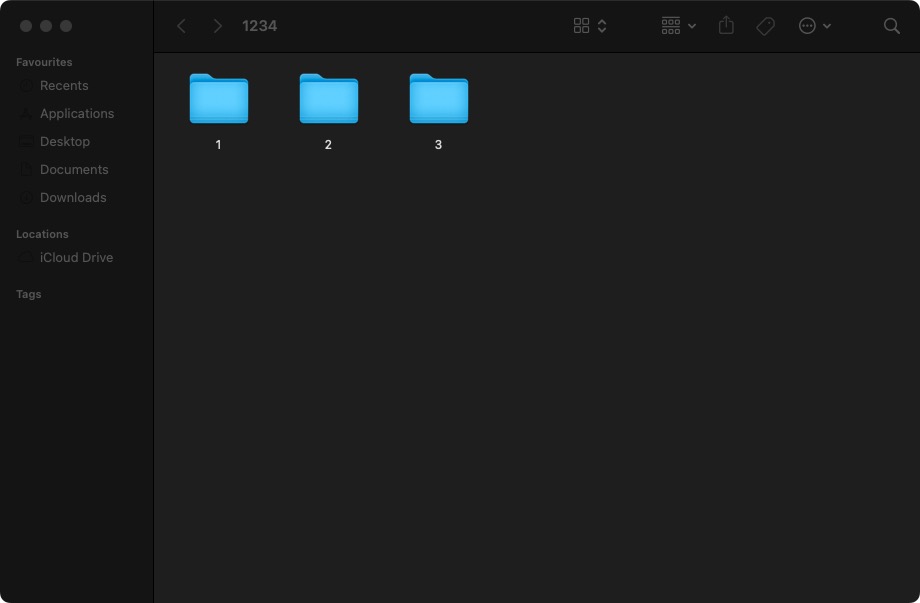
Step 4. Click "Open" again and it will pop up a window that you can edit, delete, and modify the files here.
Method 2. Use Get Info to Change Permissions
MacOS provides an intuitive and user-friendly method to change permissions on external hard drives through the "Get Info" feature. This approach is suitable for users who prefer a graphical interface and is particularly useful for adjusting permissions for individual files or folders.
Step 1. Connect the external hard drive to your Mac.
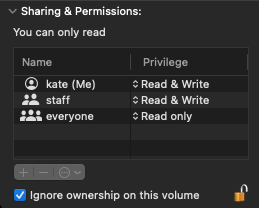
Step 2. Go to "Finder", choose the drive on "Locations" and right-click to click "Get Info".
Step 3. Click to expand the "Sharing & Permissions" option.
Step 4. Press the Unlock icon and enter your password to allow this operation.
Step 5. Tick the box next to "Ignore ownership on this volume" and close the window.
Method 3: Use Terminal to Change Permissions
For advanced users who are comfortable with command-line interfaces, using Terminal on macOS provides a powerful and precise way to change permissions on external hard drives. This method allows you to have control over permissions, making it especially useful for complex scenarios or when you need to automate permission changes.
Step 1. Go to "Launchpad" to launch Terminal.
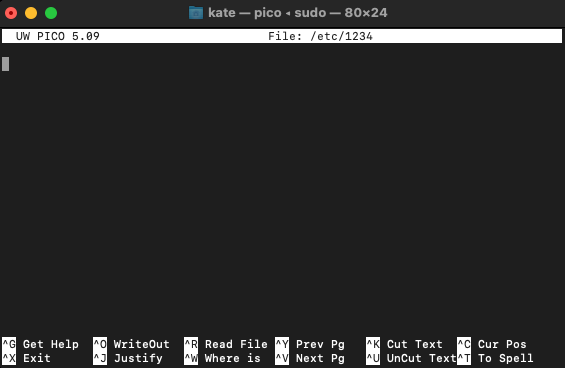
Step 2. Type sudo nano /etc/1234 to modify the file and press Enter.
Step 3. Enter your admin password.
Step 4. Type the following command: LABEL=NAME none ntfs rw,auto,nobrowse. Here, you should insert the actual name of your external drive instead of "NAME."
Step 5. Press "Ctrl + O" to save, then "Ctrl + X" to exit the Terminal window.
The Bottom Line
Generally, the three methods above can help you easily change permissions on external hard drives. If you don’t have the idea to choose the method that suits you best, you can use Kingshiper NTFS for Mac. It not only can help you change the permissions of hard drives but also can support you to edit, copy, delete, and even modify the files on Mac. Also, if you want to learn more detailed news about Kingshiper, you can pay attention to our website: https://www.kingshiper.com/
You May Also Like
1. How to Change Read-Only File Systems on Mac? 100% Free
2. 2023 Top 7 Free NTFS for Mac Software You Should Know [Pros & Cons]


