How to Easily Copy Files to NTFS Drives on Mac [Step-by-step Guide]
- Support
- Dynamic News
- Kate
1013
- 2023-11-13 14:47:33
Are you a Mac user tired of the "read-only" struggle when it comes to NTFS drives? This limitation can be a source of frustration for those who need to share files between Mac and Windows systems or simply want to back up their data on an NTFS drive.
To set up your Mac to work with NTFS-formatted storage devices, the first step is to activate NTFS write support on your Mac computer. In this guide, we've outlined three practical methods, each with detailed steps, giving you the flexibility to choose your preferred approach to get started. Let’s check the quick guide:
Method 1. Using Kingshiper NTFS for Mac to Copy Files
Method 2. Using Terminal to Copy Files
Method 3. Using Disk Utility to Format the Drive to Copy Files
Method 1. Using Kingshiper NTFS for Mac to Copy Files
If you want a stable and efficient solution to solve the problem that NTFS can’t write on Mac, it is best for you to choose Kingshiper NTFS for Mac which grants your Mac the ability to write data to NTFS drives. This means you can not only view files but also edit, delete, and create new ones, making it easier to collaborate with Windows users and manage your data effectively. Additionally, the software is optimized for performance, ensuring that data transfer between your Mac and NTFS drives is fast and efficient.
Here is how to copy files to your NTFS drives on Mac:
Step 1. Launch Kingshiper NTFS for Mac and connect your NTFS drive.

Step 2. Click "Open" to get writable access. Then, it will pop up a window to help you edit, copy, and even modify the files.

Step 3. When you’ve finished, click "Eject" to safely remove your drive.

Method 2. Using Terminal to Copy Files
Another method you might consider is to use the built-in command tool on Mac - Terminal. It's essential to note that this approach requires a good understanding of Mac operations, and precision is crucial. A single misstep could lead to unintended consequences.
Step 1. Go to "Launchpad" > "Utilities" > "Terminal".
Step 2. Type sudo nano /etc/fstab and press enter. (Enter your password if any)
Step 3. Add the line LABEL=DRIVE_NAME none ntfs rw,auto,nobrowse
Step 4. Reboot the Mac and connect the NTFS drive.

Method 3. Using Disk Utility to Format the Drive to Copy Files
Disk Utility is a versatile system utility native to Apple's macOS and Mac OS X operating systems. Designed to provide users with the tools to manage their internal and external storage devices, Disk Utility serves a myriad of functions aimed at disk maintenance and optimization. It allows you to format storage devices with different file systems, including HFS+, APFS, FAT, and NTFS. Formatting is essential for preparing a drive to be compatible with your Mac and other devices.
Step 1. Connect your NTFS drive to the Mac.
Step 2. Go to "Launchpad" > "Utilities" to Open Disk Utility and select the connected drive.
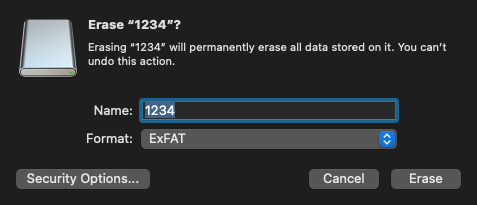
Step 3. Click "Erase", choose “exFAT” under format, and then hit “Erase.”
Remember, this method requires reformatting, so back up your data first.

The Bottom Line
Copying files to NTFS drives on your Mac doesn't have to be a headache. With the methods outlined in this step-by-step guide, you can easily share and manage files between your Mac and Windows systems. For the easiest solution, don’t miss Kingshiper NTFS for Mac for which it can automatically mount the NTFS drive once it has been detected by this software.
You May Also Like
1. 3 Ways to Change Permissions on External Hard Drives, 100% Works
2. How to Change Read-Only File Systems on Mac? 100% Free
3. 2023 Top 7 Free NTFS for Mac Software You Should Know [Pros & Cons]


