Quick Fixes: Can’t Safely Remove External Hard Drives on Mac
- Support
- Dynamic News
- Kate
692
- 2023-11-13 15:08:10
External hard drives are a convenient way to store and transfer large amounts of data between computers. However, when it comes to safely removing an external hard drive from a Mac, things can sometimes get a bit tricky. Sometimes, when you try to unplug it, you may receive a warning message that says "Disk Not Ejected Properly". This can be an annoying experience, especially if you're in a hurry or if you're worried about data loss.
Fortunately, there are some quick fixes that you can try to safely remove your external hard drive from your Mac. In this blog post, we'll explore some of the most effective solutions to this problem.
Why Mac Can’t Safely Remove External Hard Drives?
The problem of an external hard drive not safely remove from Mac may be caused by several reasons. Here are some common reasons:
File system format: The file system format of the external hard drive can also affect whether it can be safely removed. For example, if the drive is formatted as NTFS (which is commonly used on Windows computers), Mac computers may not be able to safely remove it without using third-party software.
Cached Data: macOS may cache data on external drives to improve performance. Cached data is a feature that Mac computers use to improve the performance of external hard drives. However, this means that there may be data that has not yet been written to the hard drive, and removing the drive before this data has been written can result in data loss or corruption.
Files in Use: If any files on the external drive are currently open or in use by applications, macOS won't allow you to eject the drive until those files are closed. This is because macOS wants to ensure that all file transfers are complete.
Continue to read, and we will provide some useful tips on how to safely eject external hard drives on Mac.
How to Safely Eject External Hard Drives with One Click?
If the Mac cannot remove an external hard drive as normal, you can try fixing the issue by using third-party software or some built-in tools on Mac.
Fix 1. Use Kingshiper NTFS for Mac to Safely Eject Drives
Kingshiper NTFS for Mac is a third-party software that allows Mac users to read, write, and safely eject external hard drives that are formatted with the NTFS file system. To solve the issue of not writing NTFS drives on Mac, Kingshiper NTFS for Mac provides a simple solution to this problem by allowing Mac users to access and manage NTFS-formatted external hard drives. In addition to providing read and write access, Kingshiper NTFS for Mac also includes a one-click eject feature that allows users to safely disconnect their external hard drives from their Mac computers.
To use Kingshiper NTFS for Mac, follow these steps:
Step 1. Launch Kingshiper NTFS for Mac on your computer and Connect your NTFS-formatted external hard drive.

Step 2. Select your external hard drive from the list of available drives and click “Eject”(Enter password if any).

Step 3. Click “OK” to safely eject your external hard drive.

Fix 2. Use the Finder to Safely Eject Drives
Another option is to use the built-in tool - Finder, which is the default file management application on macOS, designed to help you navigate, organize, and access files and folders on your computer. Among its array of features, Finder also offers a convenient function for safely ejecting USB drives and other external devices.
Step 1. Connect your external hard drive to your Mac.
Step 2. Open a Finder window and locate your external hard drive in the sidebar.
Step 3. Right-click the drive and choose “Eject 1234”.
Step 4. Then, the drive has been removed and you can unplug the drive from your Mac.

Fix 3. Use Terminal to Safely Eject Drives
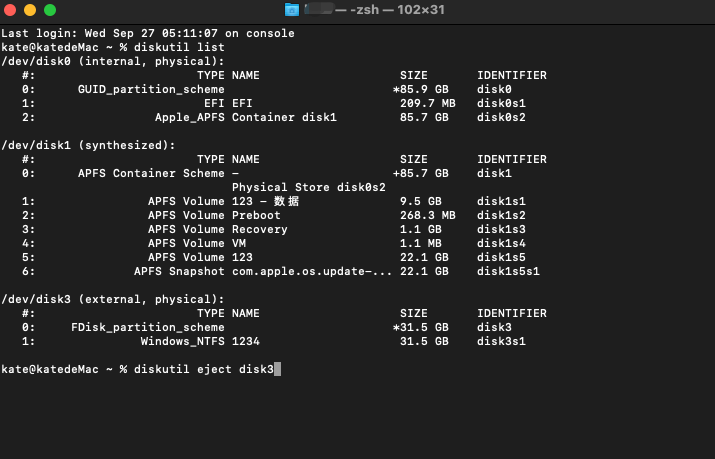
If the above methods don't work, you can try using Terminal to force eject the external hard drive which provides an alternative way to eject stubborn external hard drives. In addition, Terminal aims to offer direct access to the underlying functions and features of your computer through text-based commands. While it may seem intimidating at first, Terminal offers numerous benefits and capabilities for advanced users and developers.
Step 1. Go to "Launchpad" > "Utilities" > "Terminal".
Step 2. Type the following command: diskutil list.
Step 3. Then, type the command: diskutil eject disk3, replacing "disk3" with the identifier for your external hard drive.
Step 4. When you see the terminal window show “Disk disk3 ejected”, you can unplug the disk from your Mac successfully.

The Bottom Line
We hope this post helps you to fix the issue and enable you to remove your external drive on Mac. When you can’t safely eject the drives on Mac, you can consider any mentioned method. For the easiest and most stable way to get the job done, I strongly recommend you to use Kingshiper NTFS for Mac which not only can help you eject the drives safely and quickly but also ensure your data security without losing any quality.
You May Also Like
1. 3 Ways to Change Permissions on External Hard Drives, 100% Works
2. [2 Methods]How to Format External Hard Drives to NTFS on a Mac
3. How to Change Read-Only File Systems on Mac? 100% Free


