Top 3 Options to Copy Files to NTFS on Mac, 100% Free
- Support
- Dynamic News
- Kate
7613
- 2023-11-09 13:38:07
On this page, you'll find a comprehensive guide on copying files to NTFS drives on your Mac. Should you wish to transfer files from your Mac to an external hard drive with some easy steps? Simply follow the instructions provided below. By the end, you will get a quick way to access the NTFS drives.
Check the Overview of Top 3 Options to Copy Files to NTFS on Mac:
1. Why Can’t I Copy Files to NTFS drives on Mac?
2. Option 1. Copy Files to NTFS with Kingshiper NTFS for Mac
3. Option 2. Copy Files to NTFS with Bootcamp Assistant
4. Option 3. Format the Drive to exFAT via Disk Utility
Why Can’t Copy Files to NTFS drives on Mac?
If you've ever tried to copy files to an NTFS-formatted external hard drive, you've probably encountered a perplexing problem. It is strange that macOS, a user-friendly operating system, refuses to allow users to copy files to NTFS drives. This is because NTFS is a file system that is primarily used by Windows operating systems, and macOS has limited support for it. While macOS can read files from NTFS drives, it cannot write to them by default.
However, there are 3 methods that you can use to copy files to NTFS drives on Mac. Follow this complete guide below, you’ll get the answer to copy any files between your NTFS drives and Mac easily.
Option 1. Copy Files to NTFS with Kingshiper NTFS for Mac
It is essential to mention that Kingshiper NTFS for Mac is a very reliable and user-friendly application, that offers comprehensive support for NTFS-formatted drives, allowing you to not only read but also write files to them without any limitations. It means that you can easily copy, edit, and manage any files stored on your Mac's NTFS drive in a few simple steps. More importantly, Kingshiper NTFS for Mac ensures data safety and integrity throughout the process, you can access your NTFS drives without any data loss or corruption.
Step 1. Connect the NTFS drive to your Mac and launch Kingshiper NTFS for Mac.

Step 2. Select the drive and click "Open" to get writable access(Enter your password if any).

Step 3. In the pop-up window, you can edit, copy, and even modify the saved data on the NTFS drive.

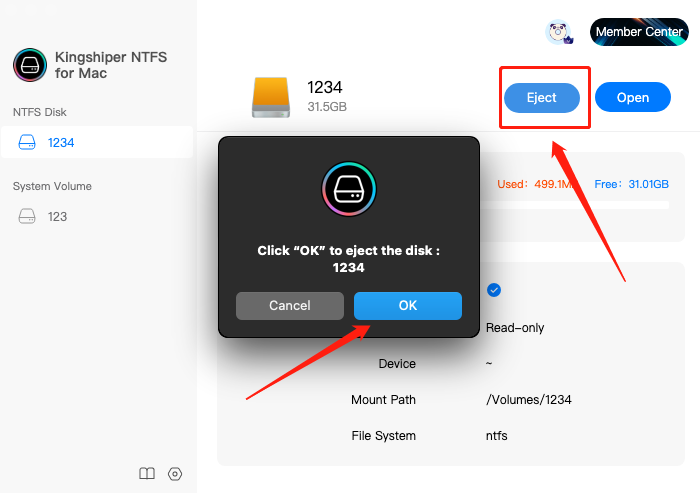
Step 4. If you’ve successfully copied the files to it, close the window. Click on the "Eject" button to safely remove the drive from your Mac.

Option 2. Copy Files to NTFS with Bootcamp Assistant
If you want to ensure that your Mac will be able to access NTFS drives with more accuracy and if you are willing to go the extra step, you can set up Boot Camp on your machine. Boot Camp allows you to run Windows on your Mac, and with Windows installed, you'll have full access to NTFS drives, including the ability to read and write files.
Step 1. Go to "Launchpad" > "Utilities" > "Bootcamp Assistant".
Step 2. Click "Continue" to proceed with the setup.
Step 3. Click "Continue" to set it to boot into Windows on Mac.
Step 4. Restart your Mac and wait for the computer to boot into Windows.
Step 5. Connect the NTFS drive to the Mac and then you can access and write to files in the drive.

Option 3. Format the Drive to exFAT via Disk Utility
If you regularly need to share files between Windows and Mac, consider formatting your external drive to exFAT. Both macOS and Windows natively support exFAT, making it an excellent choice for cross-platform use. But before using this option, you should make sure to back up any essential files prior to this process since it will erase all the data on the drive.
Step 1. Go to "Launchpad" > "Utilities" > "Disk Utility" and connect the NTFS drive to your Mac.
Step 2. Select the NTFS drive from the left sidebar and click "Erase" at the top of the window.
Step 3. In the Format dropdown menu, select exFAT. And then click on the "Erase" button to format the drive to exFAT.
Step 4. You can now copy files to and from the exFAT-formatted drive on your Mac.

The Bottom Line
When it comes to copying files to NTFS drives on your Mac, you're faced with a unique challenge due to the inherent differences between macOS and the NTFS file system primarily used by Windows. But, now you have three options can try:
1. Use Kingshiper NTFS for Mac
2. Use Bootcamp Assistant
3. Format the drive to exFAT
For those looking for the simplest and most user-friendly solution, don't miss Kingshiper NTFS for Mac. The NTFS drive will be mounted automatically once it has been detected by Kingshiper NTFS for Mac. With it, you can effortlessly utilize your NTFS drive between your Windows and Mac computers. Follow the solutions outlined on this page to improve your experience on Mac right now.
You May Also Like
1. 3 Proven Ways to Format USB to NTFS on Mac/Windows[2023]
2. Quick Fixes: Can’t Safely Remove External Hard Drives on Mac
3. 3 Ways to Change Permissions on External Hard Drives, 100% Works


