[6 Methods] How to Make a Zip File with Ease
- Support
- Dynamic News
- Kate
4946
- 2025-04-15 11:09:16
Nowadays, using zip files for file compression has become popular for individuals and businesses because it simplifies data management, reduces file sizes, and improves data transfer efficiency and convenience. It's no wonder that people are eager to learn how to create zip files proficiently. On this page, we will guide you with five methods that will assist you in mastering the skill of making zip files like a pro. Let’s try to find out together!
Page Content:
2. Method 1. Zip File with KingshiperZip
3. Method 2. Zip File with WinZip
4. Method 3. Zip File with WinRAR
5. Method 4. Zip File with Windows Built-in Tool
6. Method 5. Zip File with an Online Tool
7. Method 6. Zip File with MacOS Built-in Tool
What is a Zip File?
A zip file is a compressed file format that combines multiple files or folders into a single archive. It reduces the overall size of the files, making it easier to store, share, and transfer them. ZIP files use a compression algorithm to compress the data, and they can be created or extracted using various software programs or built-in tools in operating systems. In addition to reducing file size, zip files can also offer password protection and encryption options to secure the contents within the archive. Moreover, it is widely used in various scenarios, such as bundling documents, archiving files, distributing software packages, or organizing large collections of files for more streamlined management.
Method 1. Zip File with KingshiperZip
KingshiperZip is a powerful file compression and archiving software that allows you to create zip files effortlessly. With its user-friendly interface, you can select your desired files or folders, customize compression settings, and generate a zip file with just a few clicks. Apart from this, it supports 40+ compression formats. Whether you want to compress the file into a zip, 7z, or RAR format, you can use it right away.
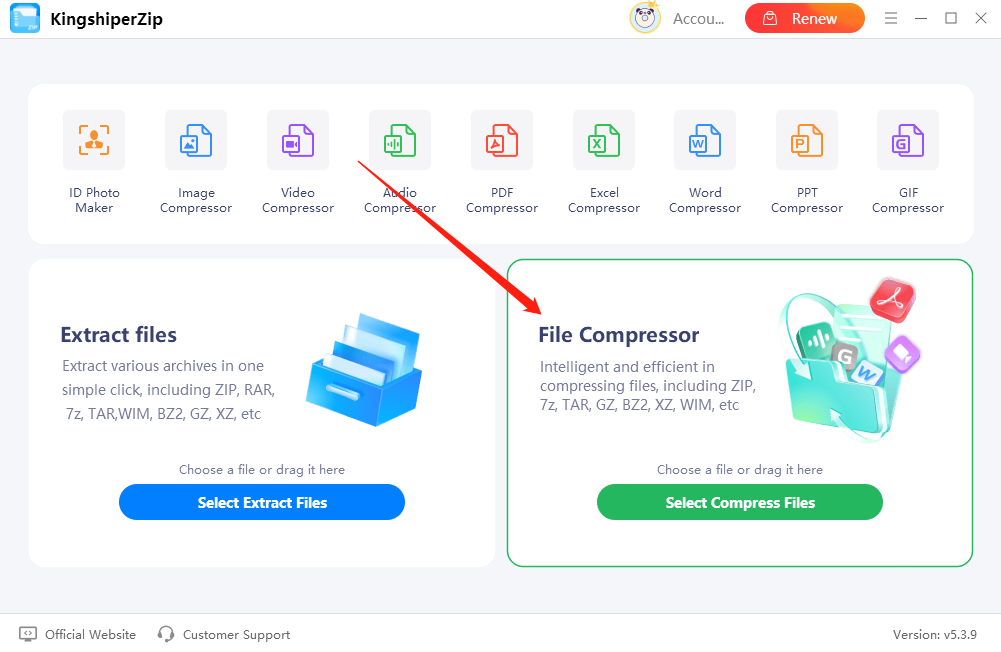
Step 1. Launch KingshiperZip on your computer and click on “File Compressor”.
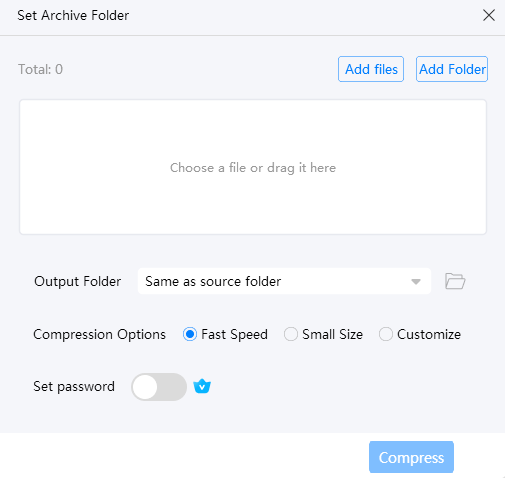
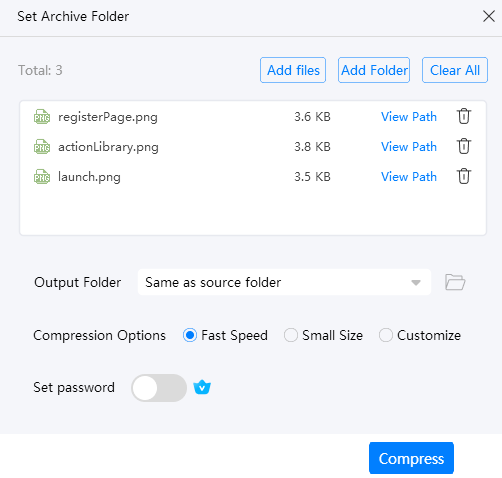
Step 2. Choose the file you need to compress and adjust the settings according to your needs.
Step 3. Click “Compress” and it will start to process.
Step 4. Press “Go to the output folder” to check it fast!

Method 2. Zip File with WinZip
WinZip is a widely used compression software that offers a range of features for creating zip files. It provides an intuitive interface with drag-and-drop functionality, making it simple to select files or folders, choose compression options, and create zip archives quickly.
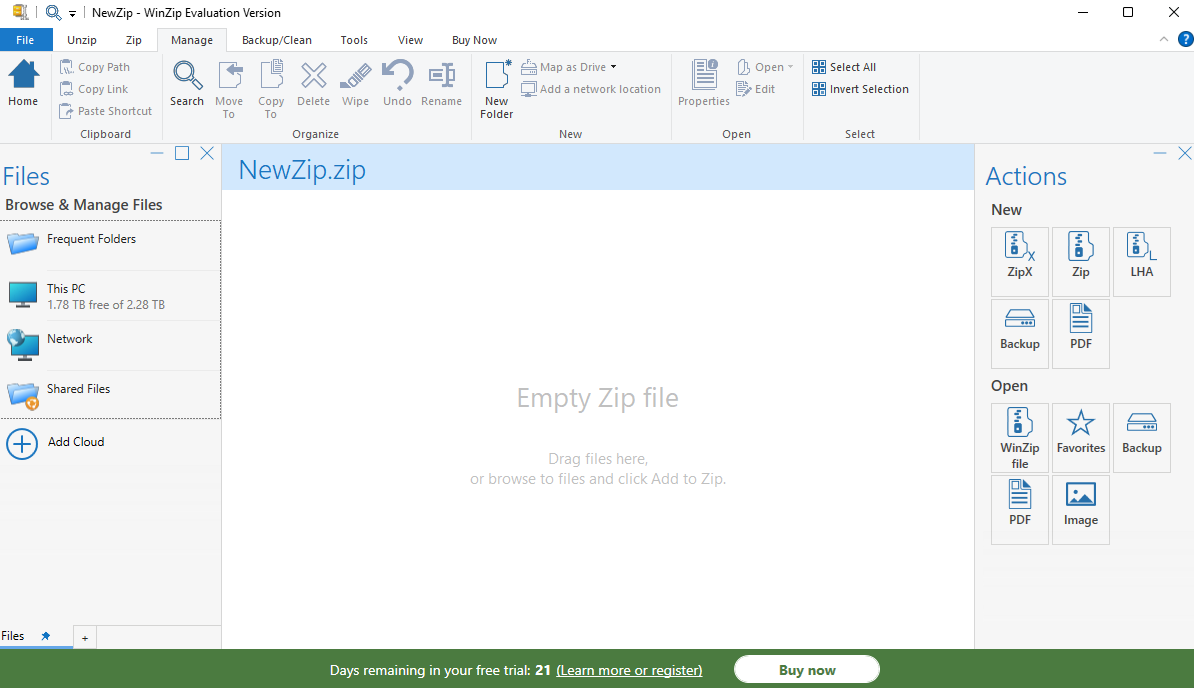
Step 1. Open WinZip and select the files or folders you wish to compress within the WinZip interface.
Step 2. Click “Add to Zip”. In the Actions pane, click “Save as”.
Step 3. Choose to save your zip file to your computer.
Method 3. Zip File with WinRAR
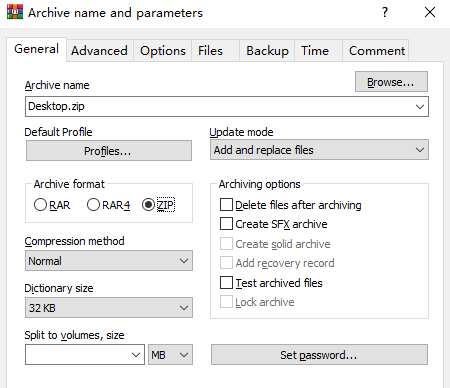
WinRAR is another popular compression tool that supports the creation of zip files. With its extensive set of features, you can easily select files or folders, apply compression settings, and generate zip archives efficiently. WinRAR also supports other archive formats, providing flexibility for your file compression needs.
Step 1. Install and open WinRAR on your computer.
Step 2. Click on the "Add" button and choose zip format, and click “OK”.
Step 3. It will start to process within a second and then you can check the file on your desktop.
Method 4. Zip File with Windows Built-in Tool
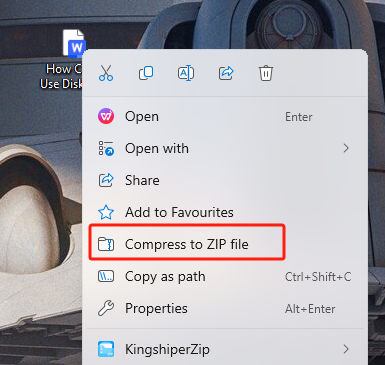
If you don’t want to download programs on your computer, you can use the built-in tool to do the same thing instead. Windows File Explorer is a built-in file management application in the Windows operating system that allows you to compress multiple files into a single compressed archive for efficient storage or sharing, and extract files from ZIP archives with ease.
Step 1. Select the files or folders you want to compress.
Step 2. Right-click on your selection and choose the "Compress to ZIP file" option.
Step 3. Windows will create a zip file in the same location as your selected files or folders.
Method 5. Zip File with an Online Tool
Another option is to use an online tool. Compress2go is a reliable website that is designed to help you reduce the file sizes of your documents, images, and videos. With Compress2Go, you can easily compress files without compromising quality, making them easier to store, share, and transfer. All you need is to upload your files to the page and click compress. But use this online tool require a relatively stable internet speed. If your internet connection is poor, it may take an amount of time to finish the process.
Step 1. Go to compress2go on your browser.
Step 2. Click “Choose File” to upload the file you need to zip.
Step 3. Click “START” to compress your file.
Step 4. Wait a minute and then press “Download” to save it on your PC.

Method 6. Zip File with MacOS Built-in Tool
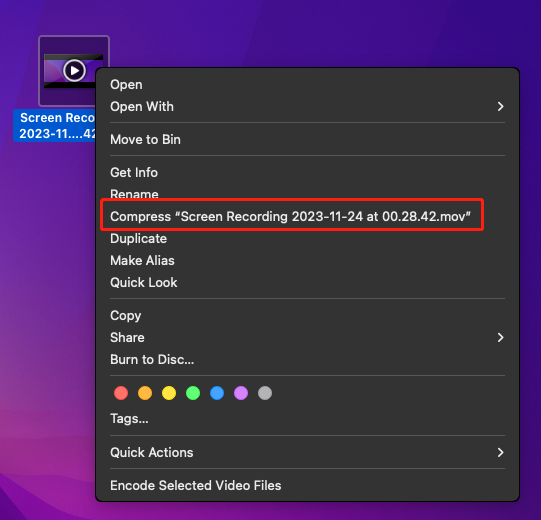
If you're using macOS, you can make a zip file using the built-in Archive Utility which is a built-in tool that enables you to compress files and folders into a zip archive, helping you compress files, data storage and share files easily. It comes pre-installed on your Mac, so you don't need to install any additional software.
Step 1. Select the files or folders you want to compress. You can use Shift + Click or Command + Click to select multiple items.
Step 2. Right-click on the selected items and choose the "Compress xxx" option.
Step 3. Click on "Compress xxx" to initiate the compression process.
The Final Words
We have listed six ways here, including Windows and Mac options. I believe that you can find the way that suits you best. But actually, we will pick up KingshiperZip as we think it is the easiest way to zip files with one simple click. If you don’t want to use any third-party software, you can try the built-in tool or an online tool.
You May Also Like
1. 5 Easy Ways to Set Password to Protect A Zip File [2025 Guide]


